Table of Contents
Advertisement
6 8
TO
MONTHS
YEARS
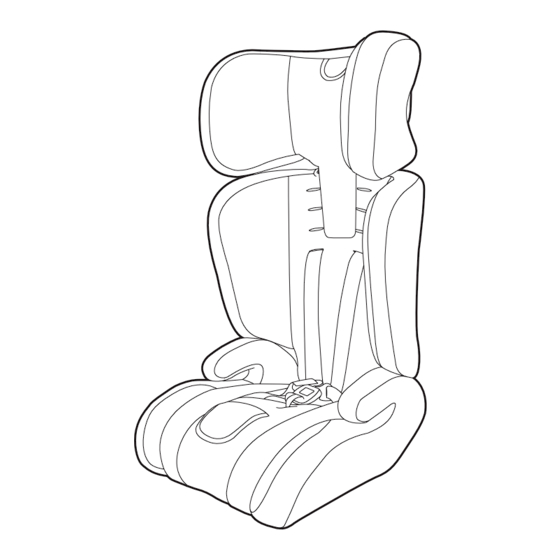
Convertible Booster Seat
C H I L D S E AT T O B O O S T E R S E AT
CS7313
CHILD CAR SEAT
BOOSTER SEAT
Child Car Seat: Suitable for children from 6 months to approximately 4 years* of age.
Boosters Seat: Suitable for children from 4 years to approximately 6 to 8 years* of age.
Instruction Manual
IMPORTANT: KEEP THIS BOOKLET IN THE PLACE PROVIDED
ON THE CHILD RESTRAINT
*All references to age are approximates only and reference to children of average proportions.
Children vary in shapes and sizes. The photo displayed is indicative of the type of restraint and may
vary slightly depending on the model.
Licence No. 25324-2
1
Advertisement
Table of Contents

Related Manuals for Infasecure CS7313


Summary of Contents for Infasecure CS7313
- Page 1 YEARS Convertible Booster Seat C H I L D S E AT T O B O O S T E R S E AT CS7313 CHILD CAR SEAT BOOSTER SEAT Child Car Seat: Suitable for children from 6 months to approximately 4 years* of age.
- Page 2 Quick Reference Guide Page QR1 SET-UP SET-UP REFER TO PAGES 11 - 12 LOWER HEADREST SLOT SELECTION SLOT SELECTION REFER TO PAGES 34 - 37 FRONT OF VEHICLE 25mm ABOVE SHOULDER SELECT SHOULDER SLOT PULL HARNESS STRAPS METAL SPREADER PLATE ADJUST HARNESS HARNESS POSITION...
- Page 3 Quick Reference Guide Page QR2 Forward Facing Mode (Use for toddlers) INSTALLATION INSTALLATION REFER TO PAGES 13 - 16 PRESS SEAT Tongue BASEHERE “CLICK” ROUTE SEATBELT CLICK SEATBELT TENSION SEATBELT ATTACH PULL TO SASH SECTION TIGHTEN ATTACH TO SASH SECTION ONLY ADJUSTER LAP SECTION...
- Page 4 Quick Reference Guide Page QR3 Forward Facing Mode (Use for toddlers) INSTALLATION INSTALLATION REFER TO PAGES 26 - 27 ATTACH PULL TO TIGHTEN ADJUSTER Pull to Tilt Lengthen Pull to Tighten INSTALL ATTACH TETHER TENSION TETHER ADJUST HEADREST ADJUST HEADREST REFER TO PAGE 28 (SASH GUIDE POSITION) (SASH GUIDE POSITION)
- Page 5 Quick Reference Guide Page QR4 Booster Seat Mode (Use for children) REFER TO PAGES 29 - 32 SASH GUIDE REMOVE ALL SLACK FROM SEATBELT “CLICK” ROUTE SEATBELT CLICK SEATBELT TIGHTEN SEATBELT SASH SECTION SASH ATTACH TO GUIDE SASH SECTION ONLY LAP SECTION SAFE GRIP (RED BELT CLAMP)
-
Page 6: Table Of Contents
Please read carefully the whole of the instructions for installation and, in the event of doubt about the method of installation, to consult InfaSecure or agent, or a child restraint fitter, or in New Zealand, to consult the agent for the vehicle. -
Page 7: Information
Information This instruction manual covers various models under the Model number CS7313. This Convertible Booster Seat is designed to be used by children from approximately 6 months of age up to approximately 8 years of age. These are installed in the back seat of the vehicle using the vehicle seatbelt &... -
Page 8: Warnings
Warnings WARNINGS • Use the restraint exactly as shown in the instructions. • Supervision of children is needed because they may be able to undo buckles. • DO NOT LEAVE CHILDREN UNATTENDED IN THE CAR. • Do not alter or modify this restraint. •... - Page 9 Warnings WARNINGS • THIS RESTRAINT IS NOT SUITABLE FOR USE WHERE THE TOP TETHER STRAP MAY FALL INTO A SPLIT IN THE SEAT BACK OR OFF THE SIDE OF THE SEAT. • THIS RESTRAINT MUST BE ATTACHED TO A CHILD RESTRAINT UPPER ANCHORAGE POINT IN THE CAR.
-
Page 10: Restraint Guide
Research has shown that the likelihood of an accessory child safety harness being used incorrectly is very high and the risk of injuries when incorrectly used is much higher compared to a lap-sash seat belt. InfaSecure recommend that an accessory child safety harness should only be used if a lap-only seat belt is all that is available. -
Page 11: Padding - Combination Guide
Padding / Inserts Combination Guide MODE STANDARD DELUXE (Shoulder pads & buckle pads) CHILD SEAT (Small Child) FORWARD FACING CHILD SEAT (Larger Child) FORWARD FACING BOOSTER SEAT FORWARD FACING The Padded Insert/s (if fitted) are designed to provide extra support and comfort for small children. Discontinue use when the insert is a tight fit or creates discomfort for larger children. -
Page 12: Child Car Seat
Child Car Seat Child Car Seat (Forward Facing) THE SUITABILITY OF THE CHILD RESTRAINT TO GROUPS OF CHILDREN TYPE B To be used in a forward-facing position with built-in harness by a child whose shoulders are above the lower shoulder height marker (approximately 6 months of age). Until their shoulders reach the middle shoulder height marker (approximately 4 years of age). -
Page 13: Cs7313 Child Restraints (Itemised List)
• Backrest • Seat Base 6. Buckle 14. Top Tether Assembly 7. Buckle Pad • Tether Strap • Adjuster 8. Adjuster Strap • Attachment Clip 9. Adjuster • Anchor Fitting + Attachment Hardware *These items may not be supplied with models of the CS7313. -
Page 14: Shoulder Height Marker
Child Car Seat Shoulder Height Marker Smaller Toddler (using inbuilt harness) Shoulder height markers are provided on this restraint for a visual indication that the child is safe to travel in this restraint. Shoulder height markers may be hidden under a pillow in the lowest position. Front of Car LOWER... - Page 15 Child Car Seat Shoulder Height Marker Taller Toddler (using inbuilt harness) Shoulder height markers may be hidden under a pillow in the lowest position Front of Car MIDDLE MIDDLE LABEL LABEL Taller Child to approximately 4 years of age REACH Continue to use this forward-facing child restraint until the child’s shoulders Middle shoulder height marker (Middle Label).
-
Page 16: Set Up
Child Car Seat Set Up Selection of appropriate padding combinations Step 1: Determine whether your child requires the additional padding provided with this restraint, to ensure a safe and snug fit in the restarint. Refer to page 6 for suggested padding combinations. Correct shoulder height The correct height for the shoulder straps is very important for the optimum performance of the... - Page 17 Child Car Seat Setup Shoulder Slot Height Having selecting the most appropriate shoulder strap slots. Reverse the removal process. Step 3: Push the ends of the shoulder harness straps through the appropriate shoulder slot holes in the cover and seat body for the child’s shoulder height. (see above for correct shoulder height for forward facing).
-
Page 18: Installation
Child Car Seat Installation Installing Using Vehicle Seatbelt Place the restraint with the back against the back of Step 1: the vehicle seat, directly in line with the anchorage point (refer Figure 1). IMPORTANT Ensure that you use the FORWARD-FACING BELT PATH Figure 1 FORWARD FACING... - Page 19 Child Car Seat Installation Installing Using Vehicle Seatbelt IMPORTANT Lap and sash belt Ensure that you use the pass across FORWARD-FACING BELT PATH the seating surface of the base. Tongue FORWARD-FACING BELT PATH Seat cover Figure 4 & foam THREAD BELT folded back BENEATH THIS TONGUE TONGUE...
- Page 20 (refer Figure 8). Safe Grip (if supplied) Layer of foam & seat cover *Can be purchased separately visit placed back Lap and sash http://store.infasecure.com.au/product into position belts pass over the top across the base of the belts SAFE GRIP BELT CLAMP...
- Page 21 Child Car Seat Installation Installing Using Vehicle Seatbelt Note: If no upper anchorage fitting is available refer to Pages 40 & 41. Step 5: Hook the attachment clip to the anchor fitting. Ensure there are no twists in the top tether strap (refer to Figure 11).
-
Page 22: Use
Child Car Seat Using Inbuilt Harness Step 1: Ensure the restraint has been installed and set up as PULL TO PULL TO per “Set Up” and “Installation” (refer Page 11 - 16). LENGTHEN LENGTHEN To lengthen the harness “LIFT” the harness adjuster Step 2: (refer Figure 1) whilst grasping both shoulder harness straps and pulling. - Page 23 Child Car Seat Using Inbuilt Harness Step 4: Insert either tongue into the buckle followed by the other tongue until a “CLICK” is heard. Should the second tongue not insert, press the red button and reinsert the tongues. Ensure secure engagement by pulling the harness strap (refer Figure 3).
-
Page 24: To Release Child
Child Car Seat Using in-built harness Step 9: Check the harness tightness by the PINCH TEST , this is acheived by pinching the harness webbing at the shoulders (refer Figure 6) PINCH • If you can pinch the harness strap, tighten more. •... -
Page 25: Booster Seat
Booster Car Seat Booster Seat (Forward Facing) THE SUITABILITY OF THE CHILD RESTRAINT TO GROUPS OF CHILDREN TYPE E To be used with a lap-sash seatbelt by a child whose shoulders are above thelower shoulder height marker (approximately 4 years of age) until the child’s shoulders reach the upper shoulder height marker (approximately 6 to 8 years of age). -
Page 26: Shoulder Height Marker
Booster Car Seat Shoulder Height Markers Smaller Child (using lap-sash seatbelt) Shoulder height markers are provided on this restraint for a visual indication that the child is safe to travel in this restraint. Shoulder height markers may be hidden under a pillow in the lowest position. Front of Car MIDDLE... - Page 27 Booster Car Seat Shoulder Height Markers Taller Child (using lap-sash seatbelt) Do not continue to use the restraint if the child’s shoulder are above the Upper Label. Front of Car UPPER UPPER LABEL LABEL Taller Child to approximately 8 years of age REACH Continue to use this booster seat until the child’s shoulders the Upper shoulder...
-
Page 28: Cs7313 Child Restraints (Itemised List)
(each side of restraint - coloured red) • Attachment Clip • Anchor Fitting + Attachment Hardware *These items may not be supplied with models of the CS7313. IMPORTANT • For a vehicle without a fixed parcel shelf an extension strap(s) may be needed. -
Page 29: Next Restraint
Booster Car Seat Next Restraint Next Type of Restraint Refer to the ‘RESTRAINT GUIDE’ for the selection for the most appropriate next restraint (refer Page 5). When the child has outgrown the booster seat, then you can use either of the following;... -
Page 30: Set Up
Booster Car Seat Set Up Selection of appropriate padding combinations Step 1: Determine whether your child requires the additional padding provided with this restraint, to ensure a safe and snug fit in the restraint. Refer to page 6 for suggested padding combinations. Converting to a child booster IMPORTANT FOR USE OF THIS RESTRAINT AS A BOOSTER... -
Page 31: Installing Using Vehicle Seatbelt
Booster Car Seat Installation Installing in Vehicle Step 1: Place the child restraint in the car, in a forward facing seating position (refer the Figure 1). Step 2: If required install the upper anchorage fitting as shown on page 40 & 41 of these instructions. Hook the attachment clip to the anchor fitting. - Page 32 Booster Car Seat Installation Installing in Vehicle Pull to tighten and remove all the slack, from Step 4: the top tether strap (refer to Figure 3). Do not PULL TO ATTACH TIGHTEN overtighten as this could cause the restraint to lift off the vehicle seat.
-
Page 33: Adjusting The Headrest
Booster Car Seat Adjusting the Headrest The headrest can be adjusted to different heights, to best suit your child. The headrest has a locking button in the front. IMPORTANT You will need your child to sit in the booster to determine the most appropriate headrest height. -
Page 34: Using Seatbelt
Booster Car Seat Using lap-sash seat belt Ensure the restraint has been installed as per “INSTALLING IN VEHICLE” (refer Figure 1) Sit your child in the restraint with their back against the backrest (refer Figure 2). IMPORTANT Ensure that you use the BOOSTER BELT PATH identified by the following label. - Page 35 • ALWAYS USE THE SASH GUIDE SEATBELT Safe Grip (if supplied) *Can be purchased separately visit http://store.infasecure.com.au/ SAFE GRIP BELT CLAMP It is important that the lap belt must be firmly across the thighs. The Safe Grip locks the lap belt to ensure a firm fit across the thighs, and avoids slack in the lap belt.
- Page 36 Booster Car Seat Using lap-sash seat belt Sash Guide Step 7: Pass the shoulder belt through the belt sash guide SASH (refer Figure 6) which is moulded in the side wings of GUIDE the headrest. Ensure the headrest is positioned as per “Adjusting the Headrest”...
-
Page 37: To Release Child
Booster Car Seat To release child To release your child from the booster seat simply press the belt buckle and carefully remove your child from the seat. If using a Safegrip (red belt clamp) It is not necessary to release the red belt clamp, to remove your child (if applicable). -
Page 38: Care Of Restraint
1. Headrest Cover 1. Main Cover 1. Base Cover VERY IMPORTANT Only replace the cover with a InfaSecure supplied replacement cover with identical shoulder height markers or a replacement cover meeting AS/NZS 8005. Care and Maintenance Regular care of the restraint will ensure safety of your child. -
Page 39: Cleaning
Cleaning IMPORTANT Use only mild soap and water to clean all parts of the CS7313 Convertible Car Seat. Do not use chemicals or cleaning agents Cold water only to be used and to be rinsed well Do not dry clean or tumble dry Do not bleach. - Page 40 Harness Tongues and Buckle, then repeat cleaning several times. If the Harness Buckle cannot be returned to its original working condition then contact InfaSecure Customer Service 02 4720 8090. Step 5: Refit the harness buckle to the restraint with the red...
-
Page 41: Remove & Replace Covers
Remove & Replace Covers Main Cover To Remove Harness Disengage shoulder straps from “G” connecting Step 1: plates as shown on page 12 (refer to section “Shoulder Slot Height” - Step 1 & 2). Step 2: Disengage buckle tongues from the buckle. Step 3: Pass the three bar slide located below the thigh harness slots on the end of each body/ shoulder straps through the thigh harness... -
Page 42: Extension Straps
Extension Straps If required contact InfaSecure for nearest supply location. Extension straps, not included in this package, may be required for vehicles without a fixed parcel shelf. TYPE E CHILD SEAT If required contact Infa Secure Customer Service 02 4728 8090 for nearest supply location. - Page 43 Accessories SPREADER SHOULDER PADS (if fitted) PLATE The shoulder pad is designed to add extra comfort for baby or child. Classic Step 1: Turn the restraint so that the back of the seat is facing you. Step 2: Remove each shoulder harness through Figure 1 the “G”...
- Page 44 Accessories PADDED INSERTS (if fitted) The padded inserts are designed to add extra comfort for your child. Press to release Buckle tongues. Step 1: Step 2: Position the padded insert in the seat. Pass the harness straps over the insert Step 3: Step 4: Pull the Buckle and leg straps through the slot...
- Page 45 Accessories SEAT PROTECTOR (if fitted) The seat protector is designed to protect your car’s seat. STANDARD STANDARD Step 1: Position the front flap with pockets, at the front of the rear seat and position the mat rearwards to obtain a flat fit. FULL LENGTH Step 1: Position the front flap with pockets, at the...
-
Page 46: Anchorage Fittings
ANCHORAGE POINTS. REFER TO A CHILD restraint) RESTRAINT FITTING STATION IF NO CAR If so ring InfaSecure on (Aust) (02) 4728 8090 for ANCHORAGE POINTS ARE IN THE MOTOR CAR. nearest supply location. • THIS RESTRAINT IS NOT SUITABLE FOR... - Page 47 Anchorage Fittings For cars not fitted with a child restraint anchorage point For Sedans Only Drill a 9mm diameter hole in the parcel shelf on the centre line of the seating position as shown in Figure 1C. Hole must be no closer than 200mm from the front of the back seat.
-
Page 48: Insurers Information
NOTICE TO INSURANCE COMPANY CHILD RESTRAINT INVOLVED IN AN ACCIDENT All InfaSecure child restraints are manufactured to Australian/New Zealand Standards AS/NZS1754 which requires us to advise users of child restraints to "Destroy the entire restraint if it has been in use in a severe crash, even if no damage is obvious". - Page 49 Notes:...
- Page 50 Notes:...
-
Page 51: Lifetime Warranty
ON SUPER STRONG BLOW MOULDED SHELL PRODUCTS Register your product to receive lifetime warranty*, product updates and information. Please visit infasecure.com.au/warranty-registration to register your product. InfaSecure Warranty Infa Group Pty Ltd warrants this product for twelve months from the date of purchase against failure due to manufacturing faults or faulty materials. - Page 52 Head Office and Registered Address 110-114 Old Bathurst Rd, Emu Plains, NSW 2750 P.O. Box 487, Emu Plains, NSW 2750 CUSTOMER CARE AU: 1300 92 4632 NZ: 067 590 870 Email - customercare@infa.com.au infasecure.com.au facebook.com/infasecure Licence No. 25324-2 instagram.com/infasecure youtube.com/infasecure...
Need help?
Do you have a question about the CS7313 and is the answer not in the manual?
Questions and answers