Advertisement
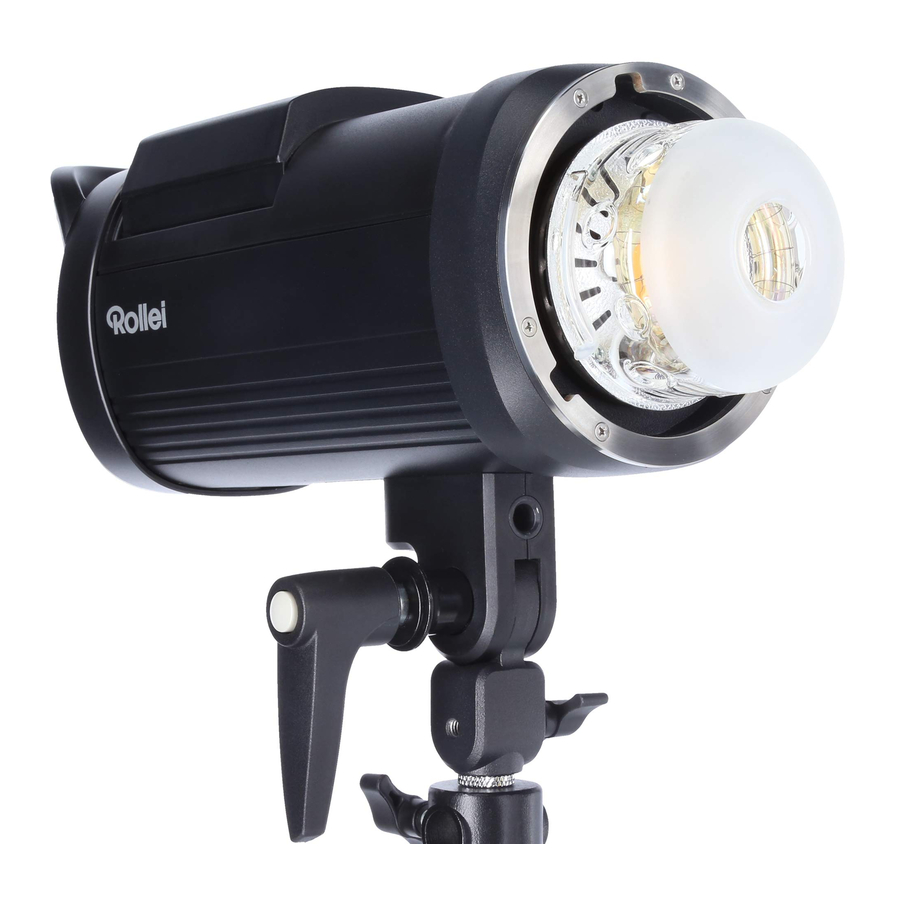
Overview

- Battery
- Sync socket
- Light head locker
- Glass protector
- Umbrella socket
- Ligth stand locker
- Flash tube
- LED modeling lamp
- Infra red sensor
- Test flash button
- Power output button / OK button
- Function buttons (4)
- Power switch / modeling lamp
- Battery release button
- Battery charger

- Group A, B, C, D, E, F, G, H, I, J
- Channel (00–15)
- Power output (TTL: ±3.0 | M: 1.0 – 9.0
HSS: 4.0–9.0 | Freeze 1.0–9.0) - OH: Overheat protection
- Canon RT mode / ID number (only display under Canon RT radio mode)
- Battery
- M / TTL
- Normal
![]() | HSS
| HSS ![]() | Freeze
| Freeze ![]()
- Beep
- Photo cell activated
- Modeling lamp
Quick Menu
Press the first function button from the left side repeatedly to cycle through the different menus.

 | Press the second function button from the left side to switch between M (manual) and TTL mode. |
 | Press the third function button from the left side to switch between the different sync modes. Normal flash mode Normal flash mode High speed sync mode (enables the shutter speed of up to 1/8000s) High speed sync mode (enables the shutter speed of up to 1/8000s) Freeze sync mode (max. of 1/190000, sync with shutter speed, not available under TTL mode) Freeze sync mode (max. of 1/190000, sync with shutter speed, not available under TTL mode) |
 | Wireless Remote Control TTL-ALL: wireless control (the flash can be controlled via the optional Mark II professional radio transmitter) TTL-C: Canon* remote control (the flash can then be controlled with the Canon* trigger, optional accessory) TTL-N: Nikon* remote control (the flash can then be controlled with the Nikon* trigger, optional accessory) TTL-S: Sony* remote control (the flash can then be controlled with the Sony* trigger, optional accessory) TTL-F: Fuji* remote control (the flash can then be controlled with the Fuji* trigger, optional accessory) U7: Up to 7 camera brands will be supported (the flash can then be controlled with the U7 trigger, optional accessory) OFF: The wireless remote control function is deactivated. |
*Canon, Nikon, Sony und Fuji are registered trademarks, Canon, Nikon, Sony or Fuji products are trademarks or registered trademarks of Canon, Nikon, Sony or Fuji.

 | Press the second function button from the left and turn the power output button to adjust the channel number. This can be set from 00 to 15. |
 | Press the third function button from the left and turn the power output button to adjust the group. Here you can choose between A, B, C, D, E, F, G, H, I, J. |
 | Press the fourth function key from the left for two seconds to activate RT mode. Then press the fourth button again briefly to set the Canon* ID between 00 and 99. The Rollei HS Freeze 6s and a Canon* (RT) flash can be synchronized if the channel and ID are the same. |

 | Press the second function button from the left side to activate the beep. Here you can turn the function on and off. If this is turned on, the flash will make indication sounds and the icon is shown on the display. |
 | Photo cell: Press the third function button from the left side to activate or deactivate the photo cell function. If this function is activated, the icon will be shown on the display. The flash is then able to release a flash strobe as soon as another flash is fired. For this function the infra red sensor should not be hidden. |
 | Modeling lamp: Press the fourth function button from the left to activate the modeling lamp. Press it once for the proportion mode [ PRO] and the modeling lamp will be limited in its intense like the flash power has been set. Press the button again to enter the independent mode [ 1.0] in which you can set the power of the modeling lamp individually from 1.0 to 9.0 by turning the power output knob. To deactivate the modeling lamp press the power on/off button. PRO] and the modeling lamp will be limited in its intense like the flash power has been set. Press the button again to enter the independent mode [ 1.0] in which you can set the power of the modeling lamp individually from 1.0 to 9.0 by turning the power output knob. To deactivate the modeling lamp press the power on/off button. |

 | Easy Cap: |
 | Total groups of flashes under Easy Cap mode. This can be set from All1 to All6. |
 | Number of flash heads under Easy Cap mode. This can be set from No1 to No6. Further information can be found in the chapter "Easy Cap Mode". |

 | Press the second function key from the left to activate the Flash Master mode. When the icon turns red, the shutter can only release the flash, the settings should be made directly on the flash. |
 | Delay: |
 | Set the delay time from 00.00 to 30.00 seconds. Further information can be found in the chapter "Delay Mode". |

 Note: Press the first function key from the left for two seconds to enter menu 6.
 | Display Backlight: | |
 | Minimum illumination | |
 | Medium illumination | |
 | Maximum illumination | |
 | Automatic switch-off when not in use | |
 | On / Off | |
Operation
Battery
- Battery Installation
Install the battery by putting the battery guidepost![]() along the battery groove
along the battery groove ![]()
to the end.
Then press the battery release button to put the battery right in place.
 along the battery groove

- Battery release
Press the battery release button (![]() ) to take out the battery along the groove.
) to take out the battery along the groove.
![]()
- Charging the battery
Use the battery charger to charge the battery. The charging time is about 3 hours. The charging status will be indicated by the light on the charger. It is red while charging and will change to green when the battery is fully charged
 .
.
 ) to take out the battery along the groove.
 .
.Battery Maintenance
Please only use the original battery charger for charging the battery.
- Battery capacity check
Press the battery check button on the backside of the battery to check the current battery capacity.


4 sections: 100–75%
3 sections: 75–50%
2 sections: 50–25%
1 section: 25–5%
0 section: less than 5%
Notes:
- Turn off the flash before taking out the battery.
- The battery will achieve optimal performance only after two or three complete charge and discharge cycles.
- If the flash is used outdoor, the usage time might be shorter than normal.
- The proper working temperature of the battery is +15°C and +25°C. Please note that the environmental temperature might effect the battery run time. If the temperature is lower than 0°C, the battery will be limited even with full power.
- If the flash is indicated that the battery power is low, please change the battery and recharge it. If you keep working, the battery might be damaged.
- If the flash will not be used for a long time, please fully charge the battery before storing it in a cool and dry place. Please note that the battery needs to be recharged at least every 3 months.
- After long term or heavy use please let the battery cool down for about 10 minutes before storing.
Power on / off
- Switch on: Press and hold the power button for about 2 seconds until the LCD screen will light up and enters the operation interface.
- Switch off: Press and hold the power button for about 2 seconds until the LCD screen will become totally black.
TTL Mode
- Enter Menu 1 and press the second function button repeatedly until the display shows TTL on the LCD.
- Press the third function button to change the sync mode. Choose between normal mode or high speed mode.
- Enter Menu 2 to set the channel and the group of the flash.
- Choose the wireless remote control mode according to the trigger that you use.
- The exposure value can be adjusted from -3.0 up to +3.0 directly on the flash by rotating the power output knob. The value can be adjusted by 1 f-stop increment by pushing the power output knob once and then turning it around (clockwise to increase the value and counter clockwise to decrease the value). But the value can also be adjusted by 1/10 f-stop by just turning the power output knob.
Note: If you use a trigger the value of the flash will not be overwritten by the value set on the trigger. For example if your flash shows an EV of +1.0 and your trigger shows a value of +2.0, then the picture will have a real exposure value of +3.0. If the flash shows an EV of +3.0 then you are able to even get a higher exposure value by setting the trigger to also +3.0 and then the maximum exposure value of +6.0 will be reached. The same goes for the negative exposure values.
M (manual) Mode
- Enter Menu 1 and press the second function button repeatedly until the display shows M on the LCD.
- Press the third function button to change the sync mode. Choose between normal mode, high speed mode and freeze mode.
- Enter Menu 2 to set the channel and the group of the flash.
- Choose the wireless remote control mode according to the trigger that you use.
- In the manual mode the power can be set from 1.0 ~ 9.0. The minimum power output is 1.0 and the maximum one is 9.0. For a small adjustment in increments of 0.1 f stop just rotate the power output knob and the value will be adjusted accordingly. For big adjustments press the power output knob once and then rotate it and the value will be changed by 1 f stop.
High Speed Sync
If high speed sync is activated the icon ![]() will be shown on the display. In this sync mode you can set the shutter speed up to 1/8000s, to synchronize the speed with the flash. The power output in this sync mode can only be set between 5.0 up to 9.0.
will be shown on the display. In this sync mode you can set the shutter speed up to 1/8000s, to synchronize the speed with the flash. The power output in this sync mode can only be set between 5.0 up to 9.0.
Freeze Mode
If the freeze mode is activated the icon ![]() will be shown on the display. In this mode the maximum shutter speed is limited to the normal flash sync time (normally 1/250s), but the flash can be fired with 1/19000s. The power output in this sync mode can be set between 1.0 up to 9.0.
will be shown on the display. In this mode the maximum shutter speed is limited to the normal flash sync time (normally 1/250s), but the flash can be fired with 1/19000s. The power output in this sync mode can be set between 1.0 up to 9.0.
Easy Cap Mode
The Easy Cap Mode can be used to easily cut out the main subject from the background with the help of an image processing software (not part of the delivery).
Please note that therefore there are needed at least 2 flashes.
- Activate the Easy Cap mode on your flash.
- Set the number of groups that are needed. Therefore press the corresponding function button and rotate the dial to change the value. The maximum setting of the groups is limited to 6 (All6), but within each group the quantity of flashes is unlimited.
- Then set the sequence of the groups. Therefore press the corresponding function button and change the value by rotating the knob. Here you set the sequence of when the flash will be released. After the setting the groups will flash according to this sequence.
Example (working with 4 flashes)
- There are 2 groups related with Easy Cap mode, therefore the group setting is set to „All2".
- There are two flashes which will be the main flashes and they are set to „No1" (group 1). Then they will be triggered with the first frame (see figure 1 – correctly exposed picture).
- The two background flashes are set to „No2" (group 2) and they will not be triggered in the first frame but in the second one (see figure 2 – no exposure on main subject, only the background).
- With the help of an image processing software, the main subject can now be quickly cut out from the background.
")
")
Delay Mode
In this mode you can set a delay time. The flash will fire then after this time is over. This is used for example if you want to take a picture with some ambient light, but you don't want to set the flash on the front nor the rear curtain. This might be used if you want to have motion in your picture but one single motion in the middle of the complete time should be sharp. Then you can set your camera's shutter time and calculate the correct delay time that you can enter in the flash menu. Therefore enter the delay mode and set the time between 00.00 and 30.00 seconds. A longer delay is not possible.
General Notes
- Freeze Mode can only be used in manual (M) mode and it is specialised in the shortest flash duration.
- If the wireless remote control function is activated (TTL-C / TTL-N / TTL-S / TTL-F), the flash can only be controlled by the corresponding transmitter that is available as an optional accessory.
- If the wireless remote control function U7 is activated, the flash can only be controlled by the transmitter U7 which is available as an optional accessory. Please note that this transmitter does not support High Speed Sync or Freeze Mode.
- If the systems overheats, it will automatically go into the overheat protection mode. The display will show „OH" which indicates that the overheat protection programm is activated. In this event the system will stop working. As soon as the temperature is back to an acceptable level, the flash will start working again.
- If you start the continuous shooting mode in your camera, the flash power output range is only available from 1.0 to 3.0. Please note that the flash itself does not have a continuous shooting mode and there will be no corresponding icon on the flash display.
Technical Data
| Flash Power | 600 Ws |
| Flash Power Range | 9 stops (in 0.1F or 1.0F increments) |
| Guide Number | 80 (with ISO 100, 2 meters and Reflector 55 Degree) |
| Modeling Light | 20 W LED |
| Recycle Time | Approx. 0.9 seconds |
| Flash Duration | Normal: 1/800s – 1/8000s | Freeze: 1/800s – 1/19000s |
| Lighting Time | Up to 500 (if battery is fully charged) |
| Temperature | 5500 ± 150K (normal mode) | 5500 ± 800K (Freeze mode) |
| IP33* | Spray water, dust and sand protected |
| Operation modes | TTL, M (manual), Easy Cap, Delay |
| Flash modes | Normal | High Speed Sync | Freeze |
| Channels | Groups | 0 – 15 | A, B, C, D, E, F |
| Radio Range | Up to 300 meters (built-in radio receiver) |
| Infrared Sensor | Integrated (IR slave function) |
| Connections | Sync (3,5 mm) | USB (for firmware updates) |
| Display | Multifunctional LCD (7.2 cm / 2.8") |
| Power Supply | Exchangeable and rechargeable Lithium Polymer Battery (14.8 V / 6 Ah) |
| Dimension | 32.5 x 12 x 22.5 cm |
| Weight | 3.022 kg / 2.422 kg (with/without battery) |
| Scope of Delivery | Studio flash light incl. flash tube, protective glass and plastic cover, battery, charging cable, sync cable, bag, manual |
Subject to technical changes.
*This only applies for the aluminum body, the front of the flash (flash tube) is excluded.

Documents / Resources
References
![www.rollei.de]() Rollei: Der Online-Shop für Kamera- Video- und Foto-Equipment
Rollei: Der Online-Shop für Kamera- Video- und Foto-Equipment![rollei.de]() Rollei: Der Online-Shop für Kamera- Video- und Foto-Equipment
Rollei: Der Online-Shop für Kamera- Video- und Foto-Equipment
Download manual
Here you can download full pdf version of manual, it may contain additional safety instructions, warranty information, FCC rules, etc.
Advertisement


Need help?
Do you have a question about the HS Freeze 6s and is the answer not in the manual?
Questions and answers