Advertisement
Spider Quick Start Guide
!
Thank you for choosing Lantronix. Please register your product to receive notifications for firmware and
documentation updates at www.lantronix.com/product-registration.
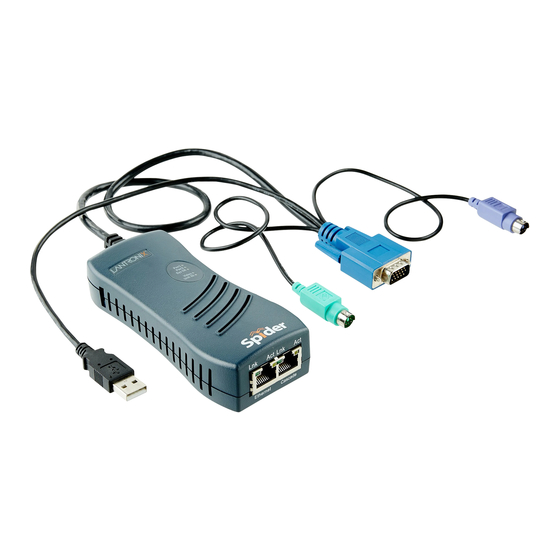
WHAT'S IN THE BOX
Spider
or
Part # SLS200USB0-02
There are two Spider models: one with both PS/2 and USB keyboard/mouse interfaces (software selectable), and one for USB-only systems. The color-coded
plugs on the ends of the cable for the keyboard, mouse, USB port and video are designed to plug directly into the target system's corresponding connector.
HARDWARE OVERVIEW
Typical Spider Configuration
HARDWARE INSTALLATION AND NETWORK SETTINGS
1. Plug the RJ45 end of the included serial cable into the Spider's serial
port. Plug the DB9F end into the serial (COM) port of a
PC/laptop running a terminal emulation (e.g. HyperTerminal). The
default serial port settings are 9600 bits per second, 8 data bits, no
parity, 1 stop bit, no flow control.
Plug the power adaptor into the Spider's power connector.
Plug an Ethernet cable connected to your network into the Ethernet
port. The Link/Act LED illuminates.
2. Plug the video, USB, and PS/2 keyboard/mouse (if applicable) cables
into the target computer. The SysOK LED will illuminate and flashes
to indicate that it is booting up. Bootup is complete within approxi-
mately one minute. The SysOK LED stops flashing and remains illumi-
nated.
3. Upon bootup, the terminal window displays the IP Configuration
screen.
Welcome!
Choose a command for the following features:
-Initial IP configuration: "config".
-Change default sysadmin password: "password".
-Exit quick setup: "quit".
[172.18.0.100 SL5a38bffdc]>
4. At the command prompt type config and press Enter.
Part # SLS200PS20-02
LED
Color
Pwr1
N/A
Pwr2
N/A
SysOK Green
Video Green
SysID
Amber Off by default. Steady on if "ID
Indicator LED Description
Quick Start Guide
Local KVM cable
Computer input cable
START
Mounting kit
Null modem DB9F to RJ95 serial cable
(30.48 mm; 120 in)
External AC/DC Power Supply
Description
Auxiliary Power Connector
N/A
N/A
Blinks upon bootup. Steady
when up and healthy.
Steady on upon bootup, and
indicator off" is unchecked.
5. To change the default IP auto configuration from DHCP to a static IP
address, at the IP autoconfiguration prompt type none and press
Enter.
6. Enter the unit's IP address, subnet mask, default gateway, and LAN
interface information.
7. Type y and press Enter to accept the changes. The system takes
[172.18.0.100 SL5a38bffdc]> config
IP autoconfiguration (none/dhcp/bootp) [dhcp]: none
IP [172.18.0.100]:
NetMask [255.255.255.0]:
Gateway (0.0.0.0 for none) [172.18.0.100]:
LAN interface speed (auto/10/100/1000) [auto]:
LAN interface duplex mode (auto/half/full) [auto]:
Are the entered values correct? Enter y for Yes, n for No or c to Cancel y
Configuring device...
Done.
about 20 seconds to complete. Press Enter once again at the prompt
to display the updated IP address.
8. Plug an Ethernet cable connected to your network into the Ethernet
port. The Link LED illuminates.
1
KVM-Over-IP Solution
Accessories
Pin # RS-232
1
RTS
Serial Port
2
—
(RS-232)
3
TX
4
Ground
5
Ground
6
RX
7
—
8
CTS
Port Description
Serial RS-232 Pinouts
Integrated
Part Number
N/A
N/A
N/A
N/A
ACC 520-0203-00
Pinouts
Advertisement
Table of Contents

Related Manuals for Lantronix SLS200USB0-02


Summary of Contents for Lantronix SLS200USB0-02
- Page 1 Spider Quick Start Guide Integrated KVM-Over-IP Solution Thank you for choosing Lantronix. Please register your product to receive notifications for firmware and documentation updates at www.lantronix.com/product-registration. WHAT’S IN THE BOX Spider Quick Start Guide Accessories Part Number Local KVM cable...
- Page 2 For the latest firmware downloads, visit https://www.lantronix.com/support/downloads © 2023 Lantronix, Inc. Lantronix is a registered trademark of Lantronix, Inc. All other trademarks are the property of their respective owners. Specifications subject to change without notice. 895-0069-00 Rev. A...
Need help?
Do you have a question about the SLS200USB0-02 and is the answer not in the manual?
Questions and answers