
Related Manuals for Lantronix SecureLinx SLK Series


Summary of Contents for Lantronix SecureLinx SLK Series
- Page 1 SecureLinx SLK Remote KVM User Guide SecureLinx SLK1 • SecureLinx SLK8 • SecureLinx SLK16 • Part Number: 900–336 Revision B March 2005...
- Page 2 15353 Barranca Parkway Irvine, CA 92618, USA Phone: 949–453–3990 Fax: 949–453–3995 Technical Support Phone: 800–422–4074 or 949–453–7198 Fax: 949–450–7226 Online: www.lantronix.com/support Sales Offices For a current list of our domestic and international sales offices, go to the Lantronix Web site at www.lantronix.com/about/contact/index.html.
- Page 3 Changes or modifications to this device not explicitly approved by Lantronix will void the user's authority to operate this device.
-
Page 5: Table Of Contents
Contents Contents ............. . .1-i List of Figures . - Page 6 Performing Operation Activities..........4-8 Controlling Hosts .
- Page 7 Downloading Firmware from the Lantronix Web Site ....... . 8-2...
- Page 8 SecureLinx SLK Remote KVM...
-
Page 9: List Of Figures
List of Figures Figure 1-1. SLK1 Back Panel ..........1-3 Figure 1-2. - Page 10 Figure 4-27. SNMP Configuration Page ........4-43 Figure 4-28.
- Page 11 List of Tables Table 2-1. SLK Feature Comparison....... . . 2-3 Table 3-1.
- Page 12 viii SecureLinx SLK Remote KVM...
-
Page 13: 1: Quick Start
1: Quick Start This Quick Start chapter describes how to get your SecureLinx™ SLK Remote KVM™ up and running in the shortest possible time. For detailed installation instructions, see Chapter 5, Installing the SLK. Topics in this chapter include: Topic Page Number “Getting Started”... -
Page 14: Making The Physical Connections
Quick Start Making the Physical Connections The following procedure describes how to perform SLK connections. Refer to Figure 1-1 on page 1-3, Figure 1-2 on page 1-3, and Figure 1-3 on page 1-4 for visual reference. Disconnect the monitor, keyboard and mouse from the servers or KVM-switch that your SLK is to control. -
Page 15: Figure 1-1. Slk1 Back Panel
Quick Start Figure 1-1. SLK1 Back Panel AC Power Receptacle RJ45 Network Connector Serial Port 1 Serial Port 2 Channel Port Connectors for Target Server Local Keyboard, Monitor, Mouse Connectors Figure 1-2. SLK8 Back Panel Serial Port 1 Serial Port 2 8 Channel Port Connectors for Target Servers Local AC Power... -
Page 16: Powering On And Initial Configuration
Quick Start Figure 1-3. SLK16 Back Panel Serial Port 1 RJ45 Network Connector Serial Port 2 8 Channel Port Connectors for Target Servers (CH-1 — CH-8) 8 Channel Port Connectors for Target Servers Local AC Power Serial (CH-9 — CH-16) Keyboard, Receptacle Port 3... -
Page 17: Validating Servers
Quick Start Validating Servers After you configure your SLK, connect a PC to it via a TCP/IP connection: Verify each server’s remote performance: Start your web browser and enter the SLK’s IP address in the address bar. User name and password prompts display. Type the default user name root in lower-case characters and type the default password PASS in upper-case characters;... -
Page 18: Where To Go From Here
Upload the proper encryption certificate and key into the SLK Flash File if you want to use encryption. See “Using Security and Encryption” on page 8-3. Note: For answers to frequently asked questions about the SecureLinx SLK Remote KVMs, please visit www.lantronix.com/support. SecureLinx SLK Remote KVM... -
Page 19: 2: Introduction
2: Introduction This chapter provides introductory information about your SecureLinx SLK Remote KVM. Topics in this chapter include: Topic Page Number “Overview” “SecureLinx SLK Models” “Features and Benefits” “SLK Configurations” Overview SecureLinx is a family of remote server-management solutions that enable remote clients to efficiently control their target servers and serial devices over a Local Area Net- work (LAN) or the Internet using the standard Transmission Control Protocol/Internet Protocol (TCP/IP). -
Page 20: Securelinx Slk Models
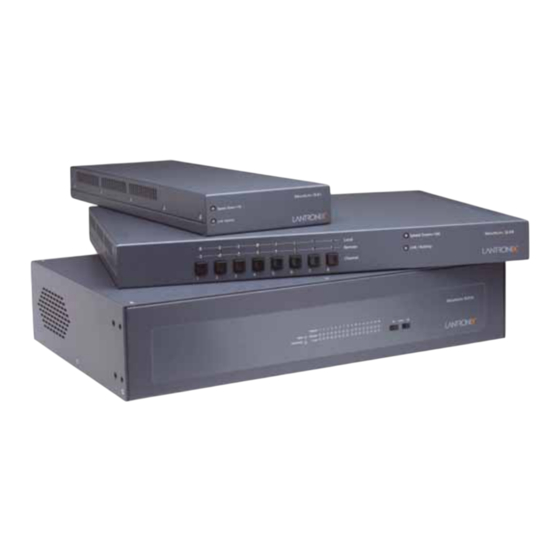
Introduction With a small investment, SecureLinx SLK Remote KVMs can preserve precious office space, centralize the management of your servers and serial devices, slash redundant peripheral costs, and increase uptime and productivity. SecureLinx SLK Models SecureLinx SLK Remote KVMs come in three models: ❖... -
Page 21: Features And Benefits
Introduction Features and Benefits Features at a Glance Table 2-1 summarizes the features of the three SLK models. Table 2-1. SLK Feature Comparison Feature Description SLK1 SLK8 SLK16 Number of server ports Number of independent remote clients Number of multipurpose serial ports Number of user profiles Monitors video output of all servers simultaneously Ability to assign server access for each individual user... -
Page 22: Slk Configurations
Introduction users/passwords and upgradeable public-key certificates. VPN and SSH environments can be used to provide external encryption to support existing security policies. In addi- tion, the SLK provides “Turtle Mode” and “Stealth Mode.” These automated security features serve to hide the SLK on a network and provide the ability to shut down the SLK if it is attacked by hackers. -
Page 23: Connecting To Different Switches
Introduction Connecting to Different Switches Figure 2-2, the SLK and server are connected to different switches. Figure 2-2. Connecting to Different Switches Multiple Server Configurations SecureLinx SLK Remote KVMs can connect to an existing KVM switch, as shown in Figure 2-3. -
Page 24: Figure 2-4. Multiple Server Configuration With Firewall
Introduction Figure 2-4 shows another multiple-server configuration. This example includes a fire- wall. In this example, the SLK continues to monitor the servers, even if the firewall fails or the connection to the firewall goes down. Figure 2-4. Multiple Server Configuration with Firewall Note: If the KVM switch requires a USB connection to the SLK, you need an appropriate USB-to-PS/2 adapter. -
Page 25: 3: Installing The Slk
3: Installing the SLK This chapter describes how to install SecureLinx SLK Remote KVMs. Topics in this chapter include: Topic Page Number “Unpacking Your Components” “Items Supplied by the User” “Hardware Description” “Installing the SLK” 3-10 “Validating Target Servers” 3-18 “Where to Go from Here”... -
Page 26: Items Supplied By The User
Installing the SLK Table 3-1. Components Shipped with the SecureLinx SLK Remote KVMs SLK Model Package Components ❖ SLK1 SecureLinx SLK1 1-port Remote KVM ❖ U.S. power cord (500-041) ❖ Serial “Y” mini-DIN8–to–RJ12/DB9F cable (SLKCHY001-01) ❖ Six-foot, 3-in-1 KVM, PS/2 cable (SLKCHS006-01) ❖... -
Page 27: Hardware Description
Installing the SLK The following items are optional: ❖ Serial devices and cables, if you want to control serial devices with the SLK. ❖ A KVM switch. ❖ A 19-inch rack and mounting hardware, if you want to rack-mount the SLK. For more information, see “Rack-Mounting the SLK”... -
Page 28: Figure 3-2. Slk1 Back Panel
Installing the SLK Figure 3-2. SLK1 Back Panel ❷ ❸ ❶ ❿ ❽ ❾ ❻ ❺ ❹ ❼ Table 3-3. SLK1 Back Panel Description SLK power connector Serial port 1 (DB9 female, DCE) Recessed reset button. Use a paper clip (or equivalent) to reset the SLK. -
Page 29: Slk8 Front And Back Panels
Installing the SLK SLK8 Front and Back Panels Figure 3-3 shows the front panel of the SLK8 and Table 3-4 describes the front panel components. Figure 3-3. SLK8 Front Panel ❸ ❶ ❷ ❺ ❹ Table 3-4. SLK8 Front Panel Description Eight remote channel LEDs show which remote channel is active. -
Page 30: Figure 3-4. Slk8 Back Panel
Installing the SLK Figure 3-4. SLK8 Back Panel ❸ ❹ ❶ ❷ ❻ ❽ ❺ ❿ ❾ ❼ Table 3-5. SLK8 Back Panel Description 10/100 Speed LED: Green = 100 Base-T connection Orange = 10 Base-T connection Serial port 1 (DB9 female, DCE). Recessed reset button. -
Page 31: Slk16 Front And Back Panels
Installing the SLK SLK16 Front and Back Panels Figure 3-5 shows the front panel of the SLK16, and Table 3-6 describes the front panel components. Figure 3-5. SLK16 Front Panel ❷ ¹ ❶ ❹ ❸ ❺ Table 3-6. SLK16 Front Panel Description Link/Activity LED: ON = good connection OFF = no connection... -
Page 32: Figure 3-6. Slk16 Back Panel
Installing the SLK Figure 3-6 shows the back panel of the SLK16 and Table 3-7 describes the back panel components. Figure 3-6. SLK16 Back Panel ❹ ❶ ❼ ❷ ❸ ❺ ❻ ❿ ❽ ❼ ❾ Table 3-7. SLK16 Back Panel Description Serial port 2 (DB9 female, DCE) Serial port 1 (DB9 female, DCE) Recessed reset button. - Page 33 Installing the SLK One group of Local connectors for connecting a local console. Each connector is labeled and color coded. M/green PS/2 mouse connector (6-pin mini-DIN female) K/purple PS/2 keyboard connector (6-pin mini-DIN female) Monitor/blue VGA monitor connector (HDDB15 female in blue) Serial port 3 (DB9 male, DTE) 10 SLK power connector SecureLinx SLK Remote KVM User Guide...
-
Page 34: Installing The Slk
SLK16 is 2U). The SLK8 and SLK16 come with their own mounting hard- ware. Mounting hardware for the SLK1 can be ordered from Lantronix. When rack-mounting the SLK units, place the rack in a dry, well-ventilated location, with a minimum of dust and vibration. - Page 35 Installing the SLK Optimizing Video For optimum viewing during remote sessions, use the following guidelines to config- ure the video resolution settings on the servers that the SLK will control: ❖ Make sure all monitors and adapters are VESA-compliant. ❖ Select a video resolution of 1280 x 1024 or less.
-
Page 36: Figure 3-7. Recommended Mouse Settings For Target Servers
Installing the SLK Figure 3-7. Recommended Mouse Settings for Target Servers Windows 98 Windows 2000 Set pointer speed to slowest, and leave trails off. Set motion to Slow, acceleration to none. Windows NT Windows ME Set motion to Slow. Adjust pointer to midrange speed. Turn off Accelerator Windows XP Silicon Graphics Inc IR Set pointer speed to medium. -
Page 37: Connecting Devices To The Slk
Connecting Target Servers to SLK Use the following procedure to connect servers to the SLK back panel. Note: For low noise and reduced wiring clutter, use Lantronix-suggested KVM cables to connect target servers to the SLK. SecureLinx SLK Remote KVM User Guide... -
Page 38: Figure 3-8. Slk1 Connections
Installing the SLK Connect the mouse to the green PS/2 mini-DIN female connector SLK1 labeled M. Connect the keyboard to the purple PS/2 mini-DIN female connector labeled K. Connect the monitor plug to the black HDDB15 male connector labeled Video. The SLK1 manages one server. -
Page 39: Figure 3-9. Slk8 Connections
Installing the SLK Figure 3-9. SLK8 Connections Connect the Connect a second serial device (if any) here first serial device here Connect the keyboard, monitor, and mice ports from up Connect the Connect the to 8 target servers here, starting from the left (CH-1) local keyboard, power cord monitor, and... -
Page 40: Connecting To The Network
SLK to the appropriate uplink connectors on the KVM switch (the manual that came with the KVM switch should describe this proce- dure). For a list of compatible KVM switches, please visit our Web site at www.lantronix.com. To optimize the use of KVM switches: ❖... -
Page 41: Connecting To A Power Source
The pattern, interval, and alert are all user-configurable. ❖ Power Control — connects to an optional Lantronix SLP Remote Power Manager to turn power off or on at the controlled device. Connecting to a Power Source To connect the SLK to a power source: Connect the supplied power cord to the SLK AC receptacle. -
Page 42: Validating Target Servers
Installing the SLK Validating Target Servers After you make your SLK connections, use the following procedure to configure the network settings and to validate the performance of the target servers. At the local keyboard, press the key twice. When the On Screen Display opens, scroll down to Setup Menus and press Enter. Select Network Configuration and press Enter. -
Page 43: Figure 3-12. Slk Home Page
Installing the SLK Figure 3-12. SLK Home Page Under Channel (click to view), click the first channel (the channel in the top row). In Figure 3-12, the first channel is Support PDC (for demonstration purpose only). 10 Verify that you can view the video (see Figure 3-13). -
Page 44: Figure 3-13. Example Of Viewing Video From A Remote Server
Installing the SLK Figure 3-13. Example of Viewing Video from a Remote Server Figure 3-14. Example of No Incoming Video Message 11 Test the mouse and keyboard functionality. If the on-screen pointer moves satisfactorily as you move the mouse, proceed to the next step. Otherwise, click Resync Mouse in the left pane (the upper left-most button). -
Page 45: Where To Go From Here
Note: Store the new master account password in a safe place. If you lose or forget it, contact Lantronix Technical Support. 16 Click Change. 17 Follow the instructions on the SLK home page to view the current screen contents and take control of the host’s keyboard and mouse. - Page 46 Upload the proper encryption certificate and key into the SLK Flash File if you want to use encryption. See “Using Security and Encryption” on page 8-3. Note: For answers to frequently asked questions about the SecureLinx SLK Remote KVMs, please visit www.lantronix.com/support. 3-22 SecureLinx SLK Remote KVM...
-
Page 47: 4: Using The Web Control Interface To Configure The Slk
4: Using the Web Control Interface to Configure the This chapter describes how to use the web control interface to configure SecureLinx SLK Remote KVMs and control the attached servers. Topics in this chapter include: Topic Page Number “Overview” “Starting a Session” “Understanding the Web Control Interface”... -
Page 48: Starting A Session
Using the Web Control Interface to Configure the SLK Starting a Session To access the web control interface, use the following procedure: Start a web browser from a computer that is on the same subnet as the SLK. Enter the SLK’s IP address into the address bar of your web browser. A login window similar to the one in Figure 4-1 opens. -
Page 49: Figure 4-2. Slk Home Page
Using the Web Control Interface to Configure the SLK Note: The following figure is accurate for the SLK16, but not for the SLK8 or SLK1. Figure 4-2. SLK Home Page The home page is your starting location for configuring the SLK and the attached servers. -
Page 50: Understanding The Web Control Interface
At the bottom of each page are a Home link for returning to the SLK home page, a Back link for returning to the previous page displayed, and a Logout link for logging out of the current session. There is also a link to the Lantronix web site. Note: In addition to the controls in the web control interface, you can also use the Back and Forward buttons in your browser to move backward and forward. -
Page 51: Figure 4-3. Web Control Interface Page Components
Using the Web Control Interface to Configure the SLK Figure 4-3. Web Control Interface Page Components Home Page Icon Logout Button Menu Pane SLK Home Page Link Lantronix Web Site Back Link Main Area Logout Link SecureLinx SLK Remote KVM User Guide... -
Page 52: Table 4-1. Web Control Interface Menus
Using the Web Control Interface to Configure the SLK Table 4-1. Web Control Interface Menus Menu Description See Page Operation Control Hosts Initiates a JavaView session without an active channel being selected. View Hosts Displays server desktops in one of the four preset views for 4-12 (SLK16 only) monitoring. - Page 53 Using the Web Control Interface to Configure the SLK Table 4-1. Web Control Interface Menus Menu Description See Page 4-46 Browse Menu Tree Displays a representation of the OSD menu. (SLK16 only) Connection Displays miscellaneous installation and SSL information. 4-47 Version Displays serial numbers and versions for your installation.
-
Page 54: Performing Operation Activities
Using the Web Control Interface to Configure the SLK Performing Operation Activities SLK operation activities can be performed using the links under Operation in the menu pane of the web control interface. Table 4-2 lists the SLK operation activities. Table 4-2. SLK Operation Activities Menu Description Page... -
Page 55: Controlling Hosts
Using the Web Control Interface to Configure the SLK Controlling Hosts The Control Hosts link lets you view and control a server desktop. Control Hosts is functionally equivalent to clicking a server in the Channel column on the SLK home page. Note: If NO INCOMING VIDEO appears, see “Video Troubleshooting”... -
Page 56: Table 4-3. Menus, Icons, And Buttons
Using the Web Control Interface to Configure the SLK Table 4-3. Menus, Icons, and Buttons Menu Item Description REMOTE FOCUS Status indicator; turns gray when the mouse leaves the active server desktop Session--> Provides session management options. Connect Restores the connection if the connection was disconnected. Disconnect Disconnects from the server you were viewing. - Page 57 Using the Web Control Interface to Configure the SLK Table 4-3. Menus, Icons, and Buttons Advanced Color Depth Allows the user to select either 8-bit or 16-bit color mode. Position Calibration Allows remote users to choose between manual and automatic position- ing of the server screen.
-
Page 58: Viewing Hosts
Using the Web Control Interface to Configure the SLK Viewing Hosts The View Hosts link lets SLK16 users view the maximum number of channels sup- ported by the SLK16. (This feature is not available with the SLK1 and SLK8.) ❖ SLK1 users can store the desktop view for one channel. -
Page 59: Using Power Control
Using the Web Control Interface to Configure the SLK Using Power Control The Power Control link provides on/off/reboot control of attached systems when an SLP Remote Power Manger is attached to the SLK. You must attach a serial cable (Appendix A:, Specifications) between a serial port on the SLK and the serial (serial, RS-232) port of the SLP, and configure the SLK serial port for “Power Module,”... -
Page 60: Performing User Activity Functions
Using the Web Control Interface to Configure the SLK Performing User Activity Functions The User Activity link lets you view which users are currently logged into the SLK. When the User Activity page appears (see Figure 4-7), you can click a slot number link to terminate the corresponding session. -
Page 61: Figure 4-7. User Activity Page
Using the Web Control Interface to Configure the SLK Figure 4-7. User Activity Page Note: For the SLK1 and SLK8, the title of this page is “Who’s logged in,” and it does not have a Channel column. SecureLinx SLK Remote KVM User Guide 4-15... -
Page 62: Viewing The Event Log
Using the Web Control Interface to Configure the SLK Viewing the Event Log The Event Log link lets you view system messages. Figure 4-8 shows an example of the event log. To clear the events in the log, click the Clear log contents button. Event logs are stored in volatile memory and are cleared when the SLK is reset. -
Page 63: Flash File System
These files are stored in the SLK on-board Flash memory. Because most of these files are critical for correct operation, do not perform modifications on this page unless instructed to do so by Lantronix Technical Support. The Flash File System page also lets you upload new firmware and certificates. For more information, see Chapter 8, “Uploading Flash Files and... -
Page 64: Debug (Slc16 Only)
The Debug link (on the SLC16 only) lets you perform maintenance and calibration activities. Do not perform modifications on this page unless instructed to do so by Lantronix Technical Support. Figure 4-10. Debug Menu Page 4-18 SecureLinx SLK Remote KVM User Guide... -
Page 65: Performing Configuration Activities
Using the Web Control Interface to Configure the SLK Performing Configuration Activities SLK configuration activities can be performed using the links under Configuration in the menu pane of the web control interface. Table 4-4 lists the SLK operation activities. Table 4-4. SLK Configuration Activities Menu Description See Page... -
Page 66: Figure 4-11. Network Configuration Page
Using the Web Control Interface to Configure the SLK Figure 4-11. Network Configuration Page To change the network information, use the following procedure: Close all remote user sessions. Otherwise, the sessions lock up and become unavailable to remote users. If this happens, perform a warm reset of the SLK from the Debug menu of the OSD. -
Page 67: Configuring Ppp Settings
Using the Web Control Interface to Configure the SLK To change the machine name, enter a name that will uniquely identify this device on the network and click the Apply button next to this field. The machine name can be an alphanumeric string up to 15 characters long. Once changes to all individual fields have been made, click Commit IP Config Changes to have the changes take effect. -
Page 68: Figure 4-12. Ppp Configuration Page
Using the Web Control Interface to Configure the SLK Modem ❖ Modem Init String — an initialization string specific to the modem attached to the SLK16. We recommend you set this string to factory defaults and set the modem speaker volume to level 2. ❖... -
Page 69: Setting Up User Accounts
Using the Web Control Interface to Configure the SLK Setting Up User Accounts The User Account link allows the administrator to specify users, assign permis- sions, and allocate access (see Figure 4-13). User accounts must be defined before remote (web) sessions are available. Figure 4-13. -
Page 70: Figure 4-14. Entering A Master Account Password
Using the Web Control Interface to Configure the SLK Note: The master account password is case-sensitive. For security purposes, each typed character appears as a dot (•). Figure 4-14. Entering a Master Account Password Enter the new ...then retype it again here. master account password here... -
Page 71: Figure 4-15. Page For Changing A User Id
Using the Web Control Interface to Configure the SLK To define user accounts, use the following procedure: If the User Accounts page is not displayed, click User Accounts under Configuration in the menu pane. Each row under Account Profile belongs to a different user. Find the row that corresponds to the user you want to configure. -
Page 72: Figure 4-16. Page For Changing A User Password
Using the Web Control Interface to Configure the SLK Figure 4-16. Page for Changing a User Password To change the user account status, click the link under User Account. A page similar to the one in Figure 4-17 appears. Click the appropriate user account type and click Apply. -
Page 73: Figure 4-17. Page For Changing User Channel Privileges
❖ 3: Control+ — use can view and change channel information and has additional privileges, such as viewing and changing power switching. Changing power switching is performed using an optional Lantronix SLP Remote Power Manager. Note: This numbering is correct for the SLK16, but is different on the SLK1 and SLK8. -
Page 74: Changing Your Own Password
Using the Web Control Interface to Configure the SLK Changing Your Own Password The Change Password link lets users change their own passwords. This password is spe- cific to the user and affects only their access to the SLK. Click Change Password in the menu pane. The Change My Password page displays. -
Page 75: Configuring A Security Policy
Using the Web Control Interface to Configure the SLK Configuring a Security Policy The Security link lets you define a security policy for the SLK. Clicking this link dis- plays a page with a summary of preset security profiles, buttons for selecting a security policy, and controls for customizing security parameters (see Figure 4-19). -
Page 76: Figure 4-20. Security Policy Configuration Page (Bottom)
Using the Web Control Interface to Configure the SLK Figure 4-20. Security Policy Configuration Page (bottom) 4-30 SecureLinx SLK Remote KVM User Guide... - Page 77 Using the Web Control Interface to Configure the SLK Security Profiles This area shows security settings for three pre-defined profiles. You use the buttons in the Security Policy area to select the profile you want to use. Security Policy The Security Policy area allows an Administrator to select from the three pre- defined levels of security shown in the Security Policy area.
- Page 78 Using the Web Control Interface to Configure the SLK Turtle Mode Turtle mode enables the SLK unit to shut down network access when it senses that it is under attack and security may be compromised. For example, if more than five pass- word failures are detected before a successful login, the SLK unit disconnects itself from the network.
- Page 79 Using the Web Control Interface to Configure the SLK HTTPS Port Number The default HTTPS Port Number is 443. To change, enter a new HTTPS port number. Telnet Server Port Number The default Telnet Server Port Number is 23. To change, enter a new Telnet server port number.
- Page 80 Using the Web Control Interface to Configure the SLK Local User Exclude This option lets you select the following parameters: ❖ 0: Share access: Local user can type when the remote user is connected and also controlling the same machine. ❖...
-
Page 81: Monitoring Your Configuration
Using the Web Control Interface to Configure the SLK Monitoring Your Configuration To reduce server downtime, use the Monitoring link to have the SLK alert you by email to user-defined error conditions. To receive email alerts, enter your email address, the numeric IP address of the SMTP server used to send the email, and the message format (long or short). -
Page 82: Figure 4-22. Monitoring Configuration Page (Error Conditions To Monitor))
Using the Web Control Interface to Configure the SLK Figure 4-22. Monitoring Configuration Page (Error Conditions to Monitor)) 4-36 SecureLinx SLK Remote KVM User Guide... -
Page 83: Configuring Serial Ports
Using the Web Control Interface to Configure the SLK Configuring Serial Ports The Serial Ports link lets you configure the SLK serial ports. Serial ports 1 and 2 provide similar functionality. Serial port 3 on the SLK16 supports modem (PPP) con- nections (see “Configuring PPP Settings”... - Page 84 Using the Web Control Interface to Configure the SLK Port 1, Port 2, Port 3 These areas let you individually configure the serial ports. (Port 3 only appears for the SLK16.) Selectable parameters are: ❖ Mode — lets you configure the serial port for log, Telnet, watchdog, or an SLP Remote Power Manager (Serial port 3 also supports PPP mode.) Before you choose a mode, specify the port parameters such as Watchdog pattern, mode, time- out, and baud rate.
-
Page 85: Configuring Local User/Vnc Settings
Using the Web Control Interface to Configure the SLK Configuring Local User/VNC Settings The Local User/VNC link lets you configure Virtual Network Computing (VNC) and adjust mouse and keyboard settings for local users. The mouse adjustments do not affect remote operations. Figure 4-24. - Page 86 Using the Web Control Interface to Configure the SLK VNC Server Configuration The VNC Server Configuration area lets you select the following parameters: ❖ VNC server port number — the default port for the first VNC display on a VNC server (normally 5900).
-
Page 87: Setting The Date And Time
Using the Web Control Interface to Configure the SLK Setting the Date and Time The Date & Time page lets you synchronize the SLK (local) time setting to match the remote time on your browser. The SLK reports the remote time rather than the local time zone setting for the controlled servers. -
Page 88: Figure 4-26. Syslog Configuration Page
Using the Web Control Interface to Configure the SLK This page also provides checkboxes for selecting severity levels that are to be enabled (the severity level that has been enabled/disabled also affects the log messages on the serial port, as it uses the same mask). You can use the Default, Clear all, and Select all links to select or clear these checkboxes. -
Page 89: Configuring Snmp
Using the Web Control Interface to Configure the SLK Configuring SNMP The Simple Network Management Protocol (SNMP) is the most widely used way to gather information about the status of individual nodes on the network and make changes in the operational parameters of the nodes. The SNMP link lets you control the SNMP settings for the SLK. -
Page 90: Performing Information Activities
Using the Web Control Interface to Configure the SLK Performing Information Activities SLK information activities can be performed using the links under Information in the menu pane of the web control interface. Table 4-5 lists the SLK operation activities. Table 4-5. SLK Information Activities Menu Description See Page... -
Page 91: Viewing The Full Menu Tree
Using the Web Control Interface to Configure the SLK Viewing the Full Menu Tree The Full Menu link displays an expanded, interactive tree view of all the operation and configuration functions. This is an alternative access method for configuring SLK functions and provides a visual mapping to the OSD selections. Figure 4-28. -
Page 92: Viewing The Browse Menu Tree
Using the Web Control Interface to Configure the SLK Viewing the Browse Menu Tree The Browse Menu Tree link shows the collapsed structure of the Full Menu Tree. If you click a link, the next page provides a high-level, at-a-glance view of the channel or setup menus. -
Page 93: Viewing Connections
Using the Web Control Interface to Configure the SLK Viewing Connections The Connection link displays a page containing connection and SSL information related to the SLK. Figure 4-30 shows an example of this page. Figure 4-30. Viewing Connection Information SecureLinx SLK Remote KVM User Guide 4-47... -
Page 94: Viewing Version Information
Using the Web Control Interface to Configure the SLK Viewing Version Information The Version link displays a page containing firmware release version information. The network administrator can view (and record) the MAC address from this page without having to remove the device from its installation. Figure 4-31 shows an example of this page. -
Page 95: Viewing Capture Settings
Using the Web Control Interface to Configure the SLK Viewing Capture Settings The Capture Settings link lets you capture text of log entries and system settings to aid in troubleshooting. Figure 4-32. Capture Settings Page Note: The saved settings file allows you to view the configuration for reference. It does not provide a format that can be used to upload a saved configuration for re- installation. -
Page 96: Viewing Copyright Information
Using the Web Control Interface to Configure the SLK Viewing Copyright Information The Copyright link displays a page that shows the text that users of Open SSL are required to post on their web sites. Figure 4-33. Copyright Page 4-50 SecureLinx SLK Remote KVM User Guide... -
Page 97: 5: Using The Osd Interface To Configure The Slk
5: Using the OSD Interface to Configure the SLK This chapter describes how to use the local console’s On Screen Display (OSD) interface to configure SecureLinx SLK Remote KVMs. Topics in this chapter include: Topic Page Number “Overview” “Logging into the OSD” “Navigating through the OSD”... -
Page 98: Logging Into The Osd
Using the OSD Interface to Configure the SLK Note: Alpha-numeric naming restrictions within the OSD are strict. You can enter names that contain upper- and lower-cased a-z and 0-9, as well as period and @ sign. If you use other characters, results may be erratic or confusing. Note: All OSD operations are fully described in the web control interface chapter (see Chapter 4, “Using the Web Control Interface to Configure the SLK”... -
Page 99: Navigating Through The Osd
Using the OSD Interface to Configure the SLK Navigating through the OSD The OSD has no mouse support, only simple keyboard navigation commands shown below the black screen. Table 5-1 lists the keys for navigating through the OSD. Table 5-1. Navigating through the OSD To... -
Page 100: Channel Switch Menu
Using the OSD Interface to Configure the SLK Channel Switch Menu From the OSD menu (Figure 5-2), highlight the first option to choose channels to control at the local console. To select an active channel, use the directional arrows to highlight that channel and press Enter. -
Page 101: Setup Menu
Using the OSD Interface to Configure the SLK Setup Menu From the OSD menu (Figure 5-1), move the cursor down to the Setup Menu and press Enter. (For the SLK8, move the cursor up.) The Setup menu opens, with OSD functions arranged in categories (see Figure 5-3). - Page 102 Using the OSD Interface to Configure the SLK configured for DHCP, the IP address field displays DHCP, and the Ethernet’s current IP field displays the acquired address. Subnet mask. Highlight Subnet Mask, press Enter, and type the value for the subnet mask.
-
Page 103: Ppp Options (Slc16 Only)
Using the OSD Interface to Configure the SLK PPP Options (SLC16 only) Select the lines you need to change in PPP Options and press Enter to change as required. Figure 5-5. PPP Options Restart PPP server. Reset the server function in the SLK. 10 Local IP address. -
Page 104: Monitoring Settings Menu
Using the OSD Interface to Configure the SLK Monitoring Settings Menu The Monitor Settings menu spans three OSD screens. Use the up and down arrows to navigate between them. From these menus you can configure the SLK to continuously monitor the attached servers for common failures. If such a failure occurs, the SLK logs the event and can be configured to alert an administrator via email. -
Page 105: Second Monitoring Settings Screen
Using the OSD Interface to Configure the SLK Alert if no video. Enabling this alert causes a notification if no video signal comes from one of the controlled servers. Note: Active screensavers (DPMS) can trigger this notification erroneously. Alert if no NumLock toggle. If this is enabled, the SLK simulates the key being pressed every few seconds. -
Page 106: Third Monitor Settings Screen (Slk16 Only)
Using the OSD Interface to Configure the SLK packets are lost during a short interval. This IP address does not need to be that of the controlled server but might be a border router or other "always-on" network component. To enable, enter an IP address to ping. To disable, type 0.0.0.0 (default). -
Page 107: Network Management Settings Menu
Using the OSD Interface to Configure the SLK Network Management Settings Menu To configure network logging, use the menus in Network Management Settings (see Figure 5-9). Network Management Settings has two sub-menus, SNMP Configura- tion and Syslog Configuration. Figure 5-9. Network Management Settings Note: The SLK8 and SLK1 display SNMP and Syslog as unique top-level menu selections. -
Page 108: Syslog Configuration
Using the OSD Interface to Configure the SLK Write Community. Community that can write messages. (These display as asterisks on the SLK8). Trap Destination IP. IP address of SNMP management station (e.g., HP OpenView). Trap Destination Port Number. UDP port number of the SNMP management station (default 162). -
Page 109: Security Settings
Using the OSD Interface to Configure the SLK Security Settings There are two OSD screens for configuring the SLK security. Initial Security Screen The first security screen handles functions like Stealth and Turtle as well as general policy. ❖ Change overall security mode. Press the right arrow key to select between relaxed, snooper, or public options. - Page 110 Using the OSD Interface to Configure the SLK ❖ Reset web server. Select and press Enter to reset Web server to implement new Web server settings. ❖ Idle logout. This logs out sessions that are no longer in use and makes these resources available for a new remote connection.
-
Page 111: User Administration
Using the OSD Interface to Configure the SLK User Administration If you have the authority to access this screen, you can configure new users and assign their passwords and system privileges. The total number of user accounts you can specify depends on the SLK model you have: ❖... -
Page 112: Serial Port Configuration
Using the OSD Interface to Configure the SLK Serial Port Configuration Using the serial port screens, you can configure the SLK serial ports. For the SLK16, you can also configure serial port 3 for a dial-up response. For each available setting, select the menu item and press Enter to advance through the options. -
Page 113: Figure 5-16. Serial Port 2 - Baud Rate Settings
Using the OSD Interface to Configure the SLK Watchdog pattern. Select to enter the watchdog pattern. Each channel is matched against this simple string. Watchdog timeout. Select and press Enter to edit. Enter timeout values in minutes. Port 2 - Baud rate settings. The default is 38400/8/N/2/N (Figure 5-16). -
Page 114: Local User Control
Using the OSD Interface to Configure the SLK Figure 5-18. Serial Port 3— Baud Rate Settings Port 3 settings (Baud rate, data bits, parity, stop bits, and flow control) are selected the same way as for port 1. 12 P3 serial port 3 mode. PPP (dial-up through modem). Select and press Enter to select other modes on port 3. -
Page 115: Figure 5-20. Local User Control Screen (2 Of 2)
Using the OSD Interface to Configure the SLK Local console. The available options are No password, Require Password, and Disable access. Note: Disable access renders the SLK inaccessible if remote access fails. Local User exclude. Options are to share access with remote, have no keyboard for the local user, or have a blank screen + keyboard (no local access except for mouse). -
Page 116: Virtual Network Computing
Synchronize Outlet Names to Channel Names Debug – (Factory Only) This screen provides OSD map and maintenance options (including a warm reset fea- ture). Do not change settings in this submenu unless authorized by Lantronix Technical Support. 5-20 SecureLinx SLK Remote KVM User Guide... -
Page 117: 6: Using A Vnc Viewer To Access The Slk
6: Using a VNC Viewer to Access the SLK This chapter describes how to use a Virtual Network Computing (VNC) viewer to access target servers attached to SecureLinx SLK Remote KVMs. Topics in this chapter include: Topic Page Number “Overview” “Using a VNC Viewer to Access Target Servers”... -
Page 118: Figure 6-1. Local Console Vnc Configuration Screen
Using a VNC Viewer to Access the SLK Figure 6-1. Local Console VNC Configuration Screen Virtual Network Computer (VNC) 5900 is the default to VNC server port number: 5900 put in after URL VNC Bandwidth goal: Network bandwidth goal: 17.2 kbps Max resolution (expected) Auto Press ESCAPE/... -
Page 119: Figure 6-3. Osd/Vnc Menu With Corner Icon
Using a VNC Viewer to Access the SLK Figure 6-3. OSD/VNC Menu with Corner Icon Although the menu contains the word OSD and looks like the SLK’s local OSD, it is only for remote access to the SLK. To navigate between channels in the OSD via VNC menu, enter a value from 1-9 or A to G to select one of the 16 possible channels. - Page 120 Using a VNC Viewer to Access the SLK SecureLinx SLK Remote KVM User Guide...
-
Page 121: 7: Troubleshooting
This chapter provides troubleshooting suggestions you can follow in the unlikely event that you encounter a problem using SecureLinx SLK Remote KVMs. In addition to this chapter, you can find answers to frequently asked questions at www.lantronix.com/support. Topics in this chapter include: Topic Page Number “General Troubleshooting”... -
Page 122: General Troubleshooting
General Troubleshooting Problem Suggestion You forgot your password. Please contact Lantronix Technical Support. You cannot log into the SLK Web page or ping its IP There is a problem with the assigned IP address. address. From the Local Console OSD: 1. - Page 123 Troubleshooting Problem Suggestion You want to reduce the overall network traffic gener- 1. Use a flat-color desktop background, rather ated by VNC. than a personal picture (e.g., your family). This data must be sent every time the window is moved, so it is best if it is a single color that requires little compression.
-
Page 124: Keyboard Troubleshooting
Troubleshooting Keyboard Troubleshooting Problem Suggestion There is no keyboard signal. Disconnect and reconnect keyboard cable between the server and the SLK, or reset the server. If you are using extended length cables, try using shorter ones. The local keyboard does not respond or the key- Locally re-seat the keyboard. -
Page 125: Mouse Troubleshooting
Troubleshooting Mouse Troubleshooting Note: This guide refers to the mouse indicator on the attached server as the “local” mouse. We refer to the mouse on the PC accessing the KVM remotely as the “remote” mouse. (In the browser interface, the remote mouse usually displays as a crosshair icon. - Page 126 Troubleshooting Problem Suggestion The local mouse (on the attached server) does Perform the following steps: not move. 1. Disconnect and reconnect connections. 2. Select “Reset local keyboard+mouse” from Local user control in the OSD (see “Local User Control” on page 5-18).
- Page 127 Troubleshooting Problem Suggestion The remote and local mice are tracking slowly. Perform the following steps: 1. The cause could be noisy video. Using the web control interface, log into the SLK and the target server, and observe the bandwidth meter on the web control interface window. On a static screen, the indicator should show negligible traffic (less than 20 Kbps).
-
Page 128: Video Troubleshooting
Troubleshooting Video Troubleshooting Problem Suggestion You see NO INCOMING VIDEO when trying to Perform the following steps: view a remote server. 1. Disable or time-out any video overlays, such as KVM switch status, as overlays often gen- erate noise. 2. Select different resolutions and refresh rates within the supported maximum of 1280 x 1024 and 75 Hz. - Page 129 Video is sluggish. Perform the following steps: 1. Check your firmware version and try using different video settings. To update to the newest firmware, go to www.lantronix.com. 2. Try different resolutions and refresh rates on the target servers. Video is not updating.
- Page 130 Troubleshooting Problem Suggestion You see black video when opening a browser If the connect/disconnect options keep toggling, session. and you can connect locally through VNC and Telnet, this could be a configuration issue. Be sure the Java plug-in is installed. Use only the latest release of Java 2 runtime environment (J2RE).
-
Page 131: 8: Uploading Flash Files And Certificates
Checking the Current SLK Firmware Version Before you upgrade the SLK firmware, check the current firmware version. If your installed version matches the most recent version available on the Lantronix Web site, no download is necessary. Click the Version button on the web control interface menu (see “Viewing Version... -
Page 132: Downloading Firmware From The Lantronix Web Site
Uploading Firmware to Flash After you download firmware from the Lantronix Web site, you can upload it into the SLK. Uploading firmware is a straightforward operation. However, if you upload the wrong version, recovery can be time-consuming. -
Page 133: Using Security And Encryption
Uploading Flash Files and Certificates After the firmware has been uploaded, a message tells you that upload was successful. Click the Reboot now link in the bottom-right corner of the Flash File System page. Reboot disconnects you and logs you out of your current session. -
Page 134: Figure 8-3. Controls For Locating And Uploading Firmware
From the home page, under Operation, click Flash File System to confirm that the new certificate has been installed successfully. Note: Uploading corrupted or incorrect files can render your SLK inoperable. If this occurs, contact Lantronix for assistance. SecureLinx SLK Remote KVM User Guide... -
Page 135: 9: Defining Custom Send Keys
9: Defining Custom Send Keys The Send Keys feature provides pre-programmed “hot” keys for functions that require specific key combinations. The SLK comes pre-configured with an extensive list of the most common key combinations (for example, Ctrl+Alt+Delete). If an attached server requires a new key combination, you must create a custom key file. -
Page 136: Custom Key Guidelines
Defining Custom Send Keys Custom Key Guidelines Definitions ❖ [keylist] indicates beginning of document. ❖ [newitem] “Itemname” indicates beginning of item description with “Itemname” being the descriptor. ❖ [end] indicates end of item description. ❖ [down] indicates depress and hold key commands listed hereafter. ❖... -
Page 137: Potential Send Keys
Defining Custom Send Keys [end] [newitem] "L+RShift+Alt-Esc" [down] LShift RShift ALT ESCAPE [up] ESCAPE ALT RShift LShift [end] [newitem]"TAB" [type] TAB [end] [newitem] "Shift-TAB" [down] SHIFT TAB [up] TAB SHIFT [end] [newitem] "Print Screen" [type] PRINTSCREEN [end] [newitem] "Print Screen, Print Screen" [type] PRINTSCREEN PRINTSCREEN [end] [newitem] "Scroll Lock"... - Page 138 Defining Custom Send Keys Custom Send Key [keylist] indicates beginning of document [newitem] “Itemname” indicates beginning of item description with “Itemname” being the descriptor [end] indicates end of item description [down] depress and hold key commands listed hereafter [up] release key commands listed hereafter [type] depress and release key commands hereafter each key command has to be separated from the next by a space...
- Page 139 Defining Custom Send Keys Command Command 1 on Num Pad NUMPAD1 0061 Equals2 EQUALS2 00BB 2 on Num Pad NUMPAD2 0062 Comma2 COMMA2 00BC 3 on Num Pad NUMPAD3 0063 Period2 PERIOD2 00BE 4 on Num Pad NUMPAD4 0064 Slash2 SLASH2 00BF 5 on Num Pad...
- Page 140 Defining Custom Send Keys SecureLinx SLK Remote KVM...
-
Page 141: Hardware Specifications
A: Specifications Hardware Specifications Ethernet One 10/100BaseT connection Standard RJ45 connector LEDs for link, 10/100 indicator, and network activity VGA Input Max resolution 1280 x 1024 at 75Hz. Supports most VESA graphics modes and all text modes DDC2B compatible VGA Local Output Copy of input video with OSD (On-Screen Display) for setup Optional use;... - Page 142 Standard baud rates up to 115,200 bps Can be used for multiple functions: ❖ Telnet access (console server mode). Provides access to a serial console server (e.g., Lantronix SLC) or serial management port of a connected server. ❖ Watchdog mode. With appropriate server software, the SLK can detect a string pattern which can trigger an alert or kill the power to reset failed software/hardware.
- Page 143 Specifications Serial Port 3 (SLK16) DB9 male connector (DTE) Functions same as Serial Ports 1 and 2 Additional RS-232-C modem function Reset SLK hardware reset switch Power Auto-sensing power supply Input Voltage Range: 100 - 240 VAC Frequency: 50 - 60 Hz Max.
- Page 144 Specifications RJ-45 to DB9M Adapter Figure A-1. RJ-45 to DB9M Adapter for Serial Connection of SLP Remote Power Manager SecureLinx SLK Remote KVM User Guide...
-
Page 145: Software Specifications
Specifications Software Specifications Network Protocols HTTP/1.1 and HTTPS (secure) web server used for control and setup VNC server (implements RFB 3.3 protocol with Hextile encoding) Requires one dedicated IP address TCP/IP port numbers for all services may be changed to confuse attackers SMTP is used to deliver email notifications Does not require a DNS server (Domain Name Service), so it will continue to operate during this network failure... -
Page 146: Agency Statements
Warning: changes or modifications to SecureLinx SLK Remote KVMs not expressly approved by Lantronix could void the user’s authority to operate the equipment. Note: This equipment has been tested and found to comply with the limits for a Class A digital device, pursuant to Part 15 of the FCC Rules. -
Page 147: B: Binary To Hexadecimals
Binary to Hexadecimals B: Binary to Hexadecimals Some of the procedures require you to assemble a series of options (represented as bits) into a complete command (represented as a byte). The resulting binary value must be converted to a hexadecimal representation. Use this appendix to learn to convert binary values to hexadecimals. -
Page 148: Figure B-1. Scientific Calculator With Binary Values
Binary to Hexadecimals Scientific Calculator Another simple way to convert binary to hexadecimals is to use a scientific calculator, such as the one available on Windows’ operating systems. For example: On the Windows’ Start menu, click Programs-->Accessories-->Calculator. On the View menu, select Scientific. The scientific calculator displays. Click Bin (Binary), and type the number you want to convert. - Page 149 C: Glossary This appendix defines the technical terms in this User Guide. Authentication The process of identifying an individual, usually based on a user- name and password. Channel The path between the SLK unit and the target server being man- aged.
- Page 150 Glossary Modem init string A series (string) of commands sent by modem software to initialize the modem. These commands configure the modem's options for parameters such as error correction, data compression, and flow control. Init strings are fairly specific to each modem. Not all pro- grams use init strings.
- Page 151 Lantronix, freight prepaid. Upon verification of warranty, Lantronix will -- at its option -- repair or replace the product and return it to the customer freight prepaid. If the product is not under warranty, the customer may have Lantronix repair the unit on a fee basis or return it.
- Page 152 SecureLinx SLK Remote KVM User Guide...
- Page 153 Index Accessing servers with a VNC viewer Adjusting mouse 3-11 Agency approvals statements Benefits Browse menu tree 4-46 Capture settings 4-49 Components, unpacking Configuration activities On Screen Display interface VNC viewer Web control interface 4-19 Configurations connecting to different switches connecting to the same network and switch as the server using multiple servers Connecting...
- Page 154 Encryption Event log 4-16 Features Firmware upload instructions Flash file system uploading certificate 5-13, 8-4 uploading firmware uploading key 5-13, 8-4 Web control interface 4-17 Full menu tree 4-45 General troubleshooting Hardware description SLK1 SLK16 SLK8 Hardware specifications Hosts controlling viewing 4-12 Information activities, Web control interface...
- Page 155 rack-mounting 3-10 verifying target servers 3-18 Items supplied by user Keyboard troubleshooting KVM switches, connecting to SLK 3-16 Local console connecting to SLK 3-13 On Screen Display interface security 4-33 verifying target servers 3-18 VNC Configuration screen Local user control On Screen Display interface 5-18 Web control interface...
- Page 156 local user control 5-18 logging in Monitoring Settings menu navigating through Network Configuration menu Network Management Settings menu 5-11 overview PPP options security 5-13 Setup menu SNMP 5-11 Syslog 5-12 user administration 5-15 Virtual Network Computing 5-20 Operation activities, Web control interface Optimizing video 3-11 Power control...
- Page 157 On Screen Display interface 5-16 Web control interface 4-37 Servers accessed with a VNC viewer accessed with the On Screen Display interface accessed with the Web control interface Setting the date and time 4-41 components configurations features and benefits hardware description installation 3-10 models...
- Page 158 Unpacking components Uploading firmware User accounts 4-23 User activity functions 4-14 User administration, On Screen Display interface 5-15 User-supplied items Verifying target servers 3-18 Version 4-48 Video troubleshooting Video, optimizing 3-11 View connections 4-47 Virtual Network Computing On Screen Display 5-20 Web control interface 4-39...
- Page 159 Index overview power control 4-13 4-21 security 4-29 SNMP 4-43 starting a session Syslog 4-41 user accounts 4-23 user activity functions 4-14 version 4-48 view connections 4-47 viewing hosts 4-12 VNC settings 4-39 SecureLinx SLK Remote KVM User Guide Index-7...
- Page 160 Index Index-8 SecureLinx SLK Remote KVM...
Need help?
Do you have a question about the SecureLinx SLK Series and is the answer not in the manual?
Questions and answers