Table of Contents
Advertisement
Quick Links
Advertisement
Table of Contents

Related Manuals for Agilent Technologies M9210A


Summary of Contents for Agilent Technologies M9210A
- Page 1 Agilent Technologies PXI-H 10-bit Digitizing Scope M9210A Startup Guide...
- Page 2 Responsible body is the individual or Agilent Technologies, Inc. as governed by shall control. group responsible for the use and United States and international copyright maintenance of equipment, for ensur- laws.
- Page 3 To prevent electrical shock, disconnect the NOT as safety earth ground connections. unlimited power circuits. They are intended Agilent Technologies instrument from mains If you are using a test fixture, keep the lid to be used with impedance-limited sources. before cleaning. Use a dry cloth or one...
- Page 4 expected to leak or deteriorate during Front and Rear Panel Symbols: normal use. Forty years is the expected useful life of the product. The CE mark is a registered trademark of the European This symbol indicates the Community. instrument is sensitive to electro- static discharge (ESD).
-
Page 5: Table Of Contents
Step 3: Install the Software Step 4: Install the Module M9210A Front Panel Features Front Panel Connectors Front Panel LED Step 5: Verify Operation of the M9210A Module Conducting a Self-Test Conduct M9210A Operational check (optional) Requirements for Verification Required Hardware... -
Page 6: Documentation Map
Documentation Map M9210A PXI-H 10-bit Digitizing Scope Startup Guide... -
Page 7: Agilent M9210A Introduction
Related Documentation Agilent M9210A Introduction The scope of this Startup Guide is to detail the processes of receiving and installing the Agilent M9210A PXI-H 10-bit Digitizing Scope, installing the required software, and verifying basic module operation. If you have any... -
Page 8: Step 1: Unpack And Inspect The Module
To avoid damage when handling a module, do not touch exposed connector pins. Return the module for service Should it become necessary to return the M9210A module for repair or service, follow the steps below: 1. Review the warranty information shipped with your product. -
Page 9: Step 2: Verify The M9210A Shipment Contents
If any correspondence is required, refer to the product by model and serial numbers. Step 2: Verify the M9210A Shipment Contents The following items are included with your M9210A order: Part Number Quantity... -
Page 10: Step 3: Install The Software
If you are using an embedded controller, complete the following steps: 1. Install the embedded controller module into the compatible chassis (Agilent M9018A chassis recommended). 2. Connect peripherals (mouse, keyboard, monitor). 3. Power up the chassis. M9210A PXI-H 10-bit Digitizing Scope Startup Guide... - Page 11 Return the module for service Install the Software The M9210A PXI-H 10-bit Digitizing Scope module software is located on the Agilent MD1 High-Speed Digitizer Software and Product Information CD CD (M9210-90007) and the Agilent IO Library Suite CD (E2904- 60003). This software is also available for download at the Agilent website www.agilent.com/find/PXI-Digitizers...
-
Page 12: Step 4: Install The Module
11. Check the status LED on the module front panel, It should be orange or red when the power is applied, If not- there is a problem with either the module or the chassis. 12. Follow the New Hardware Wizard's instructions to install the driver. 13. Reboot the system. M9210A PXI-H 10-bit Digitizing Scope Startup Guide... -
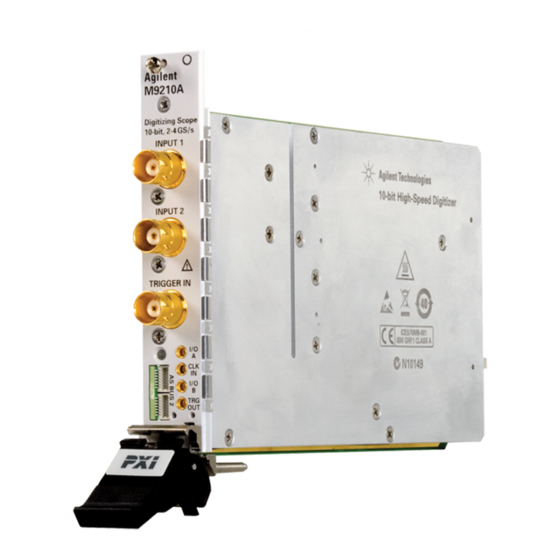
Page 13: M9210A Front Panel Features
'Identify' function is used. The maximum input to the input connectors (INPUT 1 and INPUT 2) must not exceed +27 dBm into 50 Ω, or 300 V into 1 MΩ. Agilent M9210A PXI-H 10-bit Digitizing Scope Startup Guide... -
Page 14: Step 5: Verify Operation Of The M9210A Module
Suite > Agilent Connection Expert). It will display the modules that are installed. 2. Check that the M9210A module is recognized. 3. Select the M9210A module and check that the correct Model Name appears in the Instrument Properties. 4. Select the 'Installed Software' tab and review the configuration data (as shown below). -
Page 15: Conducting A Self-Test
Verify that no error is shown in the lower left hand log area. The image below shows the desired result. Figure 5 - Soft Front Panel (SFP) showing the result of the Self-Test Agilent M9210A PXI-H 10-bit Digitizing Scope Startup Guide... -
Page 16: Conduct M9210A Operational Check (Optional)
Requirements for Verification The M9210A is verified by using it to trigger on and visualize a signal from a Function Generator. The trigger must be stable and the signal frequency and amplitude must correspond to that set on the generator. -
Page 17: If A Problem Is Found
4. Verify that the problem is reproducible. 5. Refer to "Return the module for service" on page 9, concerning the details on sending the module to Agilent for service. Agilent M9210A PXI-H 10-bit Digitizing Scope Startup Guide... - Page 18 As with a tangram, the possibilities may seem infinite as you begin to create For more information on Agilent Technologies' products, a new test system. With a set of clearly defined elements—...