Table of Contents
Advertisement
Quick Links
Advertisement
Table of Contents

Related Manuals for Torque XRACK 5832101-A


Summary of Contents for Torque XRACK 5832101-A
- Page 1 X-RACK ASSEMBLY GUIDE VERSION: XRACK PART #: 5832101 - A...
- Page 2 Children and pets must not be allowed near this machine. Supervise teenagers. This product is not a toy. • If unsure of proper use of this product, contact Torque Fitness Customer service at: 763-754-7533 (8:30 am - 5:00 pm CST). www.service@torquefitness.com Important Safety Instructions for Assembling Equipment •...
- Page 3 • In a continual effort to improve our products, while secondary connections need to be loosen • If any items are missing, contact Torque 1/4 turn. specifications are subject to change. Fitness Customer service at: 763-754-7533 •...
-
Page 4: Table Of Contents
ADDITIONAL ATTACHMENTS TABLE OF CONTENTS: • XRACK BALL TARGET: PAGE 59 WARNINGS: PAGE 2 • FLYING PULLUP: PAGE 60-61 GENERAL NOTES: PAGE 3 • UPPER BAND PEG ATTACHMENT: PAGE 62 • ROCK CLIMBING KIT: PAGE 63 BASE RACK ASSEMBLY • UNIVERSAL HEAVY BAG MOUNT: PAGE 64-67 •... - Page 5 STEP 1 XRACK BOOT UPRIGHT NOTE: For the purpose of this assembly guide, the 9' UPRIGHTS are shown. However, the 8' UPRIGHT and 7.5' UPRIGHT are assembled the exact same way. NOTE: If optional XRACK BOOTS where purchased, then they must be installed over the uprights first, prior to assembly of the product.
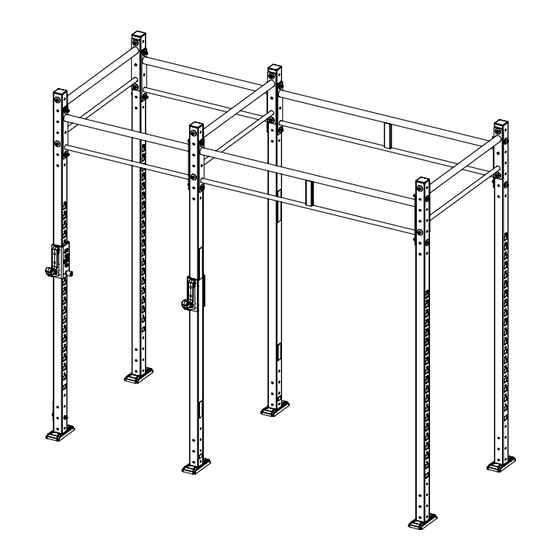
- Page 6 NOTE: There are many different lengths, widths, heights and options for the FREE STANDING X-RACKS. For the purposes of this assembly guide, a 4' X 10' X 9' FREE STANDING X-RACK will be shown for standard bolt connections as well as different assembly options that are common for all X-RACKS.
- Page 7 STEP 2 NOTE: For the purpose of this illustration, the 6' DOUBLE CROSSES are shown. However, the 6' RECTANGLE CROSS, 6' SINGLE CROSS and 6' TRIPLE CROSS are assembled the exact same way. NOTE: For the purpose of this illustration, the 4' DOUBLE CROSSES are shown.
-
Page 8: Warnings
ANCHOR STEP FOR FREE STANDING X-RACKS XRACK 9U XRACK BOOT NOTE: All uprights are required to be anchored to the floor. Two anchors per base plate. WARNING! ALL FREE STANDING X-RACKS ARE REQUIRED TO BE ANCHORED TO THE FLOOR TO PREVENT ROCKING OR TIPPING DURING USE. - Page 9 NOTE: There are many different lengths, widths, heights and options for the WALL MOUNT X-RACKS. For the purposes of this assembly guide, a 4' X 10' X 9' WALL MOUNT X-RACK will be shown for standard bolt connections as well as different assembly options that are common for all X-RACKS.
- Page 10 STEP 3 NOTE: For the purpous of this illustration, the 6' DOUBLE CROSSES are shown. However, the 6' RECTANGLE CROSS, 6' SINGLE CROSS and 6' TRIPLE CROSS are assembled the exact same way. NOTE: For the purpous of this illustration, the 4' DOUBLE CROSSES are shown.
- Page 11 ANCHOR STEPS FOR WALL MOUNT X-RACKS XRACK-4DX NOTE: Anchor holes. (See page 13 - 15 for different anchoring options). XRACK-9U XRACK BOOT NOTE: All uprights are required to be anchored to the floor. Two anchors per base plate. WARNING! ALL WALL MOUNT X-RACKS ARE REQUIRED TO BE ANCHORED TO THE FLOOR AND WALL TO PREVENT ROCKING OR TIPPING DURING USE.
- Page 12 STEP 4 (WALL MOUNT ANCHOR) XRACK-4DX WARNING: Anchor holes THE WALL MOUNT X-RACK MUST BE ANCHORED TO THE WALL USING NINE WALL ANCHORS SUITABLE FOR THAT PARTICULAR WALL CONSTRUCTION. 75" 45" 7" 7" 9U - 92-1/8" 8U - 78-3/8" WALL VIEW NOTES: The images above show how to attach the WALL MOUNT X-RACK to the wall using wall anchors.
- Page 13 STEP 5A (WALL MOUNT WITH HEADER BOARD) WARNING: THE HEADER BOARD MUST BE ANCHORED TO THE WALL USING TEN WALL ANCHORS SUITABLE FOR THAT PARTICULAR WALL CONSTRUCTION. 32" 32" 32" 32" HEADER BOARD (Not included) 5-1/2" 11-1/2" 3/8" LAG BOLT For wood studs.
- Page 14 STEP 5B (WALL MOUNT WITH HEADER BOARD) 3/8" FLAT WASHER (Not included) 3/8" LAG BOLT (Not included) HEADER BOARD WARNING: THE WALL MOUNT X-RACK MUST BE ANCHORED TO THE HEADER BOARD USING ALL SIX WALL ANCHORS XRACK-4DX 45" 75" 7" 9U - 99"...
- Page 15 NOTE: There are many different lengths, widths, heights and options for the FREE STANDING MONKEY BAR X-RACKS. For the purposes of this assembly guide, a 4' X 10' X 9' FREE STANDONG MONKEY BAR X-RACK will be shown for standard bolt connections as well as different assembly options that are common for all X-RACKS.
- Page 16 STEP 6 XRACK-6MBX XRACK-4MBX XRACK-4SX NOTE: Assemble to holes 2 & 6 1/2" LOCK NUT XRACK-9U NOTE: Assemble to holes 1 & 5 1/2 x 4-1/2" BOLT 1/2" WASHER NOTE: LOOSELY tighten bolt connections in this step.
- Page 17 STEP 7 NOTE: The MONKEY BARS are shown assembled 1/2" X 4-1/2" BOLT XRACK-4MBX XRACK-6MBX 1/2" WASHER 1/2" LOCK NUT XRACK-4MB NOTE: SECURELY tighten all bolt connections in this step and previous step.
- Page 18 ANCHOR STEP FOR FREE STANDING MONKEY BAR X-RACKS XRACK-9U XRACK BOOT NOTE: All uprights are required to be anchored to the floor. Two anchors per base plate. WARNING! ALL FREE STANDING X-RACKS ARE REQUIRED TO BE ANCHORED TO THE FLOOR TO PREVENT ROCKING OR TIPPING DURING USE.
- Page 19 NOTE: There are many different lengths, widths, heights and options for the MONKEY BAR WALL MOUNT X-RACKS. For the purposes of this assembly guide, a 4' X 10' X 9' MONKEY BAR WALL MOUNT X-RACK will be shown for standard bolt connections as well as different assembly options that are common for all X-RACKS.
- Page 20 STEP 8 XRACK-4SX XRACK-6MBX NOTE: Assemble to holes 2 & 6 XRACK-4MBX 1/2" LOCK NUT NOTE: XRACK-9U Assemble to holes 1 & 5 1/2 X 4-1/2" BOLT 1/2" WASHER NOTE: LOOSELY tighten bolt connections in this step.
- Page 21 STEP 9 XRACK-4MB XRACK-6MBX 1/2" LOCK NUT XRACK-4MBX 1/2 X 4-1/2" BOLT 1/2" WASHER NOTE: SECURELY tighten all bolt connections in this step and previous step.
- Page 22 ANCHOR STEPS FOR WALL MOUNT MONKEY BAR X-RACKS NOTE: XRACK-4MB Anchor holes. (See pages 24 - 26 for different anchoring options) NOTE: Anchor holes. (See pages 24 - 26 for different anchoring options) XRACK-4SX XRACK-9U XRACK BOOT NOTE: All uprights are required to be anchored WARNING! to the floor.
- Page 23 STEP 10 (MONKEY BAR WALL MOUNT ANCHOR) Anchor holes XRACK-4MB WARNING: THE MONKEY BAR WALL MOUNT MUST BE ANCHORED TO THE WALL Anchor holes USING FIFTEEN WALL ANCHORS SUITABLE FOR THAT PARTICULAR WALL CONSTRUCTION. 75" 45" 7" 7" XRACK-4SX 21-1/2" 7"...
- Page 24 STEP 11A (MONKEY BAR WALL MOUNT WITH HEADER BOARD) WARNING: THE HEADER BOARD MUST BE ANCHORED TO THE WALL USING TEN WALL ANCHORS SUITABLE FOR THAT PARTICULAR WALL CONSTRUCTION. 32" 32" 32" 32" HEADER BOARD (Not included) 5-1/2" 11-1/2" 3" 3/8"...
- Page 25 STEP 11B (MONKEY BAR WALL MOUNT WITH HEADER BOARD) 3/8" FLAT WASHER (Not included) XRACK-4MB 3/8" LAG BOLT (Not included) HEADER BOARD WARNING: THE MONKEY BAR WALL MOUNT X-RACK MUST BE ANCHORED TO THE HEADER BOARD USING ALL TWELVE WALL ANCHORS. 45"...
- Page 26 XRACK STORAGE SYSTEM NOTES: The XRACK has a wide range of attachments available for a variety of configurations. This manual will illustrate these attachments for there bolted connections. Some components may be hidden for assembly clarity. The following XRACK series 6' storage attachments are NOT COMPATIBLE with the attachment uprights.
-
Page 27: Xrack Storage Attachment
XRACK STORAGE SYSTEM XRACK VERTICAL XRACK VERTICAL ACCESSORY XRACK 6' HORIZONTAL WEIGHT STORAGE STORAGE UPRIGHTS WEIGHT STORAGE XRACK 6' ACCESSORY TRAY... - Page 28 STEP 16 (OPTIONAL VERTICAL WEIGHT STORAGE) NOTE: The VERTICAL WEIGHT STORAGE can only be assembled to a 4' or 6' RECTANGLE CROSS 1/2 X 4-1/2" BOLT 1/2 X 4-1/2" BOLT XRACK-4RX 1/2 X LOCK NUT XRACK-9UVWS REPEAT 2X NOTES: Some items have been hidden for assembly clarity. If this is the only option being assembled to the X-RACK then SECURELY tighten all bolt connections.
-
Page 29: Xrack 6At
STEP 17A (OPTIONAL 6' ACCESSORY STORAGE, FLAT) XRACK-6AT NOTE: The XRACK-6AT can be assembled at an angle. (See next page). NOTE: The 6' ACCESSORY 1/2" LOCK NUT 1/2 X 4-1/2" BOLT TRAY is shown assembled 1/2" WASHER XRACK-9UVWS REPEAT 2X NOTES: If this is the only option being assembled to the X-RACK then SECURELY tighten all bolt connections in this step and previous step. - Page 30 STEP 17B (OPTIONAL 6' ACCESSORY STORAGE, ANGLED) REAR RAIL REMOVAL NOTE: To mount the XRACK-6AT at an angle, use 3rd hole on top and 1st hole on bottom as shown. XRACK-6AT NOTE: Rail can be removed for larger dumbbells. NOTE: See diagram above The 6' ACCESSORY 1/2 X 4-1/2"...
- Page 31 STEP 18 (OPTIONAL VERTICAL ACCESSORY STORAGE) NOTE: The VERTICAL ACCESSORY STORAGE can only be assembled to a 4' or 6' RECTANGLE CROSS 1/2 X 4-1/2" BOLT 1/2" WASHER XRACK-4RX 1/2" LOCK NUT XRACK-9UVAS REPEAT 2X NOTES: Some items have been hidden for assembly clarity. If this is the only option being assembled to the X-RACK then SECURELY tighten all bolt connections.
-
Page 32: Xrack 6Hws
STEP 19 (OPTIONAL 6' HORIZONTAL WEIGHT STORAGE) XRACK-6HWS XRACK-9UVAS 1/2 X 4-1/2" BOLT 1/2" WASHER 1/2" LOCK NUT REPEAT 2X NOTE: The 6' HORIZONTAL WEIGHT STORAGE is shown assmbled NOTES: If this is the only option being assembled to the X-RACK then SECURELY tighten all bolt connections in this step and previous step. -
Page 33: Attachment Uprights
OPTIONAL ATTACHMENT UPRIGHTS NOTE: For the purpose of this illustration, the 4'/6' DOUBLE CROSSES are shown. However, the 4' NINJA CROSS, 4' / 6' RECTANGLE CROSS, 4' / 6' SINGLE CROSS and 4' / 6' TRIPLE CROSS are assembled the exact same way. NOTE: There are many different lengths, widths, heights and options for X-RACKS. -
Page 34: 4' Monitor Mount
ATTACHMENT UPRIGHT 4' & 6' ATTACHMENTS XCREATE 4' BALL XCREATE 4' XCREATE 4' / 6' STORAGE MODULES XCREATE 4' / 6' STORAGE MODULES TARGET WALL MONITOR MOUNT XCREATE 4' BALL TARGET WALL PADS XCREATE BARBELL STORAGE MODULES XCREATE BARBELL STORAGE MODULES XCREATE 4' STALL BARS... -
Page 35: Bosu Storage Attachment
ATTACHMENTS XCREATE 8UVWSS XCREATE VBS10 XCREATE VBS5 XCREATE VDS5 & XCREATE VDS4 VERTICAL WEIGHT STORAGE UPRIGHTS VERTICAL BAR STORAGE (10 BARS) VERTICAL BAR STORAGE (5 BARS) VERTICAL DUMBBELL STORAGE XCREATE BHSE XCREATE HSH XCREATE BOSU SA ATTACHMENT ANCHOR BALL HANGING STORAGE EXTENSION HANGING STORAGE HOOK BOSU STORAGE ATTACHMENT DIP ATTACHMENT AND PLYOSTEP... - Page 36 XRACK ATTACHMENT UPRIGHT XRACK ATTACHMENT UPRIGHT NOTE: XCREATE series 4' / 6' attachments should be installed FIRST using the hardware included. Loosely assemble all attachments before tightening. NOTE: NOT ALL ATTACHMENTS OR CONFIGURATIONS ARE COMPATIBLE. NOTE: The attachment uprights feature slotted lower holes. The slots allow for attachments to be bolted in both directions.
- Page 37 OPTIONAL 4' & 6' STORAGE ATTACHMENTS (9AU) XRACK 9AU (3) 1/2 x 1-3/4" WASHER (12) 1/2 x 4-1/4" BOLT (18) 1/2 x 4-1/2" BOLT (6) XCREATE 4UBS 1/2 x 1" WASHER (36) 1/2" LOCK NUT (24) XCREATE 6UBS XCREATE 4AT XCREATE 6TRAY XCREATE 4BBS XCREATE 6BBS...
- Page 38 OPTIONAL 4' AND 6' STORAGE ATTACHMENTS (8AU) XRACK 8AU (3) NOTE: Cross is NOT optional if a 4' / 6' accessory is mounted in the highest position as shown. 1/2 x 4-1/4" BOLT (18) XCREATE 4UBS 1/2 x 1" WASHER (36) 1/2"...
- Page 39 ACCESSORY TRAY LABELS ATTACH DESIRED LABEL TO EACH ACCESSORY TRAY SEE NOTE BELOW ACCESSORY LABEL 3/8" XCREATE 4TRAY (3) XCREATE-6AT (3) NOTE: If you are a professional contractor installing this system for a facility, leave these labels and instruction with manager or inquire what label to attach to each accessory tray.
- Page 40 MAT STORAGE AND ACCESSORY PINS 4' HANGING STORAGE 3/8" FLAT WASHER (10) 3/8" LOCK NUT (5) XCREATE-4BHS MAT STORAGE PIN (2) XCREATE-4UBS ACCESSORY HOLDER PIN (3) BEFORE TIGHTENING NUT, ADJUST MAT STORAGE PIN TO DESIRED POSITION XCREATE-6UBS NOTE: XCREATE-UBSHP-6 For the purpose of illustration the XCREATE-4BHS is shown. The XCREATE-4UBS, and XCREATE-6-UBS can be assembled the exact same way.
- Page 41 OPTIONAL MONITOR MOUNT MONITOR (NOT INCLUDED) XRACK ATTACHMENT UPRIGHT (2) 1/2 x 1-3/4" WASHER (8) 1/2" x 4-1/2 BOLT (4) NOTE: BOLT LOCATION VARIES DEPENDING ON MONITOR 1/2 x 1" WASHER (8) M8 WASHER 1/2" LOCK NUT (8) M8 SCREW 16MM (4) XCREATE 4MM GROMMET (4) M6 BOLT 35MM (2)
- Page 42 OPTIONAL BALL TARGET WALL XRACK 9AU (2) CROSS (OPTIONAL) 1/2 x 1-3/4" WASHER (8) XRACK 8AU (2) NOTE: CROSS CAN NOT BE INSTALLED OVER BALL TARGET WALL 1/2 x 4-1/2" BOLT (4) 1/2 x 1" WASHER (40) 1/2 x 1" WASHER (40) 1/2"...
- Page 43 OPTIONAL BALL TARGET WALL REVERSE SIDE XRACK ATTACHMENT UPRIGHT XCREATE BALL TARGET WALL (BACK SIDE) 0.5 (2) 0.5 (6) 5/8 x 31-3/4" FOAM STRIP 5/8 x 5-1/4" FOAM STRIP 0.6 (4) 0.5 (4) 5/8 x 18-3/4" FOAM STRIP 5/8 x 40-3/4" FOAM STRIP NOTE: CUT FOAM STRIPS TO LENGTH AS SHOWN.
- Page 44 OPTIONAL STALL BARS XRACK 9AU CROSS (OPTIONAL) NOTE: CROSS CAN NOT BE INSTALLED OVER STALL BARS 1/2 x 1-3/4" WASHER (8) XRACK 8AU 1/2 x 4-1/2" BOLT (4) 1/2 x 1" WASHER (40) 1/2 x 1" WASHER (40) 1/2" LOCK NUT (24) 1/2"...
- Page 45 OPTIONAL BALL TARGET WALL PADS (STEP 1) NOTE DIRECTION OF ICON BEFORE INSTALLING HOOKS XCREATE-4BTWP 10-32 X 9/16" SCREW (8) HOOK (4) NOTES: SECURELY TIGHTEN, DO NOT OVERTIGHTEN bolted connections in this step. Repeat this step for all ball target pads.
- Page 46 OPTIONAL BALL TARGET WALL PADS ASSEMBLED SECTION VIEW NOTE: ALIGN AND HOOK BALL TARGET PADS OVER STALL BAR CROSSMEMBERS. PRESS PAD DOWN TO LOCK INTO PLACE NOTE: XCREATE-4BTWP WHEN INSTALLING MULTIPLE PADS ALWAYS START WITH THE LOWEST PAD. XCREATE STALL BARS NOTES: The XCREATE 4' STALL BARS ARE REQUIRED.
- Page 47 OPTIONAL STORAGE ATTACHMENTS XRACK ATTACHMENT UPRIGHT (2) XCREATE 4BHSE 1/2 x 4-1/4" Bolt (4) 1/2 x 3-1/4" Bolt (2) 1/2 x 1" WASHER (8) 1/2" LOCK NUT (4) XCREATE HSH NOTES: SECURELY tighten all bolt connections in this step and previous step.
- Page 48 OPTIONAL STORAGE ATTACHMENTS XRACK ATTACHMENT UPRIGHT (2) BOSU BALL (NOT INCLUDED) XCREATE BOSU-SA 1/2 x 4-1/4" Bolt (2) 1/2" LOCK NUT (2) 1/2 x 1" WASHER (4) NOTES: SECURELY tighten all bolt connections in this step and previous step.
- Page 49 OPTIONAL VERTICAL WEIGHT STORAGE XRACK ATTACHMENT UPRIGHT (2) 1/2 X 5-3/4" BOLT (20) 1/2 x 1" WASHER (40) 1/2" LOCK NUT (20) XCREATE 8UVWS (2) NOTES: SECURELY tighten all bolt connections in this step and previous step.
- Page 50 OPTIONAL VERTICAL DUMBBELL STORAGE XRACK ATTACHMENT UPRIGHT (2) 1/2 X 4-1/4" BOLT (16) 1/2 x 1" WASHER (32) XCREATE VDS4 1/2" LOCK NUT (16) XCREATE VDS5 NOTES: SECURELY tighten all bolt connections in this step and previous step.
- Page 51 OPTIONAL PLYOSTEP AND DIP ATTACHMENT XRACK ATTACHMENT UPRIGHT XRACK ATTACHMENT UPRIGHT 1/2 x 1" WASHER (4) 1/2" LOCK NUT (2) 1/2 x 4-1/4" BOLT (2) XLAB PS XLAB DA XLAB ATTACHMENT ANCHOR NOTES: SECURELY tighten all bolt connections in this step and previous step.
- Page 52 OPTIONAL BAR STORAGE ATTACHMENTS XRACK ATTACHMENT UPRIGHT (2) XRACK ATTACHMENT UPRIGHT (2) 1/2 x 4-1/4" BOLT (8) 1/2 x 4-1/4" BOLT (8) 1/2 x 1" WASHER (16) 1/2 x 1" WASHER (16) 1/2" LOCK NUT (8) 1/2" LOCK NUT (8) XCREATE VBS5 XCREATE VBS10 NOTES:...
- Page 53 OPTIONAL BAR STORAGE ATTACHMENTS XRACK ATTACHMENT UPRIGHT (2) XRACK ATTACHMENT UPRIGHT (2) 1/2 x 4-1/2" BOLT (4) 1/2 x 4-1/2" BOLT (4) 1/2" LOCK NUT (20) 1/2 x 1-3/4" WASHER (8) 1/2" LOCK NUT (20) 1/2 x 1-3/4" WASHER (8) 1/2 x 4-1/4"...
- Page 54 OPTIONAL 4' CABLE STATIONS - 4SRM, 4LPDM, 4CCM 4' SEATED ROW MODULE 4' LAT PULL DOWN MODULE 4' CABLE COMPONENT MODULE 4' CABLE COMPONENT MODULE 4' LAT PULL DOWN MODULE 4' SEATED ROW MODULE NOTES: The XCREATE 4SRM, 4LPDM, and 4CCM can be assembled to the 8AU and 9AU.
- Page 55 OPTIONAL 4' CABLE STATIONS - 4SRM, 4LPDM, 4CCM NOTE: CROSS CAN NOT XRACK 9AU (2) BE INSTALLED ABOVE TOP BOOM SUPPORT Cross (Optional) TOP BOOM SUPPORT XRACK 8AU (2) TOP BOOM SUPPORT 1/2 x 1" WASHER (8) 1/2 x 1" WASHER (16) 1/2 x 4-1/4"...
- Page 56 GENERAL ATTACHMENT OPTIONS NOTE: There are many different lengths, widths, heights and options for X-RACKS. For the purposes of this assembly guide, the attachments are shown for the bolted connections. The following attachments apply to both the standard XRACK uprights and the Attachment Uprights unless specified.
-
Page 57: Flying Pullup
GENERAL ATTACHMENTS UBPA BALL TARGET ROCK CLIMBING KIT FLYING PULL UP ATTACHMENT UPPER BAND PEG ATTACHMENT UHBM XERT LBPA UNIVERSAL HEAVY BAG MOUNT RELENTLESS ROPE TRAINER LOWER BAND PEG ATTACHMENT BATTLE ROPE ANCHOR... - Page 58 GENERAL ATTACHMENTS HMGRT HORIZONTAL MOUNT GROUND ROTATIONAL TRAINER GROUND ROTATIONAL TRAINER DOUBLE PLAY TRIPLE PLAY...
- Page 59 OPTIONAL BALL TARGET NOTE: Discard these two BOLTS. BT-103 1/2" WASHER 1/2 X 6-1/4" BOLT NOTE: The BOLTS must be NOTE: assembled from this side. Loosen and remove BOLTS, WASHERS and NUTS. NOTE: 1/2" LOCK NUT New longer bolts NOTE: NOTE: Re-use WASHERS and SECURELY tighten all bolt connections in this step.
- Page 60 OPTIONAL FLYING PULL-UP NOTE: Re-use BOLTS, WASHERS and NUTS from previous step. REPEAT 2X XRACK-4FPU 1/2" LOCK NUT 1/2" WASHER NOTE: Loosen and remove BOLTS, WASHERS and NUTS NOTE: REPEAT 2X NOTE: Use additional BOLTS (2), WASHERS (4) and NUTS (2) LOOSELY tighten all bolt connections in this step.
- Page 61 OPTIONAL FLYING PULL-UP NOTE: The FLYING PULL-UP BARS are shown assembled 1/2" WASHER 1/2" LOCK NUT 1/2 X 3-1/4" BOLT XRACK-4FPU REPEAT 4X NOTE: SECURELY tighten all bolt connections in this step and previous step.
- Page 62 OPTIONAL UPPER BAND PEG ATTACHMENT 1/2" LOCK NUT 1/2" WASHER NOTE: 1/2 X 4-1/2" BOLT Loosen and remove BOLTS, WASHERS and NUTS REPEAT 2X NOTE: Re-use BOLTS,WASHERS NOTE: and NUTS from previous step XRACK-UBPA SECURELY tighten all bolt connections in this step. REPEAT 2X The 9U is shown, follow the same steps for assembling to the 8U, 8AU, and 9AU...
- Page 63 OPTIONAL ROCK CLIMBING KIT 1/2" LOCK NUT 1/2" WASHER XRACK-RCK NOTE: NOTE: Loosen and remove BOLTS, Re-use BOLTS, WASHERS WASHERS and NUTS and NUTS from previous step 1/2 X 4-1/2" BOLT NOTE: SECURELY tighten all bolt connections in this step.
- Page 64 OPTIONAL UNIVERSAL HEAVY BAG MOUNT - STRAIGHT 1/2" WASHER 1/2" LOCK NUT NOTE: Re-use BOLT, WASHERS and NUT from previous step NOTE: Loosen and removeBOLT, UHBM WASHERS and NUT. 1/2 X 4-1/2" BOLT NOTE: SECURELY tighten all bolt connections in this step. NOTE: Use additional BOLT (1), WASHERS (2) and NUT (1)
- Page 65 OPTIONAL UNIVERSAL HEAVY BAG MOUNT STRAIGHT UHBM...
- Page 66 OPTIONAL UNIVERSAL HEAVY BAG MOUNT - ANGLED 1/2" LOCK NUT NOTE: Re-use BOLT, WASHERS and NUT from previous step UHBM NOTE: Loosen and remove BOLT, 1/2" WASHER WASHERS and NUT 1/2 X 4-1/2" BOLT NOTE: Use additional BOLT (1), WASHERS (2) and NUT (1) NOTE: SECURELY tighten all bolt connections in this step.
- Page 67 OPTIONAL UNIVERSAL HEAVY BAG MOUNT ANGLED UHBM...
- Page 68 OPTIONAL RELENTLESS ROPE TRAINER - CROSS MOUNT XERT 1/2" LOCK NUT 1/2" WASHER NOTE: Use the two center slots 1/2 X 4-1/2" BOLT NOTE: Loosen and remove BOLTS, WASHERS and NUTS. XRACK-6MBX NOTE: NOTE: Re-use BOLT, WASHERS and NUT from previous step. SECURELY tighten all bolt connections in this step.
- Page 69 OPTIONAL RELENTLESS ROPE TRAINER - OVER TUBE MOUNT NOTE: Tube is in between top and bottom bolts NOTE: Use 2nd and 4th holes for assembly XERT MOUNTING PLATE (INCLUDED WITH XERT) 1/2" FLANGE NUT XERT END VIEW 1/2 X 4-1/4" BOLT 1/2"...
- Page 70 OPTIONAL RELENTLESS ROPE TRAINER - UPRIGHT MOUNT 1/2" LOCK NUT NOTE: NOTE: Re-use BOLT, WASHERS Loosen and remove BOLT, and NUT from previous step. WASHERS and NUT. NOTE: Use additional BOLT (1), WASHERS (2) and NUT (1) XERT MOUNTING PLATE 1/2 4-1/2"...
- Page 71 OPTIONAL RELENTLESS ROPE TRAINER - UPRIGHT MOUNT XERT MOUNTING BPLATE XERT 1/2" FLANGE NUT 1/2" WASHER 1/2 X 1-1/4" BOLT NOTE: SECURELY tighten all bolt connections in this step.
- Page 72 OPTIONAL XCC ATTACHMENT - BASE TO ATTACHMENT UPRIGHTS XRACK ATTACHMENT UPRIGHT 1/2 x 4-1/2" BOLT (2) XCC-103 BASE NOTE: LEVEL BASE BEFORE TIGHTENING 4.25" 1/2" LOCK NUT 1/2 x 1-3/4" WASHER (8) NOTES: For further instruction refer to the XCC-103 manual. The remaining steps are assembled the exact same way.
- Page 73 OPTIONAL LOWER BAND PEG ATTACHMENT (XRACK UPRIGHT) XRACK-LBPA 1/2" LOCK NUT 1/2 X 4-1/2" BOLT 1/2" WASHER NOTE: SECURELY tighten all bolt connections in this step.
- Page 74 OPTIONAL LOWER BAND PEG ATTACHMENT (ATTACHMENT UPRIGHT) XRACK ATTACHMENT UPRIGHT LOWER BAND PEG ATTACHMENT 1/2" LOCK NUT (4) 1/2 x 4-1/2" BOLT (4) Position Lower Band Peg attachment until 1/2 x 1-3/4" WASHER (8) the base is firmly touching the floor before tightening.
- Page 75 OPTIONAL GROUND ROTATIONAL TRAINER - HORIZONTAL MOUNT 1/2 X 4-1/4" BOLT XHMGRT XRACK-LBPA 1/2" WASHER 1/2" LOCK NUT NOTE: SECURELY tighten all bolt connections in this step.
- Page 76 OPTIONAL GROUND ROTATIONAL TRAINER - VERTICAL MOUNT 1/2 X 4-1/4" BOLT 1/2" WASHER 1/2" LOCK NUT NOTE: The GRT can be assembled to the attachment uprights the exact same way. Center and level attachement before tightening. SECURELY tighten all bolt connections in this step.
- Page 77 OPTIONAL BATTLE ROPE ANCHOR - VERTICAL MOUNT 1/2 X 4-1/4" BOLT 1/2" WASHER 1/2" LOCK NUT NOTE: The BRA can be assembled to the attachment uprights the exact same way. Center and level attachment before tightening. SECURELY tighten all bolt connections in this step.
- Page 78 OPTIONAL BATTLE ROPE ANCHOR - HORIZONTAL MOUNT 1/2 X 4-1/4"BOLT XRACK LBPA 1/2" WASHER NOTE: 1/2" LOCK NUT SECURELY tighten all bolt connections in this step.
- Page 79 OPTIONAL DOUBLE PLAY WHEN LOWER BAND PEG ATTACHMENT IS ASSEMBLED DP ADAPTER 1/2" LOCK NUT 1/2" WASHER 1/2 X 4-1/4" BOLT XRACK-LBPA NOTE: SECURELY tighten all bolt connections in this step.
-
Page 80: Double Play
OPTIONAL DOUBLE PLAY 1/2" LOCK NUT 1/2" WASHER 1/2 X 4-1/4" BOLT NOTE: The DOUBLE PLAY can be assembled to the attachment uprights the exact same way, Center and level attachment before tightening. SECURELY tighten all bolt connections in this step. -
Page 81: Triple Play
OPTIONAL TRIPLE PLAY TP-101 1/2 X 4-1/4" BOLT 1/2" LOCK NUT 1/2" WASHER NOTE: The TRIPLE PLAY can be assembled to the attachment uprights the exact same way. Center and level attachment before tightening. SECURELY tighten all bolt connections in this step. - Page 82 OPTIONAL MAGNETIC SUSPENSION STORAGE NOTE: Suspension storage clip can be positioned to desired height. The 9U is shown, follow the same steps for assembling to the 8U, 8AU, and 9AU...
-
Page 83: Bar Supports
STEP 12 (BAR SUPPORTS) NOTE: WARNING LABEL Insert BAR SUPPORTS into desired slots on UPRIGHTS. Push down to lock in place XRG2 BS-101 XRG2-U9 To remove BAR SUPPORTS from UPRIGHTS, pull SPRING PIN out to unlock. Lift up and pull out NOTE: The 9U is shown, follow the same steps for assembling to the 8U. -
Page 84: Bar Catches
STEP 13 (OPTIONAL BAR CATCHES) Insert BAR CATCHES into desired slots on UPRIGHTS. Push down to lock in place NOTE: WARNING LABEL XRG2-U9 To remove BAR CATCHES from UPRIGHTS, pull SPRING PIN out to unlock. Lift up and pull out XRG2-BC-101 NOTE: The 9U is shown, follow the same steps for assembling to the 8U. - Page 85 STEP 14 (OPTIONAL DIP ATTACHMENTS) Insert DIP ATTACHMENTS into desired slots on UPRIGHTS. Push down to lock in place XRACK-9U To remove DIP ATTACHMENTS NOTE: WARNING from UPRIGHTS, pull SPRING PIN out to unlock. Lift up and LABEL XDSA pull out NOTE: The 9U is shown, follow the same steps for assembling to the 8U.
- Page 86 STEP 15 (OPTIONAL BAR CATCH STRAPS) Insert BAR CATCHES into desired slots on UPRIGHTS. Push down to lock in place XRACK-9U NOTE: WARNING LABEL XRACK-4BCS To remove BAR CATCHES from UPRIGHTS, pull SPRING PIN out to unlock. Lift up and pull out NOTE: The 9U is shown, follow the same steps for assembling to the 8U.
- Page 87 Tighten spring pin nuts as needed. • FRAME: Wipe down frame with a damp cloth. WARNING LABEL SPRING WARNING LABEL Torque Fitness 11201 Xeon Street NW Ste 101 Coon Rapids, MN USA 55448 www.torquefitness.com 763-754-7533 (8:30 am – 5:00 CST). For sales: sales@torquefitness.com For service: service@torquefitness.com...
Need help?
Do you have a question about the XRACK 5832101-A and is the answer not in the manual?
Questions and answers