Advertisement
Quick Links
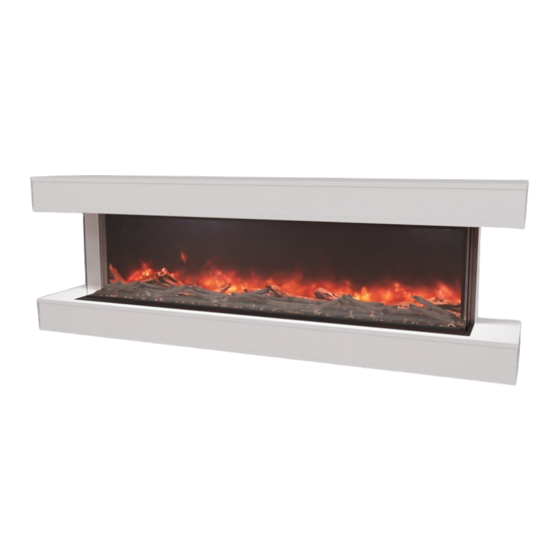
WALL MOUNTED STUDIO SUITE DISPLAY FOR
WALL MOUNTED STUDIO SUITE DISPLAY FOR
THE LANDSCAPE PRO MULTI FIREPLACE
THE LANDSCAPE PRO MULTI FIREPLACE
customerservice@modernflames.com
Owner/Installation Guide
Covers Part Numbers:
WMC-xxLPM-xxx
44-56-68-80-96 CS-DW-RTF-WW
HOW TO INSTALL VIDEO
07-00038
modernflames.com
Advertisement

Related Manuals for Modern Flames WMC LPM Series


Summary of Contents for Modern Flames WMC LPM Series
- Page 1 WALL MOUNTED STUDIO SUITE DISPLAY FOR WALL MOUNTED STUDIO SUITE DISPLAY FOR THE LANDSCAPE PRO MULTI FIREPLACE THE LANDSCAPE PRO MULTI FIREPLACE Owner/Installation Guide Covers Part Numbers: WMC-xxLPM-xxx 44-56-68-80-96 CS-DW-RTF-WW HOW TO INSTALL VIDEO 07-00038 customerservice@modernflames.com modernflames.com...
- Page 2 Assembly, Parts & Hardware List What's in the Box Instruction guide o Power Cord o Cabinet mount brackets P/N: 02-00595 o Top/Bottom LPM cabinet suite o Matching side pieces o WMC spacers (Not applicable to all fireplaces). o Size-specific wall mount bracket o Hardware kit: Image is example only.
- Page 3 Assembly, Parts & Hardware List Verify you have the correct suite for your fireplace by checking the part number. WMC-xxLPM-xxx Finish of the Suite Size of the fireplace CS-DW-RTF-WW 44-56-68-80-96 EXAMPLE OF FINISH (RTF is a ready-to-paint white primer finish, not shown.) customerservice@modernflames.com modernflames.com...
-
Page 4: Installation And Assembly
Unpack and separate the contents of the Wall mounted Studio Suites for the Landscape Pro Multi. Reference page 2 to verify contents. If any contents missing contact Modern Flames customer service at 1-877-246-9353 or via email at customerservice@modernflames.com. - Page 5 Installation and Assembly Locate the studs on the wall to install size-specific wall mount bracket. You must be able to secure a minimum of 2 studs for proper installation and as close to the end of the bracket as possible. The hollow wall anchors provided are only for additional support between studs. Measure where you would like the top of the fireplace to be by installing bracket on fireplace and referencing where the bracket sits from the top of the fireplace.
- Page 6 Installation and Assembly Secure your bracket and align it with marks so that you can mount the bracket. It is recom- mended to pre-drill holes before installation. When using hollow wall anchors, the anchors need to be installed before installing the wall mounting bracket. Note: Anchors should be installed with a Phillips tip screwdriver and not with a drill.
- Page 7 Installation and Assembly Run a hardwire line or locate an outlet 2.25" to the right side of the bracket. The space where the outlet can be installed measures: 4” W x 4.5” H. Outlet position can be horizontal or vertical. Outlet Depending on your fireplace you may need to install spacers (x2) 1 per each side of the fireplace as shown in the image.
- Page 8 Installation and Assembly Screws If using the power cord, attach the power cord to the fireplace going through the side access. Connect the power cord hot connection (black wire) to L1 on the fireplace terminal block, the power cord neutral connection (white wire) to N on the terminal block, and the ground wire (green wire) to the ground on the terminal block.
- Page 9 Installation and Assembly TURN OFF POWER FROM CIRCUIT BREAKER FIRST TURN OFF POWER FROM CIRCUIT BREAKER FIRST Terminal Block Neutral Ground Line/Hot "Example shown from rear of fireplace" customerservice@modernflames.com modernflames.com...
- Page 10 Installation and Assembly Lift the fireplace onto the wall mount bracket, ensuring both hooks on the bracket secure into the fireplace. Slots in fireplace for bracket hooks. customerservice@modernflames.com modernflames.com...
- Page 11 Installation and Assembly Wall bracket While pushing the fireplace towards the bracket and with the #8x3/4" self-drilling screws (x4), secure the fireplace to the bracket. Self-drilling screws customerservice@modernflames.com modernflames.com...
- Page 12 Installation and Assembly Power cord can now be connected to the outlet. Secure excess cable. Power cord Install cabinet mount brackets to all four corners. See the below examples. On some versions of the LPM fireplace, a self-tapping screw for the front hole will be needed. Front hole customerservice@modernflames.com modernflames.com...
- Page 13 Installation and Assembly Binding may occur if there is not a 3/4" gap between bracket and drywall stop and if top or bottom is not inserted leveled and evenly on both sides. Corner (1) Fireplace media and glass can now be installed. Reference the fireplace manual for details. Front glass Side glass (1) customerservice@modernflames.com...
- Page 14 Installation and Assembly Installation and Assembly Evenly slide the bottom suite onto the fireplace by sliding it between cabinet mount brackets and drywall stops. If binding occurs ensure it is being inserted evenly and level. customerservice@modernflames.com modernflames.com...
-
Page 15: Fireplace Installation
Fireplace Installation Evenly slide the top suite onto the fireplace by sliding it between cabinet mount brackets and drywall stops. Tuck any excess power cord wire in the cabinet cavity to ensure the top is fully inserted. If binding occurs ensure it is being inserted and leveled. customerservice@modernflames.com modernflames.com... - Page 16 Fireplace Installation customerservice@modernflames.com modernflames.com...
- Page 17 Fireplace Installation Starting at drywall stop, slide the side piece in, then push the remaining into place. Repeat the same step on the other side of the fireplace. Note these are friction fit, if there is not enough friction, a construction adhesive or double sided tape may be used to secure it to the fireplace.
- Page 18 Fireplace Installation customerservice@modernflames.com modernflames.com...
- Page 19 DO NOT RETURN TO STORE! CALL US FIRST For immediate help with installation, product information or if your product arrives damaged, please call our toll free number at: 1-877-246-9353 (Monday - Friday, 8:00AM - 5:00PM, AZ Mountain Time) Or email us at: customerservice@modernflames.com OUR STAFF IS READY TO PROVIDE ASSISTANCE customerservice@modernflames.com...
- Page 20 Thank you for choosing Modern Flames, we appreciate all our customers and hope you have many years of enjoyment of our products. Take a look at our other products from our RPG Brands family of companies GrandCanyonGasLogs.com For all your indoor, outdoor gas fireplaces & fire feature products.
Need help?
Do you have a question about the WMC LPM Series and is the answer not in the manual?
Questions and answers