Advertisement
Quick Links
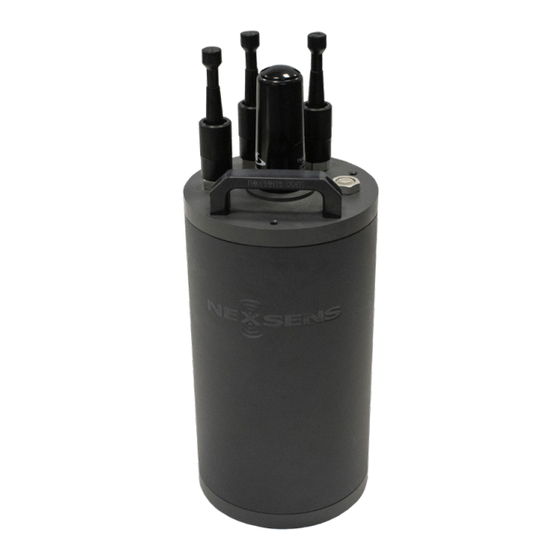
X2-SDLMC CELLULAR DATA LOGGER
QUICK START GUIDE
IMPORTANT - BEFORE FIELD DEPLOYMENT: Completely configure new X2 systems with sensors and a web connec-
tion in a nearby work area. Operate the system for several hours and ensure correct sensor readings. Use this test run
to become familiar with the features and functions.
Figure 1: X2-SDLMC Submersible Data Logger.
Overview
The X2-SDLMC with cellular telemetry includes an
integrated modem. Two sensor ports provide industry
standard protocols including SDI-12, RS-232, and RS-485.
The SOLAR/HOST MCIL-6-FS port offers direct commu-
nication (serial to PC) and power input. All connections
are made using MCIL/MCBH wet-mate connectors. The
X2-SDLMC is powered from an internal solar recharge-
able battery reserve. Smartphones and tablets connect
by WiFi.
Data is accessed and stored on the WQData LIVE web
datacenter. An easy-to-use dashboard and built-in sensor
library automatically facilitate setup and configuration.
What's Included?
(1) X2-SDLMC data logger
(1) Pre-installed antenna
(2) Sensor port plugs
(1) Power port plug
(3) 11" cable ties
(1) Quick start guide
To get started:
1
a.
Go to
WQDataLIVE.com
b.
Create a new account or sign into an existing
account.
c.
Choose or create the project that will contain
the data logger by selecting the Projects link
from the bottom right footer of the page.
d.
Go to the ADMIN tab located at the top of the
project dashboard and click Settings.
From there, choose the Project/Site pull down
2
menu and select the site for the new data logger.
a.
If a site has not been created, select New Site.
Create and save the site before entering the
claim code.
Enter the claim code listed below into the space
3
provided under Assigned Devices.
Click Add Device.
4
a.
The new device should be visible in the
Assigned Devices list.
If cellular service is not purchased through
5
NexSens, visit the article link below for steps on
how to setup the cell modem.
a.
nexsens.com/x2apn
Use the CONNECT software to ensure the proper
6
scripts are enabled for each sensor.
a.
nexsens.com/conncss
Remove the top white plate from the buoy and
7
one blank sensor plug from an MCIL-8-pin port
(i.e., Sensor 1 or Sensor 2) for each available sensor.
Note: Before installing, ensure that all SDI-12 and
RS-485 sensors have unique addresses.
Advertisement

Related Manuals for NexSens X2-SDLMC


Summary of Contents for NexSens X2-SDLMC
- Page 1 (serial to PC) and power input. All connections are made using MCIL/MCBH wet-mate connectors. The Click Add Device. X2-SDLMC is powered from an internal solar recharge- The new device should be visible in the able battery reserve. Smartphones and tablets connect Assigned Devices list.
- Page 2 Successfully WQData LIVE setup is automatically done after sensor detection. Figure 3: Sensor routing through pass-through tube. For additional information, please reference the X2-SDLMC Resource Library on the NexSens Knowledge Base. nexsens.com/x2sdlmckb 937-426-2703 2091 Exchange Court Fairborn, Ohio 45324...
Need help?
Do you have a question about the X2-SDLMC and is the answer not in the manual?
Questions and answers