Advertisement
WHAT'S IN THE BOX

SPECIFICATIONS
| Motor: | 850W |
| Impact Rate: | 3,000 bpm |
| Impact Energy: | 3.8 Joule |
| Accessory Fitment: | SDS+ |
| Drilling Capacities: | Timber 40mm Steel 13mm Masonry |
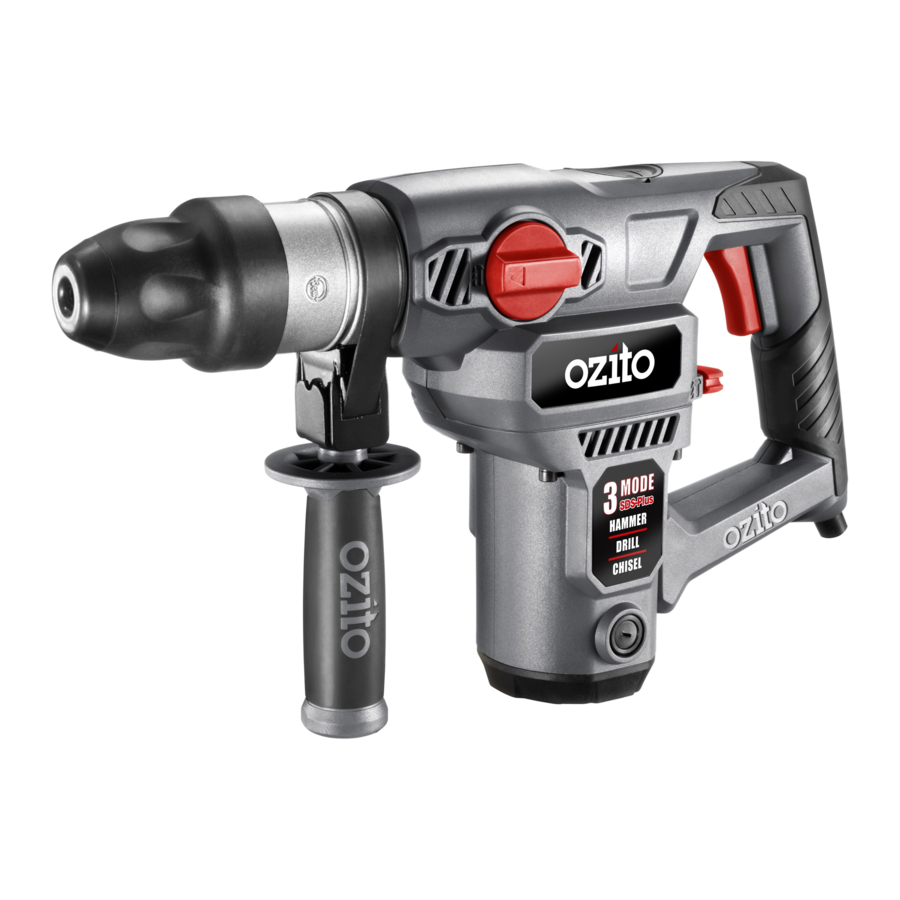
KNOW YOUR PRODUCT
DEVICE

- SDS + Accessory Holder
- Accessory Locking Sleeve
- Magnesium Gear Case
- Depth Rod Locking Hole
- Side Handle
- Side Mode Selector
- Grease Cap
- Rear Mode Selector
- On/Off Switch
- Soft Grip Rear Handle
ACCESSORIES

- Depth Rod
- 3 x SDS+ 150mm Drill Bits
- 1 x SDS+ Flat Chisel
14 x 250mm - 1 x SDS+ Point Chisel
14 x 250mm - Dust Cover
- Tub of Grease
- Pin Spanner
SETUP & PREPARATION
USING THE DEPTH ROD
Ensure the tool is disconnected from the power supply before performing any of the following operations.
The depth rod allows you to drill to a predetermined depth.
- Loosen the side handle by turning as shown.

- Adjust the depth rod so the drill bit extends beyond the end of the depth rod to the required drilling depth.

- To secure the depth rod in position, tighten the side handle by turning as shown.

- Drill the hole until the end of the depth rod touches the workpiece.


SDS+ ACCESSORIES

- Prior to insertion into chuck, ensure the SDS accessory is clear of dust and debris
![]()
- Prior to insertion into drill add supplied lubricant to the SDS+ accessory.
![]()
- Pull locking sleeve back and hold.

- Insert SDS+ Accessory.

- Rotate and continue to insert as far as possible.

- Release locking sleeve.

- Checked SDS+ accessory is locked. Try to pull it out.
Note: It should have approx 10 – 20mm movement. This is normal.

- To remove the SDS+ accessory pull back the locking sleeve and pull accessory out.


FITTING AND USING THE DUST COVER
The cover catches dust and debris - while using the drill upright or overhead - to avoid dust entering the air vents.
- Slide dust cover over accessory.

- Add lubrication grease.

- Insert drill bit in locking sleeve.

- Press dust cover to the end of locking sleeve.


OPERATION
- Choose an operation mode:


Hammer Drill
Rotate the side mode selector to the hammer and drill icon, and rotate the rear mode selector to the drill and hammer icon.
This setting is recommended for use when drilling holes in concrete and other masonry products. The hammer action will be in operation while simultaneously the drill bit rotates.

Chiselling
Rotate the side mode selector to the hammer icon, and rotate the rear mode selector to the drill and hammer icon. This setting is recommended for use when you desire a hammer action without the accessory rotating which is ideal for "chiseling or chipping" away at masonry products, pick or chisel accessory bits should be used.

Drilling
Rotate the side mode selector to the hammer and drill icon, and rotate the rear mode selector to the drill icon. This setting is recommended for use when you desire the accessory to rotate without hammer action. Ideal for drilling into timber or steel when correct accessories for such materials are used.

- Ensure your workpiece is securely clamped where possible.
- Connect the tool to the mains power supply.
- To start drilling squeeze the On/Off switch.

- To stop drilling release the On/Off switch.


NOTE: PRIOR TO CHANGING MODES, THE ON/ OFF SWITCH SHOULD BE RELEASED AND THE DRILL SHOULD HAVE COME TO A COMPLETE STOP.
MAINTENANCE
- Keep the ventilation vents of the drill clean at all times.
- After each use, blow air through the drill housing to ensure it is free from all dust particles which may build up. Build up of dust particles may cause the drill to overheat and fail.
- If the enclosure of the drill requires cleaning, do not use solvents but a moist soft cloth only. Never let any liquid get inside the drill; never immerse any part of the drill into a liquid.
Gear Box Grease Replenishment
The grease in the gearbox will require replenishment after approximately 50 hours accumulative use. After this time, add approximately 50 grams (approx 2 – 3 teaspoons) of the grease (supplied), into the gearbox. First remove the grease cap from the drill by using the pin spanner. Once removed, add the grease through this hole. Ensure the grease cap is secured back into position prior to operation. Further grease (normal ball bearing grease) can be purchased through your local Bunnings Warehouse.
Carbon Brushes
When the carbon brushes wear out, the drill will spark and/or stop. Discontinue use as soon as this happens. They should be replaced prior to recommencing use of the drill. Carbon brushes are a wearing component of the drill therefore not covered under warranty. Continuing to use the drill when carbon brushes need to be replaced may cause permanent damage to the drill. Carbon brushes will wear out after many uses but when the carbon brushes need to be replaced, take the drill to an electrician or a power tool repairer for a quick and low cost replacement. Always replace both carbon brushes at the same time.

Note: Ozito Industries will not be responsible for any damage or injuries caused by the repair of the drill by an unauthorised person or by mishandling of the drill.
DESCRIPTION OF SYMBOLS
| V | Volts | Hz | Hertz |
| ~ | Alternating current | W | Watts |
| /min | Revolutions or reciprocation per minute | no | No load speed |
| /bpm | Impact rate | ø | Diameter |
 | Double insulated |  | Regulator compliance mark |
 | Warning |
CARING FOR THE ENVIRONMENT

Power tools that are no longer usable should not be disposed of with household waste but in an environmentally friendly way. Please recycle where facilities exist. Check with your local council authority for recycling advice.

Recycling packaging reduces the need for landfill and raw materials. Reuse of recycled material decreases pollution in the environment. Please recycle packaging where facilities exist. Check with your local council authority for recycling advice.
TROUBLE SHOOTING
| Problem | Cause | Remedy |
Rotary Hammer Drill is not working | No power supplied | make sure all plugs are connected and power outlet is in working order |
| Mode Selectors in wrong position. Chisel Function will not engage is mode selectors are as shown below  | Please refer to 'Operating The Hammer Drill' section in the manual. | |
Hammer Function Not Engaging | Excess grease has been packed | Insert SDS+ accessory and then set both the modes to hammer function. Turn the drill on, firmly tap the accessory bit up and down onto a scrap piece of material to activate. |
| Motor brushes binding in brush holders. | Clean brush holders. Remove carbon dust by using compressed air to blow out brush dust | |
Excessive sparking visible through air vents | carbon brushes have worn out | replace carbon brushes as per maintenence section. |
SPARE PARTS
| Brush Holder (pair) | SPRHD4100-81 |
| Carbon Brush (pair) | SPRHD4100-82 |
| Brush Cap | SPRHD4100-83 |
| Switch | SPRHD4100-75 |
Spare parts can be ordered from the Special Orders Desk at your local Bunnings Warehouse.
For further information, or any parts not listed here, visit
www.ozito.com.au or contact Ozito Customer Service:
Australia 1800 069 486
New Zealand 0508 069 486
E-mail: enquires@ozito.com.au

Documents / Resources
References
Download manual
Here you can download full pdf version of manual, it may contain additional safety instructions, warranty information, FCC rules, etc.
Advertisement


Need help?
Do you have a question about the RHD-4100 and is the answer not in the manual?
Questions and answers