Table of Contents
Advertisement
Lithium Ion
Cordless Drill
12 Volt
Instruction Manual
3 Year Replacement Warranty
LIR-012
WARNING: Read all safety warnings and all instructions. Failure to follow the
! !
warnings and instructions may result in electric shock, fire and /or serious injury.
Save all warnings and instructions for future reference.
To view the full range visit:
www.ozito.com.au
0111
Advertisement
Table of Contents

Related Manuals for Ozito LIR-012


Summary of Contents for Ozito LIR-012
-
Page 1: Lithium Ion
12 Volt Instruction Manual 3 Year Replacement Warranty LIR-012 WARNING: Read all safety warnings and all instructions. Failure to follow the warnings and instructions may result in electric shock, fire and /or serious injury. Save all warnings and instructions for future reference. -
Page 2: Specifications
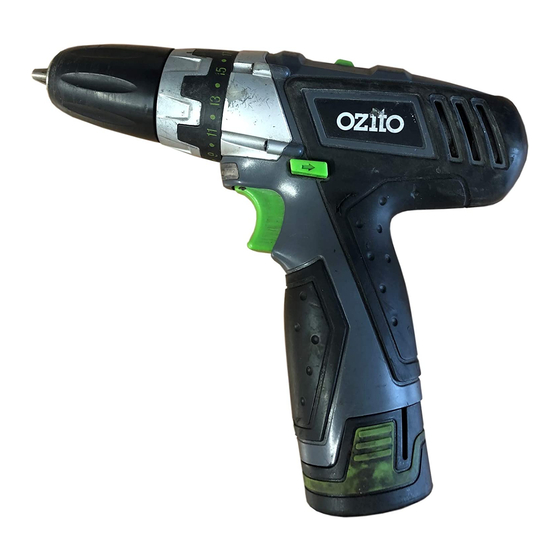
SPECIFICATIONS – MODEL NO. LIR-012 Motor: Charge time: 3 – 5 hours No load speed: 0 – 350/min, 0 – 1150/min Chuck: 10mm Keyless Torque: 15Nm Batteries: 2 x 1.3Ah Lithium Ion Weight with 1 battery: 1.05kg KNOW YOUR PRODUCT 1. -
Page 3: Table Of Contents
TABLE OF CONTENTS SPECIFICATIONS ……………………………………….. Page 1 INTRODUCTION………………………………………… Page 3 ELECTRICAL SAFETY…………………………………… Page 3 GENERAL POWER TOOL SAFETY WARNINGS….…. Page 4 BATTERY & CHARGER SAFETY FEATURE…………… Page 6 CHARGING THE BATTERY…………………………….. Page 7 INSTALLING OR REMOVING THE BATTERY...……… Page 8 DRILL OPERATION………………………………………... -
Page 4: Introduction
Drill. We aim to provide quality tools at an affordable price. We hope you will enjoy using this tool for many years. Your Lithium Ion Cordless Drill LIR-012 has been designed for general purpose drilling or screwdriving around the home and is intended for DIY use only. -
Page 5: General Power Tool Safety Warnings
ELECTRICAL SAFETY (cont.) • Never attempt to connect 2 chargers together. • DO NOT store or use the tool and battery pack in locations where the temperature may reach or exceed 40ºC (such as outside sheds or metal buildings in summer). •... - Page 6 General Power Tool Safety Warnings - Personal Safety e) When operating a power tool outdoors, use an extension cord suitable for outdoor use. Use of a cord suitable for outdoor use reduces the risk of electric shock. 3) Personal safety a) Stay alert, watch what you are doing and use common sense when operating a power tool.
-
Page 7: Battery & Charger Safety Feature
General Power Tool Safety Warnings - Personal Safety Keep cutting tools sharp and clean. Properly maintained cutting tools with sharp cutting edges are less likely to bind and are easier to control. g) Use the power tool, accessories and tool bits etc. in accordance with these instructions and in the manner intended for the particular type of power tool, taking into account the working conditions and the work to be performed. -
Page 8: Charging The Battery
CHARGING YOUR LITHIUM ION BATTERY The drill has been shipped in a low charge condition, and Fig. 1 requires charging prior to use. • Insert the charging adaptor (9) into the charging cradle (10) (see Fig. 1). Plug the charger adaptor (9) into a 240V power outlet. -
Page 9: Installing Or Removing The Battery
INSTALLING OR REMOVING THE BATTERY Always switch off the drill before insertion or removal of the battery (5). Installing the Battery • Holding the drill upright and picking up the battery (5) in your Fig. 2 opposite hand. Place two fingers over the battery release buttons (6) and insert the battery (5) until it clicks into place (See Fig. -
Page 10: Drill Operation
DRILL OPERATION Variable Speed Switch Fig. 3 Turn the drill ON by depressing the variable speed switch (7) . To turn the drill OFF release the variable speed switch (7) (See Fig. 3). Variable speed The speed can be varied from 0 to maximum in either switch gear, depending on the pressure applied to the variable speed switch (8). - Page 11 DRILL OPERATION (cont.) To Adjust Torque • Locate the arrow on the front of the drill housing (see Fig. 6). Fig. 6 • Identify the torque settings and 1 drill setting on the torque adjustment collar (2). • Rotate the torque adjustment collar (2) to the desired setting, aligning the required number on the torque adjustment collar (2) with the arrow on the drill housing.
- Page 12 DRILL OPERATION (cont.) Removing Drill/Driver Bits • Remove the battery (5) from the drill. • Loosen the keyless chuck (1) as described previously. • Remove the drill or driver bit from the keyless chuck (1). Note: Do not handle drill bits without gloves as drill bits and other accessories are sharp or can be hot after use, this can cause personal injury.
-
Page 13: Maintenance
• Blow out the ventilation slots with compressed air periodically . Note: Ozito Industries will not be responsible for any damage or injuries caused by repair of the drill by an unauthorised person or by mishandling of the drill. SPARE PARTS Limited spare parts are available subject to availability. -
Page 14: Description Of Symbols
DESCRIPTION OF SYMBOLS Volts Hertz Alternating current Watts ø Direct current Diameter Milliamperes No load speed Revolutions or Electrical Emissions reciprocation per minute Conformity (EMC) Read instruction manual Warning Indoor use only Double insulated Isolation transformer Polarity Thermal cut-out Transformer Energy protection at 130ºC Rating (MEPS) Do not use or store battery in... -
Page 15: Contents
6 x Driver bits 1 x AC Charging adaptor 2 x Batteries 1 x Instruction manual OZITO INDUSTRIES PTY LTD AUSTRALIA (Head Office) 1 - 23 Letcon Drive, Bangholme, Victoria, Australia 3175 Telephone: 1800 069 486 Facsimile: +61 3 9238 5588 Website: www.ozito.com.au... -
Page 16: Warranty
DATE PURCHASED: ________________________________________________ 3 YEAR REPLACEMENT WARRANTY Your Ozito tool is guaranteed for a period of 36 months from the original date of purchase and is intended for DIY (Do it yourself) use only. The Lithium Ion battery is covered by a 12 month warranty.
Need help?
Do you have a question about the LIR-012 and is the answer not in the manual?
Questions and answers