Table of Contents
Advertisement
Quick Links
Advertisement
Table of Contents

Subscribe to Our Youtube Channel
Related Manuals for Grunbeck desaliQ


Summary of Contents for Grunbeck desaliQ
- Page 1 We understand water. Accessories | desaliQ inline filter module Operation manual...
- Page 2 General Contact Germany Phone +49 9074 41-0 Fax +49 9074 41-120 Availability Monday to Thursday 7:00 am - 6:00 pm Friday 7:00 am - 12:00 We reserve the right to technical modifications. © by Grünbeck Wasseraufbereitung GmbH Original operation manual Edition: December 2021 Order no.: 100101180000_en_015...
-
Page 3: Table Of Contents
Table of contents Table of contents Replacing filter elements and resin Table of contents ........... 3 bag ............21 Introduction .......... 4 Maintenance and repair ..... 25 Validity of the manual ......4 Other applicable documents ....4 Cleaning ..........25 Target group ......... -
Page 4: Introduction
This manual applies to the products below: ● desaliQ inline filter module 1.2 Other applicable documents ● Operation manual of mixed bed cartridge desaliQ:MB9 ● Operation manual of desaliQ inline control module ● Quick reference manual of desaliQ inline filter module 4 | 40... -
Page 5: Target Group
Introduction 1.3 Target group Grünbeck's technical service or qualified specialists trained by Grünbeck. Expertise in the application of the product is assumed. 1.3.1 Personal protective equipment ► As an owner/operating company, make sure that the re- quired personal protective equipment is available. The components below fall under the heading of personal protec- tive equipment (PPE): Protective gloves for... -
Page 6: Symbols Used
Introduction 1.4 Symbols used Symbol Meaning Danger and risk Important information or requirement Useful information or tip Written documentation required Reference to further documents Work that must be carried out by qualified specialists only 1.5 Depiction of warnings This manual contains information and instructions that you must obey for your personal safety. - Page 7 Introduction The following signal words are defined subject to the degree of danger and might be used in the present document: Warning symbol Consequences if the and signal word information/instructions are ignored DANGER Death or serious injuries Possible death or serious WARNING injuries Possible moderate or minor...
-
Page 8: Safety
Safety Safety 2.1 Safety measures ● Only use genuine spare parts for maintenance or repair. ● Risk of burns and scalding due to hot surfaces on lines and components as well as due to escaping heating water. Let the product cool down to at least 30 °C first before carrying out any repair and maintenance work. -
Page 9: Product-Specific Safety Instructions
Safety 2.1.2 Groups of persons requiring protection ● Children must not play with the product. ● This product is not designed to be used by persons (includ- ing children) with reduced capabilities, lack of experience or lack of knowledge. ● Persons with metallic implants or pacemakers must only use the product while wearing protective clothing against electromagnetic fields 2.2 Product-specific safety instructions... -
Page 10: Product Description
● The desaliQ inline filter module is used in combination with a mixed bed cartridge desaliQ:MB9. ● The desaliQ inline filter module can also be used in combi- nation with a desaliQ resin bag. 3.1.1 Foreseeable misuse ●... -
Page 11: Product Components
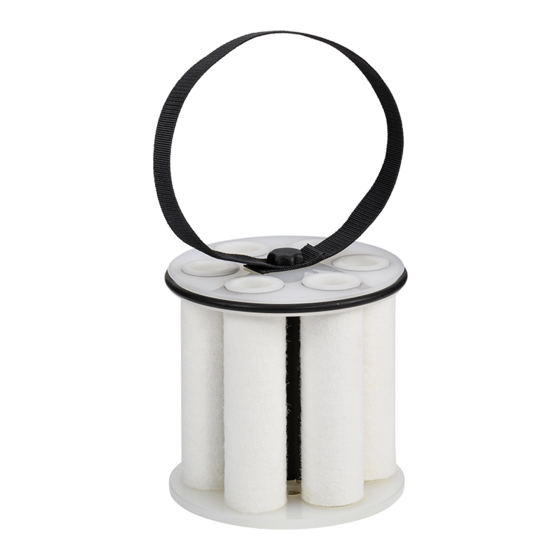
Product description 3.2 Product components Item Designation Item Designation Strap Star knob Upper part O-ring Support mesh Filter elements Magnetic rod Lower part 11 | 40... -
Page 12: Functional Description
The water pre-cleaned in this way flows through the 6 filter ele- ments. By using the strap, the desaliQ filter module can be easily re- moved from the mixed bed cartridge desaliQ:MB9. 12 | 40... -
Page 13: Transport And Storage
Transport and storage Transport and storage 4.1 Transport ► Transport the product in its original packaging only. 4.2 Storage ► Protect the product from the impacts below when stor- ing it: • Dampness, moisture • Environmental impacts such as wind, rain, snow, etc. •... -
Page 14: Installation
Installation Installation The work below must be carried out by qualified specialists only. Item Designation Item Designation desaliQ inline control module Outlet from desaliQ:MB9 (filtered heating water) Mixed bed cartridge desaliQ resin bag desaliQ:MB9 Inlet to desaliQ:MB9 Connection from heating... -
Page 15: Checking The Scope Of Supply
Installation 5.1 Checking the scope of supply Item Designation Item Designation desaliQ inline filter module Operation manual Quick reference manual ► Check the scope of supply for completeness and damage. 15 | 40... -
Page 16: Installing The Product
● Risk of damage to the heating system or consumers con- nected to it. ► Replace the filter elements before each use. ► Thoroughly clean the magnetic rod after each use. Installation example Item Designation Item Designation Mixed bed cartridge desaliQ resin bag desaliQ:MB9 16 | 40... - Page 17 Installation Opening the mixed bed cartridge desaliQ:MB9 1. Unlock and open the mixed bed cartridge. Inserting the desaliQ inline filter module and the desaliQ resin bag 1. Insert the filter module. 2. Insert the (optional) resin bar. 17 | 40...
- Page 18 Installation Closing the mixed bed cartridge desaliQ:MB9 1. Close and lock the mixed bed cartridge. » The mixed bed cartridge is filled with the desaliQ inline filter module and the (optional) desaliQ resin bag 18 | 40...
-
Page 19: Start-Up/Commissioning
Start-up/Commissioning Start-up/Commissioning 6.1 Starting up the product Obey the operation manual of the desaliQ inline control module. ► Connect the desaliQ inline control module to the heating circuit. Item Designation Item Designation Hose connection: Hose connection: Outlet from desaliQ:MB9 Inlet to desaliQ:MB9... -
Page 20: Operation
The duration of the filter operation depends on the degree of im- purities, the volume and the hydraulic conditions in the heating circuit. The desaliQ inline control module controls the operation and indi- cates when interventions are required. ► Obey the instructions in the display of the desaliQ inline control module. -
Page 21: Replacing Filter Elements And Resin Bag
7.1 Replacing filter elements and resin bag 7.1.1 Preliminary work First, the heating water in the desaliQ inline filter module must cool down to room temperature (≤ 30 °C). 1. Close the shut-off valves to the mixed bed cartridge on the desaliQ inline control module. - Page 22 Operation 7.1.2 Replacing the filter elements CAUTION Escaping water ● When removing the resin bag and the filter module from the mixed bed cartridge, a residual amount of water will escape. ● Risk of slipping and falling. ► Use safety shoes and protective gloves. ►...
- Page 23 Operation 6. Pull the used filter elements off the support mesh. » The used filter elements can be disposed of with the household waste. 7. Pull of the support mesh downwards. 8. Clean the magnetic rod with a dry cloth. 9.
- Page 24 Operation 12. Slide the new filter elements over the support mesh. 13. Put the upper part onto the lower part. 14. Firmly tighten the strap using the star knob. 15. Lubricate the O-ring with silicone grease, if needed. » The filter module is completed and ready for use again. 24 | 40...
-
Page 25: Maintenance And Repair
Maintenance and repair Maintenance and repair Maintenance and repair includes cleaning, inspection and mainte- nance of the product. Regular maintenance ensures trouble-free and hygienic opera- tion. ► Only use genuine spare and wearing parts from Grünbeck. 8.1 Cleaning Do not clean the system with cleaning agents NOTE: containing alcohol/solvents. - Page 26 Maintenance and repair 8.1.1 Cleaning the inside of mixed bed cartridge desaliQ:MB9 For cleaning, refer to the operation manual of the desaliQ:MB9. The screen element acting as flow distributor at the bottom of the mixed bed cartridge can be clogged after use.
-
Page 27: Intervals
Maintenance and repair 8.2 Intervals By way of regular inspections and maintenance, malfunctions can be detected in time and product failures might be pre- vented. The interval table below shows the minimum intervals for the ac- tivities to be carried out. Task Interval Execution... -
Page 28: Inspection
Maintenance and repair 8.3 Inspection The desaliQ inline filter module must be inspected after each use. ► Proceed as follows to carry out an inspection: 1. Drain the mixed bed cartridge at the lower connection. » Dirt particles are washed out and the mixed bed cartridge is depressurised. - Page 29 Maintenance and repair Cleaning the desaliQ inline filter module 1. Loosen the star knob and remove the used filter elements. 2. Replace the filter elements (refer to chapter 7.1). 3. Check the O-rings and the strap for tears. 4. Clean the support mesh.
-
Page 30: Maintenance
Maintenance and repair 8.4 Maintenance In order to ensure the proper functioning of the product in the long term, certain tasks have to be performed at regular intervals. DIN EN 806-5 recommends regular maintenance to ensure trou- ble-free and hygienic operation of the product. WARNING Danger due to strong magnetic field ●... - Page 31 Maintenance and repair 1. Remove the support mesh. 2. Check the support mesh and the O-rings for damage. 3. Lubricate the O-rings using silicone grease/silicone spray (care solution). 4. Check the strap for damage. 5. Check the magnetic rod for damage. 6.
-
Page 32: Consumables
Order no. Replacement filter elements (5 µm) piece(s) 707000020000 with spare O-rings for support mesh desaliQ resin bag (6 l) piece(s) 707 435 8.6 Spare parts For an overview of the spare parts, refer to our spare parts cata- logue at www.grünbeck.com. You can obtain the spare parts from your local Grünbeck representative. -
Page 33: Troubleshooting
Troubleshooting Troubleshooting The fault messages are shown in the display of the desaliQ inline control module. ► Monitor the display of the control unit. ► Eliminate the fault. Observation Explanation Remedy ► Drain the mixed bed Low flow Screen element/flow distrib-... -
Page 34: Decommissioning
Decommissioning 10 Decommissioning In case the mixed bed cartridge desaliQ:MB9 is taken out of oper- ation between uses, the following points must be adhered to: 1. Drain the mixed bed cartridge at the lower connection. » Dirt particles are washed out and the mixed bed cartridge is depressurised. -
Page 35: Dismantling And Disposal
► Obey the applicable national regulations. Packaging ► Dispose of the packaging in an environmentally sound manner. Filter elements and desaliQ resin bag ► Dispose of the filter elements and the resin bag with your household waste. Product ► Make use of the collection points available to you for the disposal of your product. -
Page 36: Technical Specifications
Technical specifications 12 Technical specifications Dimensions and weights Height of filter module Height with screw plug Diameter Number of magnetic rods piece(s) Number of filter elements piece(s) Pore size of filter elements µm Shipping weight, approx. 36 | 40... - Page 37 Technical specifications Performance data ≤ 4 Operating pressure Flow at Δp 1 bar (in combination with desaliQ:MB9) Nominal flow (in combination with desaliQ:MB9) General data 5 – 65 Water temperature °C 5 – 65 Ambient temperature °C Order no. 707000010000...
- Page 38 NOTES _____________________________ _____________________________ _____________________________ _____________________________ _____________________________ _____________________________ _____________________________ _____________________________ _____________________________ _____________________________ _____________________________ _____________________________ _____________________________ _____________________________ _____________________________ _____________________________...
- Page 40 Grünbeck Wasseraufbereitung GmbH Josef-Grünbeck-Str. 1 89420 Hoechstaedt GERMANY +49 9074 41-0 +49 9074 41-100 info@gruenbeck.com For more information go www.gruenbeck.com to www.gruenbeck.com...
Need help?
Do you have a question about the desaliQ and is the answer not in the manual?
Questions and answers