
Subscribe to Our Youtube Channel
Related Manuals for Grunbeck GENODOS DME 6


Summary of Contents for Grunbeck GENODOS DME 6
- Page 1 We understand water. Dosing system | GENODOS DME 6 – 100 / GENODOS DME Delta-p Operation manual...
- Page 2 General Contact Germany International Sales Phone +49 9074 41-145 Service Phone 09074 41-333 service@gruenbeck.de Availability Monday to Thursday 7:00 am - 6:00 pm Friday 7:00 am - 4:00 pm We reserve the right to technical modifications. © by Grünbeck Wasseraufbereitung GmbH Original operation manual Edition: February 2023 Order no.: 100174850000_en_034...
-
Page 3: Table Of Contents
Requirements for the installation site ....... 26 Checking the scope of supply ........27 Technical specifications .........50 Water installation ............. 27 12.1 Dosing system GENODOS DME 6 – 100 ....50 12.2 Dosing system GENODOS DME Delta-p ....52 Start-up/commissioning ......... 31 Connecting the canister ........... 31 Operation log ............54... -
Page 4: Introduction
Illustrations in this manual are for basic understanding and can differ from the actual design. Validity of the manual This manual applies to the products below: ● Dosing system GENODOS DME 6 ● Dosing system GENODOS DME 10 ● Dosing system GENODOS DME 20 ●... -
Page 5: Product Identification
► Check whether the products indicated in chapter 1.1 correspond to your product. The type plate is located on the side of the GENODOS dosing pump GP. Dosing systems GENODOS DME 6 – 100 1.3.1 Designation... - Page 6 Introduction 1.3.2 Dosing system GENODOS DME Delta-p Designation Designation Product designation Dosing volume Data matrix code Power supply CE mark Power input DIN EN 14812 compliance as suitable dosing Nominal connection diameter agent Operating range Disposal information Operating pressure Obey the operation manual Drinking water temperature Serial no.
-
Page 7: Symbols Used
Introduction Symbols used Symbol Meaning Danger and risk Important information or requirement Useful information or tip Written documentation required Reference to further documents Work that must be carried out by qualified specialists only Work that must be carried out by qualified electricians only Work that must be carried out by technical service personnel only Depiction of warnings This manual contains information and instructions that you must obey for your personal... -
Page 8: Demands On Personnel
Introduction Demands on personnel During the individual phases in the service life of the system, different persons carry out work on the system. This work requires different qualifications. 1.6.1 Qualification of personnel Personnel Requirements • No special expertise required User •... - Page 9 Introduction 1.6.3 Personal protective equipment ► As an owner/operator/operating company, make sure that the required personal protective equipment is available. The components below fall under the heading of personal protective equipment (PPE): Protective gloves Protective footwear Protective overall Safety goggles Protective apron Mask 9 | 64...
-
Page 10: Safety
Safety Safety Safety measures ● Only operate your product if all components are installed properly. ● Obey the local regulations on drinking water protection, accident prevention and occupational safety. ● Do not make any changes, alterations, extensions or program changes on your product. - Page 11 Safety ● Never bridge electrical fuses. Do not disable fuses. Use the correct current ratings when replacing fuses. ● Keep moisture away from live parts. Moisture can cause short-circuits. 2.1.4 Danger due to chemicals ● Chemicals can be hazardous to health and environment. They can cause chemical burns to skin and eyes as well as irritation of the respiratory tract or allergic reactions.
-
Page 12: Product-Specific Safety Instructions
Safety 2.1.5 Groups of persons requiring protection ● This product must not be used by persons (including children) with limited abilities, lack of experience or knowledge. ● Children should be supervised to make sure that they do not play with the product. ●... -
Page 13: Conduct In Emergencies
Safety 2.2.2 Safety-related components Safety components must be replaced by genuine spare parts only. ● Dosing pump, pump head ● Dosing hose, dosing valve ● All pressurised parts and parts that come into contact with the media 2.2.3 Signals and warning devices The affixed information and pictograms must be clearly legible. -
Page 14: Product Description
GENODOS DME 6 – 100 ● The dosing system GENODOS DME is designed for volume-based dosing of exaliQ mineral solutions into the drinking and industrial water pipes of commercial and industrial buildings. -
Page 15: Product Components
Product description Product components GENODOS DME 6 – 100 3.2.1 Designation Function Dosing pump GENODOS GP ../40 with dosing volume pre-set to 100 ml/m , under seal Hose connection kit in sizes: Ø 2/4 for DME 6/10/20/30 or Ø 4/6 for DME 80/100... - Page 16 Product description 3.2.2 GENODOS DME Delta-p Designation Function Dosing valve for injection point on the insert Insert with injection point G¼" for dosing valve, (available separately as an for the soft water outlet of Delta-p (in suitable size) accessory, refer to chapter 3.4) GENODOS GP-2/40 with dosing volume pre-set to 100 ml/m , under Dosing pump...
-
Page 17: Functional Description
Product description Functional description GENODOS DME 6 – 100 By means of a contact water meter with pulse generator, the dosing system GENODOS DME registers the water volume flowing through and sends the control pulses to the electronics of the dosing pump GENODOS GP according to the pulse interval of the contact water meter. -
Page 18: Accessories
Product description Accessories You can retrofit your product with accessories. Please contact your local Grünbeck representative or Grünbeck’s headquarters in Hoechstaedt/Germany for details. Illustration Product Order no. Conversion kit GENODOS DME 163 765 60 litre suction lance For conversion to 60 L canisters Optional insert with injection point G¼"... -
Page 19: Mineral Solutions
Corrosion protection due to the binding of free carbon dioxide and an increase of the pH value. Note: The mineral solution exaliQ neutra must not be used with dosing system GENODOS DME Delta-p. The stand-alone dosing system GENODOS DME 6 – 100 must be used. 19 | 64... - Page 20 Product description The shelf life of the mineral solutions is 2 years following the filling date (protected against cold and light). ● Once the canister has been opened, it is recommended to use up the contents within 6 months, but within 12 months at the latest. When changing from the mineral solution to another dosing agent, the dosing system must be flushed (refer to chapter 8.6).
-
Page 21: Transport And Storage
Transport and storage Transport and storage Transport ► Transport the product in its original packaging only. Storage ► Protect the product from the impacts below when storing it: • Dampness, moisture • Environmental impacts such as wind, rain, snow, etc. •... -
Page 22: Installation
Installation Installation The installation of the system represents a major intervention into the drinking water system and must be carried out by a qualified specialist only. Installation example GENODOS DME 6 – 100 Designation Designation Safety device protectliQ Outlet shut-off valve... - Page 23 Installation Installation example GENODOS DME Delta-p with connection kit 1"– 1¼" Designation Designation Safety device protectliQ Outlet shut-off valve Drinking water filter pureliQ Water withdrawal point Inlet shut-off valve Canister with exaliQ mineral solution Connection block Delta-p with injection point Delta-p water softener 23 | 64...
- Page 24 Installation Installation example l GENODOS DME Delta-p with connection kit 1½"– 2" Designation Designation Safety device protectliQ Water withdrawal point Insert with injection point G¼" for connection Drinking water filter pureliQ kit Delta-p 1½" – 2" Inlet shut-off valve Canister with exaliQ mineral solution Connection block Delta-p without Delta-p water softener injection point...
- Page 25 Installation Installation example GENODOS DME Delta-p with fixed piping Designation Designation Inlet shut-off valve Canister with exaliQ mineral solution Outlet shut-off valve Delta-p water softener Insert with injection point G¼" 25 | 64...
-
Page 26: Requirements For The Installation Site
Installation Requirements for the installation site Obey the local installation directives, general guidelines and technical specifications. ● The installation site must be frost-proof and ensure the system's protection from direct sunlight, chemicals, dyes, solvents and their vapours, etc. ● The installation site must be adequately illuminated and ventilated. ●... -
Page 27: Checking The Scope Of Supply
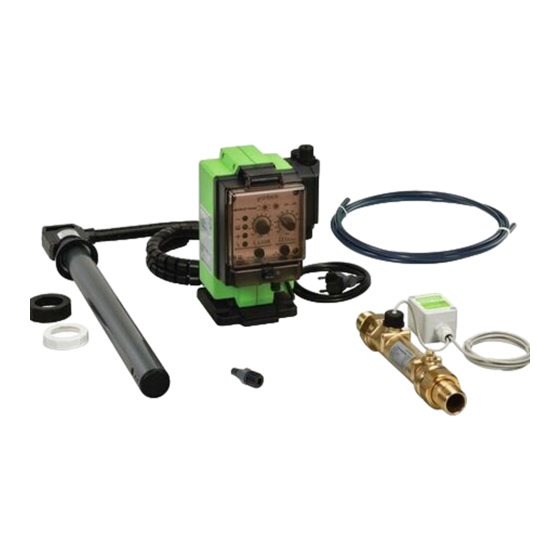
Installation Checking the scope of supply GENODOS DME 6 – 100 Designation Designation Dosing pump GENODOS GP with dosing Dosing valve for dosing hose Ø 2/4 or Ø 4/6 volume pre-set to 100 ml/m , under seal Dosing hose Hose connection kit for dosing hose Ø 2/4 or Ø... - Page 28 ► Lay the suction line constantly rising towards the dosing station. ► Do not leave a suction line lying on the floor GENODOS DME 6 – 100 1. Install the contact water meter into the pipe in a horizontal position – respect the flow direction.
- Page 29 Installation GENODOS DME Delta-p 1. Mount the dosing pump. 2. Install the (optional) insert in the soft water outlet of the Delta-p – respect the flow direction (refer to mounting instructions, order no. 100104560000). a Install the dosing valve in the insert in case of fixed piping or when using a connection kit 1½"...
- Page 30 Installation GENODOS DME Delta-p (with connection kit 1" – 1¼") b Install the dosing valve in the injection point when using a connection kit 1" – 1¼". 3. Connect the dosing hose to the hose connection kit for dosing hose Ø 2/4 and the dosing valve on the insert.
-
Page 31: Start-Up/Commissioning
Start-up/commissioning Start-up/commissioning The initial start-up of the system must only be carried out by technical service personnel. ► Before initial start-up, check that all the components required for the safe operation of the dosing system have been installed. Connecting the canister WARNING Skin and eye contact with mineral solutions ●... -
Page 32: Checking The System
Start-up/commissioning 6.1.1 Connecting the suction lance to the canister Designation Designation Screw cap Suction lance Canister Sliding cover 1. Unscrew the screw cap. 2. Keep the screw cap – to close the canister after use. 3. Vertically insert the suction lance into the canister from above. 4. - Page 33 Start-up/commissioning GENODOS DME 6 – 100 1. Check that all lines are securely connected. a Retighten the clamps if necessary. 2. Check that all contact connections are connected. 3. Establish the power supply – plug in the mains plug. 4. Completely open a water withdrawal point downstream of the dosing point.
- Page 34 Start-up/commissioning GENODOS DME Delta-p 1. Check that all lines are securely connected. a Retighten the clamps if necessary. 2. Check that all contact connections are connected. 3. Establish the power supply – plug in the mains plug. 4. Completely open a water withdrawal point downstream of the dosing point. 5.
-
Page 35: Handing Over The Product To The Owner/Operator/ Operating Company
Start-up/commissioning Handing over the product to the owner/operator/ operating company ► Explain to the owner/operator/operating company how the product works. ► Use the manual to brief the owner/operator/operating company and answer any questions. ► Inform the owner/operator/operating company about the need for inspections and maintenance. -
Page 36: Operation
Operation Operation Refer to the operation manual of GENODOS pump GP, order no. 118 940. In case of dosing pumps under seal (vp) in the drinking water sector, the pre-set dosing rate of 100 ml/m³ (at a counter-pressure of 5 bar) must not be adjusted. The dosing capacity of the dosing pump is designed for 50 Hz. - Page 37 Operation NOTE Do not refill empty canisters with mineral solution. ● Possible contamination of the mineral solution when transferring it from one canister to another ● Non-compliance with hygiene requirements when refilling empty canisters. ● Mixing of residual amounts of the mineral solution with fresh mineral solution. ►...
- Page 38 Operation 7.2.2 Replacing the canister 1. Release the sliding cover – pull upwards. 2. Pull the suction lance out upwards. 3. Pay attention to hygiene – do not touch the suction lance with your hand or place it on the floor. 4.
-
Page 39: Maintenance And Repair
Maintenance and repair Maintenance and repair Maintenance and repair includes cleaning, inspection and maintenance of the product. The responsibility for inspection and maintenance is subject to local and national requirements. The owner/operator/operating company is responsible for compliance with the prescribed maintenance and repair work. By concluding a maintenance contract you make sure that all maintenance work will be carried out on time. -
Page 40: Intervals
Maintenance and repair 8.1.1 Cleaning in case of leaked/clogged mineral solution Skin and eye contact with sodium hydroxide solution 5% – exaliQ neutra WARNING ● Chemical burns to the eyes and irritation of the skin and respiratory tract ► Use safety goggles, protective gloves and sturdy clothing. ►... -
Page 41: Inspection
Maintenance and repair Inspection You as owner/operator/operating company can do the regular inspections yourself. Initially, we recommend inspecting the system at shorter intervals and later on as required. ► Carry out an inspection at least every 2 months. 1. Visually check the dosing pump and the dosing hoses for leaks. 2. - Page 42 Maintenance and repair Clean the components that come into contact with chemicals (pump head, valves, suction and pressure membrane, seals). a Replace worn components, if necessary. 9. Check the function and condition of all system components (dosing point, suction lance, contact water meter, optional pressure maintaining valve). a Clean the injection point, if necessary.
-
Page 43: Consumables
Maintenance and repair 5. If the ACTUAL value is too low, carry out a wear test on components relevant for function (refer to the operation manual of the GENODOS pump GP). 6. If the ACTUAL value is too high, check all settings on the dosing system. Consumables Product Order no. -
Page 44: Spare Parts
Maintenance and repair NOTE Change the mineral solution only after flushing the dosing system first. ● Mixing different mineral solutions can lead to the failure of the dosing system. ● Possible function failure/damage to the dosing system. ► Flush the dosing system according to the flushing instructions. 8.6.1 Flushing instructions 1. - Page 45 Maintenance and repair GENODOS DME 6 – 100 Designation Designation Dosing valve All seals (e.g. O-rings) Non-return valve GENODOS DME Delta-p Designation Dosing valve 45 | 64...
-
Page 46: Troubleshooting
Troubleshooting Troubleshooting Messages In case of fault messages on the dosing pump – refer to chapter “Troubleshooting” in the operation manual of the GENODOS pump GP. 1. Eliminate the malfunction (refer to fault messages on the dosing pump). 2. Monitor the messages on the control unit. 3. -
Page 47: Decommissioning
Decommissioning Decommissioning If a longer shutdown of the system is planned, the system must be decommissioned. 10.1 Temporary standstill 1. Flush the dosing system with clear water – without any mineral solution. 2. Disconnect the dosing pump from mains. 3. Leave the suction lance in the container filled with drinking water 10.2 Restart/recommissioning Connect the dosing pump to mains. -
Page 48: Dismantling And Disposal
6. Remove the suction hose and the canister containing the mineral solution. 7. Remove the dosing hose and the dosing valve. 8. For GENODOS DME 6 – 100 a Insert the blind plug into the contact water meter or remove the contact water meter and close the gap in your drinking water system, e.g. -
Page 49: Disposal
Dismantling and disposal 11.2 Disposal ► Obey the applicable national regulations. Packaging NOTE Danger to the environment due to incorrect disposal ● Packaging materials are valuable raw materials that can be reused in many cases. ● Incorrect disposal can cause hazards to the environment. ►... -
Page 50: Technical Specifications
Technical specifications Technical specifications Dosing system GENODOS DME 6 – 100 12.1 Dimensions and weights DME 6 DME 10 DME 20 DME 30 DME 80 DME 100 Nominal connection DN 25 DN 32 DN 40 DN 50 DN 80 DN 100 diameter of water meter (1¼”) - Page 51 Technical specifications Consumption data DME 6 DME 10 DME 20 DME 30 DME 80 DME 100 exaliQ mineral solution ml/m³ (at a counter-pressure of 5 bar) General data DME 6 DME 10 DME 20 DME 30 DME 80 DME 100 ≤...
-
Page 52: Dosing System Genodos Dme Delta-P
Technical specifications 12.2 Dosing system GENODOS DME Delta-p Designation Designation Insert with injection point G¼" (accessories) Pulse cable Dosing hose Ø 2/4 Dosing pump GENODOS GP-2/40 Dimensions and weights DME Delta-p Nominal connection diameter of DN 25 DN 32 DN 40 DN 50 insert with injection point G¼”... - Page 53 Technical specifications Consumption data DME Delta-p exaliQ mineral solution ml/m³ (at a counter-pressure of 5 bar) (exaliQ neutra must not be dosed) General data DME Delta-p ≤ 25 Drinking water temperature °C 5 – 30 Water temperature °C 5 – 30 Ambient temperature °C ≤...
-
Page 54: Operation Log
Operation log Operation log ► Document the initial start-up/commissioning and all maintenance activities. ► Copy the maintenance report. Dosing system GENODOS DME _____________ Serial no.: ______________________________ 13.1 Start-up/commissioning log Customer Name Address Installation/Accessories Drinking water filter (make/type) Floor drain present Safety device (make/type) Water softener installed upstream... - Page 55 Operation log Maintenance no.: ___ Enter the measured values and operating data. Confirm the checks with OK or record any repairs carried out. Operating values Dosing volume checked (refer to checklist for replacement of canister) ACTUAL dosing volume, NEW dosing volume Mineral solution Replacement canister available Mineral solution used exaliQ:...
- Page 56 Operation log Maintenance no.: ___ Enter the measured values and operating data. Confirm the checks with OK or record any repairs carried out. Operating values Dosing volume checked (refer to checklist for replacement of canister) ACTUAL dosing volume, NEW dosing volume Mineral solution Replacement canister available Mineral solution used exaliQ:...
- Page 57 Operation log Maintenance no.: ___ Enter the measured values and operating data. Confirm the checks with OK or record any repairs carried out. Operating values Dosing volume checked (refer to checklist for replacement of canister) ACTUAL dosing volume, NEW dosing volume Mineral solution Replacement canister available Mineral solution used exaliQ:...
- Page 58 Operation log Maintenance no.: ___ Enter the measured values and operating data. Confirm the checks with OK or record any repairs carried out. Operating values Dosing volume checked (refer to checklist for replacement of canister) ACTUAL dosing volume, NEW dosing volume Mineral solution Replacement canister available Mineral solution used exaliQ:...
- Page 59 Operation log Checklist for replacement of canister for owner/operator/operating company Designation of mineral solution: exaliQ ____________ Date Signature Date Signature 59 | 64...
- Page 60 Operation log Checklist for replacement of canister for owner/operator/operating company Designation of mineral solution: exaliQ ____________ Date Signature Date Signature 60 | 64...
- Page 61 EU Declaration of Conformity EU Declaration of Conformity In accordance with the EU Low-Voltage Directive 2014/35/EU, Appendix IV This is to certify that the system designated below meets the safety and health protection requirements of the applicable EU guidelines in terms of its design, construction and execution. This certificate becomes void if the system is modified in any way not approved by us.
- Page 64 Grünbeck Wasseraufbereitung GmbH Josef-Grünbeck-Str. 1 89420 Hoechstaedt/Germany +49 9074 41-0 +49 9074 41-100 info@gruenbeck.com For more information go to www.gruenbeck.com www.gruenbeck.com...
Need help?
Do you have a question about the GENODOS DME 6 and is the answer not in the manual?
Questions and answers