Table of Contents
Advertisement
Quick Links
Advertisement
Table of Contents

Subscribe to Our Youtube Channel
Related Manuals for Euroflex MB-flex S aluminium


Summary of Contents for Euroflex MB-flex S aluminium
- Page 1 Quick installation guide Conveyor system MB-flex S aluminium...
- Page 2 Conveyor system MB-flex S aluminium Publisher euroflex GmbH Hohe-Flum-Strasse 62 79650 Schopfheim Germany Tel: + 49 (0) 07622 68 453-30 Fax: + 49 (0) 07622 68 453-01 E-Mail: info@euroflexgmbh.de Internet: www.euroflexgmbh.de The document is protected by copyright. All rights are strictly reserved. Copying,...
-
Page 3: Table Of Contents
Protective enclosure/Protective cover ..................7 Spare parts and their purchase ....................8 Assembly ......................... 9 Overview of MB-flex S aluminium ................... 9 Assembly the slide rails and slide profiles on the modular belt conveyor ......10 3.2.1 Assembly the slide rails on the modular belt conveyor ........... 11 3.2.2... -
Page 4: Reader Information
Our customer service department will be happy to advise you on technical matters. Information on ordering spare parts can be found in the section “Spare parts and their purchase” (Page 8). Customer service Designation Specification Company euroflex GmbH Street no. Hohe-Flum-Straße 62 Postcode, place 79650 Schopfheim Country... -
Page 5: Safety
Safety Safety This chapter provides information on the safe operation of the conveyor system: ▪ Owner (Page 5) ▪ Obligations of the owner (Page 5) ▪ Instruction of the personnel (Page 6) ▪ Qualification requirements (Page 6) ▪ Personal protective equipment (Page 7) ▪... -
Page 6: Instruction Of The Personnel
Safety Instruction of the personnel Each person assigned to carry out work must, before commencing, receive instruction from the owner regarding their delegated activities and potential dangers during work. For instruction, observe the following: ▪ Repeat instruction at regular intervals. ▪... -
Page 7: Electricians
Safety 2.4.5 Electricians Electricians are persons who, as a result of their technical training, knowledge, experience and awareness of pertinent norms and provisions, are capable of correctly carrying out work on electrical systems. Electricians are capable of recognizing potential dangers independently, and consequently avoiding personal injury and property damage caused by electrical currents. -
Page 8: Spare Parts And Their Purchase
Safety Spare parts and their purchase Spare parts and accessories can be ordered directly from the manufacturer via the following contact. Spare parts: Contact Designation Specification Company euroflex GmbH Street no. Hohe-Flum-Straße 62 Postcode, place 79650 Schopfheim Country Germany Telephone... -
Page 9: Assembly
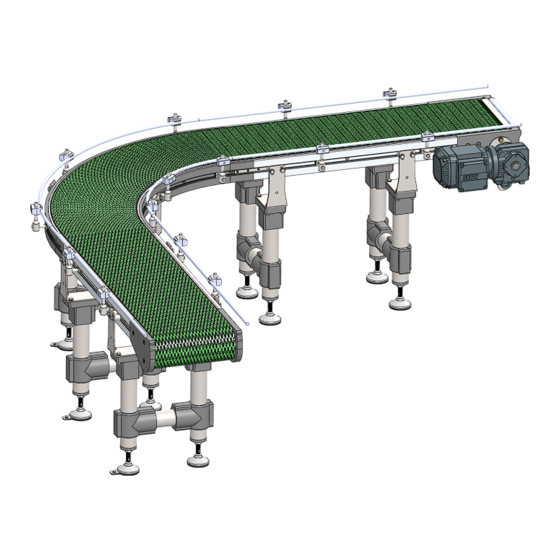
Assembly the slide rails and slide profiles on the modular belt conveyor (Page 10) ▪ Assembling the modular chain belt (Page 15) Overview of MB-flex S aluminium Fig. 1: Overview of MB-flex S aluminium (example) Legend Designation Side guide Modular chain belt... -
Page 10: Assembly The Slide Rails And Slide Profiles On The Modular Belt Conveyor
Assembly WARNING Risk of injury and serious damage to property due to improper installation! A lack of knowledge about the system and experience in assessing and averting residual risks during proper assembly can result in injury and even death. » Before working on the system, turn it off and guard it from being switched back on. -
Page 11: Assembly The Slide Rails On The Modular Belt Conveyor
Assembly 3.2.1 Assembly the slide rails on the modular belt conveyor 1. Clip the slide rails (2) onto the chassis profile. 2. Check the slide rail for damage. Only use undamaged slide rails. 3. Chamfer the slide rail at the start (viewed in running direction). - Page 12 Assembly 10. Cut the slide profile straight at the end of the chassis profile ( viewed in running direction) and clip it on flush. 11. Gently deburr the butt ends. 12. Each slide rail piece must be fixed at the start (viewed in the running direction).
-
Page 13: Assembly The Slide Profiles On The Modular Belt Conveyor
Assembly 3.2.2 Assembly the slide profiles on the modular belt conveyor 1. Press the slide profiles onto the holding profile(1). 2. Check the slide profiles for damage. Only use undamaged slide profiles. 3. Chamfer the slide profiles at the start (viewed in running direction). - Page 14 Assembly 11. Each slide profile piece must be fixed at the beginning (viewed in running direction). 12. Using the drill (drill bit ø 3.4 mm), drill a hole in the slide profile and holding profile. Secure the profile with a support against bending! 13.
-
Page 15: Assembling The Modular Chain Belt
Assembly Assembling the modular chain belt Observe the following during assembly: ▪ Select the chain length so that the contraction of the chain ends is done with little effort. ǃ With a tight chain, rattling will be heard at the drive station. 1. - Page 16 Assembly 9. Insert fastening clip as follows: a) Insert the yellow tab (1) with the foot pointing downwards into the lateral chain opening. b) Subsequently press the blue closure PIN (2) from above into the opening over the tab until the PIN latches into place.
-
Page 17: Cleaning
Cleaning Cleaning This chapter provides information on the execution of the operating mode Cleaning: ▪ Personnel and Protective equipment (Page 17) ▪ Selection of the cleaning agent (Page 17) ▪ Preparation (Page 18) ▪ Execution (Page 18) ATTENTION Warning of material damage due to improper cleaning! Improper cleaning leads to damage to the system or its surroundings. -
Page 18: Preparation
Cleaning Preparation Carry out the following work steps: 1. Switch off the conveyor system. ▼ No voltage is present at the conveyor system. 2. Close the pneumatic supply at the main valve and secure it with a personal padlock. 3. Secure the main switch on the control cabinet with a personal padlock. The conveyor system is prepared for cleaning. - Page 19 Take care not to apply too much disinfectant so that the conveyor does not need to be rinsed. ǃ Remove excess disinfectant via the drain. ✓ Ready. Contact euroflex GmbH for instructions on cleaning any further contaminants. Quick installation guide_Conveyor system MB-flex S Al_20221114_EN.docx...
-
Page 20: Maintenance
Maintenance Maintenance This chapter provides information on the maintenance work to be carried out: ▪ Lubrication (Page 20) ▪ Maintenance plan (Page 21) ▪ Maintenance log (Page 23) ▪ Repair (Page 23) Lubrication Incorrect or negligent use of hazardous substances may lead to serious environmental pollution. Observe the following: ▪... -
Page 21: Maintenance Plan
Use of non-original spare parts can lead to defects in the conveyance goods, operational malfunctions, loss of safety functions and damage to or destruction of components. » Only replace components with original spare parts from euroflex GmbH. General Assembly and maintenance work... - Page 22 Maintenance Conveyor system Assembly and maintenance work Interval [Bh] Personnel Remove foreign bodies 8 (per shift) Operating personnel Clean conveyor system surface 8 (per shift) Operating personnel Check gear unit for leakage 8 (per shift) Maintenance personnel Inspect surface for damage Maintenance personnel Conveyor chain check for damage and elongation...
-
Page 23: Maintenance Log
Maintenance Electrical system Assembly and maintenance work Interval [Bh] Personnel Check electrical wiring for visible damage Electricians Electrical connections and distributors: Electricians Check terminal boxes for damage Maintenance log The required maintenance intervals are dependent on the intensity of use of the system at the owner's deployment site and the consequent signs of wear. -
Page 24: Conveyor Chain: Repair Or Adjust The Chain Tension
Maintenance 5.4.1 Conveyor chain: Repair or adjust the chain tension WARNING Danger to life due to moving machine parts! Danger of injury and pulling in due to too long chain sag! Risk of crushing and cutting! Moving machine parts can cause serious personal injury or death. »... - Page 25 Maintenance 5.4.1.1 Adjust modular belt chain Data Designation or value Personnel Maintenance personnel Personal protective equipment Protective work clothing Protective gloves Safety shoes Interval in each case after 50 OH, 250 OH, 500 OH, then check every 500 OH Replace after 4,000 OH Tools, aids Allen key Screwdriver...
- Page 26 Maintenance Remove fastening clip as follows: 4. Press the blue locking pin (1) upwards and remove. 5. Pull the yellow tab out. 6. Pull out connecting rod. 7. Draw out opened chain. 8. Insert new chain or replace damaged chain links. 9.
-
Page 27: Table Of Figures
Table of figures Table of figures Fig. 1: Overview of MB-flex S aluminium (example) ................9 Fig. 2: Assembly the slide rails and slide profiles on the modular belt conveyor ......10 Fig. 3: Assembly the slide rails on the modular belt conveyor ............12 Fig.
Need help?
Do you have a question about the MB-flex S aluminium and is the answer not in the manual?
Questions and answers