Table of Contents
Advertisement
Quick Links
Advertisement
Table of Contents

Related Manuals for Warrior Winches 80SPS12


Summary of Contents for Warrior Winches 80SPS12
- Page 1 ELECTRICAL WINCH 80SPS12 80SPS24 Assembly & Operating Instructions...
- Page 2 INTRODUCTION Congratulations on your purchase of a winch. We design and build winches to strict specifications and with proper use and maintenance should bring you years of satisfying service. WARNING - Read, study and follow all instructions before operating this device.
-
Page 3: Getting To Know Your Winch
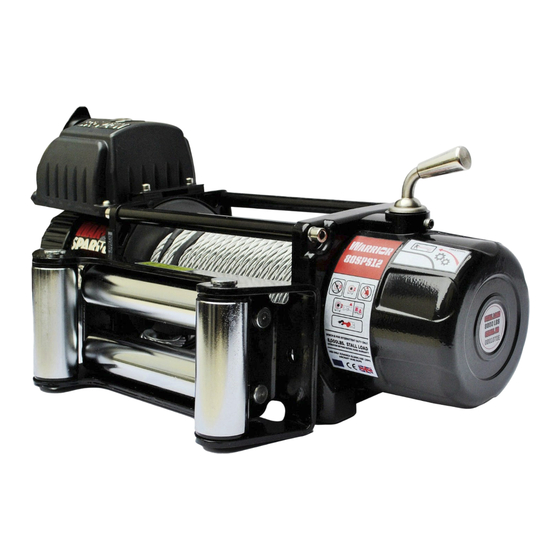
GETTING TO KNOW YOUR WINCH Your 8000lb winch is a powerful piece of machinery. It is important that you understand the basics of its operation and specifications so that when you need to use it, you can use it with confidence and safety. Below is a list of the components of your winch and their use. -
Page 4: Winch Assembly And Mounting
11. Universal Flat Bed Mounting Channel: Your winch has been optional supplied with a flat bed mounting channel that can be mounted to most flat surfaces such as trailers, step bumpers, truck beds, etc. The mounting channel also has holes to accept your roller fairlead. 12. - Page 5 1. Your 8000lb winch is designed with a bolt pattern that is standard in this class of winch. Many winch mounting kits are available that utilize this bolt pattern for the most popular vehicle and mounting channels. If you cannot find a kit locally, contact us and we will provide you with the name of a dealer near you.
-
Page 6: Safety Precautions
7. Check for proper drum rotation. Pull and turn the clutch knob to the “off” position (Free-spooling). Pull out some cable from the drum, and then turn the clutch knob to the “In” position to engage the gears. Press the cable out button on the power switch. - Page 7 WARNING- Do not exceed maximum pull rating. Avoid “shock loads” by using the control switch intermittently to take up the slack in the wire rope. “Shock loads” can far exceed the rate capacity for the wire rope and drum. WARNING- Do not exceeds maximum line pull ratings shown on the tables.
-
Page 8: General Tips For Safe Operation
not pull for more than one minute at or near the rated load. CAUTION - If the motor stalls do not maintain power to the winch. Electric winches are designed and made of intermittent use and should not be used in constant duty applications. CAUTION - Never release the free-spool clutch when there is a load on the winch. -
Page 9: Rigging Techniques
Any winch that appears to be damaged in any way, is found to be worn, or operates abnormally SHALL BE REMOVED FROM SERVICE UNTIL REPAIRED. It is recommended that the necessary repairs be made by a manufacturer’s authorized repair facility. Pull only on areas of the vehicle as specified by the vehicle manufacturer. -
Page 10: Winching Techniques A-Z
WARNING - Never use your winch for overhead hoisting or for lifting people or moving people. Fig 3.5 WINCHING TECHNIQUES A-Z a. Take time to asses your situation and plan your pull. b. Put on gloves to protect your hands. c. -
Page 11: Maintenance
p. The vehicle to be winched should be placed in neutral and the emergency brake released. Only release the brake pedal when under full tension. Avoid shock loads to the winch. This can damage the winch, rope and vehicle. q. The winch is meant for intermittent use. Under full load with a single line rig do not power in for more than a minute without letting the motor cool down for a few minutes and then resume the winching operation. -
Page 12: Troubleshooting
defective rope by free spooling. Remove the bolt (Part# 800009) M8x10 on the drum and release the rope. Insert the end of the new rope and secure the M6 x 10 mm bolt tightly. Engage the clutch and re-spool the new rope on the drum keeping tension on the rope as it spools. -
Page 13: Winch Assembly Drawing
WINCH ASSEMBLY DRAWING... -
Page 14: Winch Parts List
WINCH PARTS LIST Part # Description Remark 800001 Terminal Protect 800100 Motor Assembly 800002 Cap Screw M10 x 35 800003 Lock Washer 800004 Think Flat Washer 800005 Hex Nut M10 800200 Break / Shaft Assembly 800006 Bushing Drum 800007 Tie Bar 800008 Ring Seals 800009... -
Page 15: Duty Cycle
8000lbs SPECIFICATION Rated line pulls: 8000 lbs (35.36kN) Gear reduction ratio: 233:1 12V Motor: Series Wound Input Power 4.6hp / 3.2kW (DC 12V) Overall dimensions: 21.3" (L) x6.3" (W) x10.2" (H) 540(L) mm X 160 (W) mm X 259 (H) mm Drum size: Ø2.48"... -
Page 16: Warranty
WARRANTY Your winch has been manufactured and tested to the highest standards. Please ensure you read and understand the assembly and operating instructions before use. Failure to comply with these instructions or any improper use of the equipment will terminate the warranty. Please ensure you record the information below: Distributor Date of Purchase...
Need help?
Do you have a question about the 80SPS12 and is the answer not in the manual?
Questions and answers