Table of Contents
Advertisement
Quick Links
Advertisement
Table of Contents

Related Manuals for Warrior Winches Spartan Series


Summary of Contents for Warrior Winches Spartan Series
- Page 1 ELECTRICAL WINCH 12000 / 12000-SR Assembly & Operating Instructions...
- Page 2 INTRODUCTION Congratulations on your purchase of a winch. We design and build winches to strict specifications and with proper use and maintenance should bring you years of satisfying service. WARNING - Read, study and follow all instructions before operating this device.
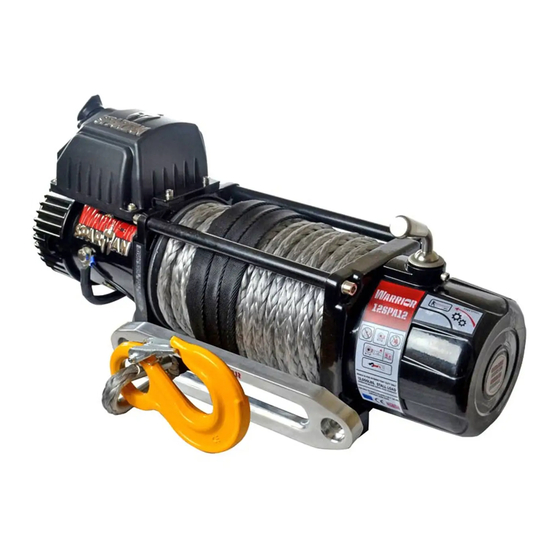
- Page 3 6. Clevis Hook w/Pin 7. Control box of 12000 (Supplied for Prototype) 8. Control box of 12000-S (Supplied for –S Type) 9. Power Switch supplied by your choice 9.1 üR1, Remote control 9.2 üR2, Remote control 9.3 üR3, Remote control 9.4 Wireless Remote Control THE FOLLOWING DESCRIPTIONS ARE OPTIONAL 001.
- Page 4 1. Motor: Your 6hp motor is powered by a 12/24 volt battery and provides power to the gear mechanism which turns the drum and winds the wire rope; 2. Winch Drum: The winch drum is the cylinder on which the wire rope is stored. It can feed or wind the rope depending on the remote winch switch.
-
Page 5: Winch Assembly And Mounting
WINCH ASSEMBLY AND MOUNTING 12000lbs: 1. Your 12000lb winch is designed with a bolt pattern that is standard in this class of winch. Many winch mounting kits are available that utilize this bolt pattern for the most popular vehicle and mounting channels. If you cannot find a kit locally, contact us and we will provide you with the name of a dealer near you. -
Page 6: Safety Precautions
Bolts (Part# 120002), Flat Washer (Part# 120004), Lock Washer (Part# 120003) and M10 Nut (Part# 120005) secure the winch to the mounting channel. 4. Connect the battery and motor leads as the drawing above every type of winch is different each other. 5. - Page 7 WARNING - A minimum of five wraps of cable around the drum barrel is necessary for pulling and holding the rated load. The cable clamp is not designed to hold the load without 5 wraps of cable around the barrel. WARNING - Keep yourself and others a safe distance to the side of the cable when under tension.
-
Page 8: General Tips For Safe Operation
hand by rotating the drum by hand with the clutch disengaged. Keep hands clear of the fairlead and drum while the winch is under power. Do not use as a hoist. Do not use for overhead lifting. Failure to heed these warnings may result in personal injury and/or property damage. -
Page 9: Rigging Techniques
50%. When doubling the line back to the vehicle, attach to the frame or other load bearing part. x The vehicle engine should be kept running during operation of the winch to minimize battery drain and maximize power and speed of the winch. -
Page 10: Winching Techniques A-Z
Do not winch from an acute angle as the wire rope will pile up on one side of the drum causing damage to wire rope and the winch. Fig 3.2 Short pulls from an angle can be used to straighten the vehicle. Long pulls should be done with the wire rope at a 90°... -
Page 11: Maintenance
k. Double check your anchors and make sure all connections are secure. l. Inspect the wire rope. Make sure there are at least 5 wraps of wire rope around the winch drum. m. Drape a blanket or jacket over the wire rope approximately 5 to 6 feet from the hook. Open the hood for added protection. -
Page 12: Replacing The Wire Rope
Remove all dirt or corrosion and always keep clean. Do not attempt to disassemble the gear box. Repairs should be done by the manufacturer or an authorized repair center. The gear box has been lubricated using a high temperature lithium grease and is sealed at the factory. - Page 13 -Battery weak, recharge. Run winch with Motor runs slowly -Insufficient current or vehicle motor running. or without normal voltage -Loose or corroded battery cable power connections. Clean, tighten, or replace. Motor overheating -Winch running time too -Allow winch to cool down periodically. long Motor runs in one -Defective Switch...
-
Page 14: Winch Assembly Drawing
WINCH ASSEMBLY DRAWING WINCH PARTS LIST Part # Description Remark 120001 Terminal Protect... - Page 15 120100 Motor Assembly 120002 Cap Screw M10 x 35 Lock Washer ĭ10 120003 Think Flat Washer ĭ10 120004 120005 Hex Nut M10 120200 Break / Shaft Assembly 120006 BushingüDrum 120007 Tie Bar 120008 Ring Seals 120009 Screw M8 x 10 Lock Washer ĭ8 120010 120011...
- Page 16 120018 Trust Washer 120019 GearüHousing 120020 Clutch Screw 120021 Ring Seals 120022 Clutch Cover 120023 Clutch Handle 120024 Locknut M10 120700 Roller Fairlead 120025 Mounting Channel By Choice 120120 Remote Control Switch˄RC3˅ 120900 Cable Assembly 121000 Control Box 120026 Screw M5h16 120027 Lock Washer Ø5 120028...
-
Page 17: Duty Cycle
DUTY CYCLE Line speed and motor current (First layer) Line speed ft/min Motor current Amps Line pull (m/min) (Max) lb (kN) 12V DC 12V DC 22(6.6˅ 6000˄26.67˅ 11.15˄3.4˅ 8000˄35.56˅ 7.22˄2.2˅ 10000˄44.45˅ 4.92˄1.5˅ 12000˄53.34˅ 3.28˄1.0˅ Line pull and cable capacity Rated line pull per Layer lb Cable capacity per Layer ft Layer of cable (kN)
Need help?
Do you have a question about the Spartan Series and is the answer not in the manual?
Questions and answers