Advertisement
Quick Links
Documentation Center
RAK7248 Quick Start Guide
Prerequisites
What Do You Need?
1. RAK7248/RAK7248C/RAK7248P WisGate Developer D4H Gateway
2. 16 GB SD Card + Card Reader
3. 5 V at least 2.5 A Micro USB Power Supply
4. A Windows/Mac OS/Linux Computer
5. Latest
RAK7248 Firmware
What's Included in the Package?
Product Configuration
After burning the firmware image onto the SD Card, make sure you have inserted the SD Card into the RAK7248
WisGate Developer D4H Gateway and have the LoRa, and GPS Antenna connected. Refer to the guide on
to burn the image
.
⚠
WARNING
Before powering the Raspberry Pi 4, you should connect the LoRa, LTE (only in the Cellular variant), and
the GPS antennas. Not doing so might damage the boards.
After the antennas are attached and the SD card is inserted into the Raspberry Pi, you can safely power
on the gateway.
Wi-Fi AP Mode
By default, the gateway will work in Wi-Fi AP Mode, which means you can find an SSID named
Rakwireless_XXXX on your PC Wi-Fi Network List.
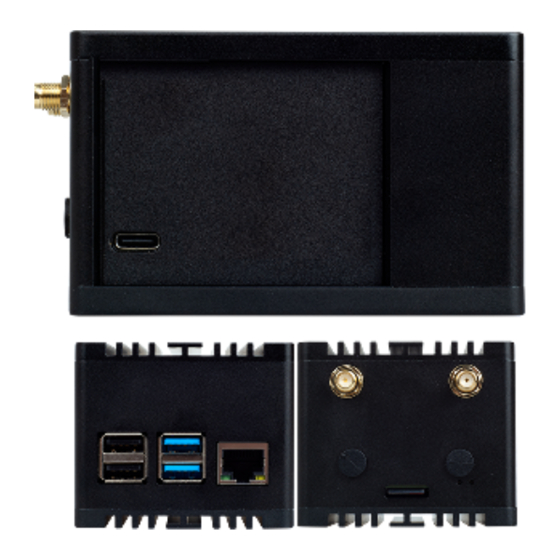
Figure 2: RAK7248/P WisGate Developer D4H Gateway package contents
Figure 3: RAK7248C WisGate Developer D4H Gateway package contents
how
Advertisement

Subscribe to Our Youtube Channel
Related Manuals for RAK RAK7248


Summary of Contents for RAK RAK7248
- Page 1 Figure 3: RAK7248C WisGate Developer D4H Gateway package contents Product Configuration After burning the firmware image onto the SD Card, make sure you have inserted the SD Card into the RAK7248 WisGate Developer D4H Gateway and have the LoRa, and GPS Antenna connected. Refer to the guide on to burn the image ⚠...
- Page 2 Figure 4: RAKwireless access point NOTE XXXX is the last 2 bytes of your RAK7248’s WiFi MAC address. Connect to this Wi-Fi SSID using the password provided below. Take note of the default IP address of the gateway provided below as this will be needed in connecting via SSH.
- Page 3 Documentation Center Figure 6: Ethernet properties 3. By default, the PC will obtain an IP Address automatically. Click Option Use the following IP Address and enter the IP address then press OK. 192.168.0.10.20 Figure 7: TCP/IPv4 Properties Now, you should be able to access your gateway from your PC successfully using the IP Address through SSH.
- Page 4 Documentation Center Figure 8: Putty Software for SSH in Windows If you have connected to the gateway through Wi-Fi AP Mode, the IP Address is 192.168.230.1 If you have connected to the gateway through Ethernet, the IP Address is 192.168.10.10 It will then prompt you to enter the username and password.
-
Page 5: Accessing The Internet
Documentation Center Figure 10: Opening terminal in Mac OS Open the terminal of Mac OS. Enter root mode by typing the following command: sudo -i Linux OS If the OS of your PC is Linux, you should do the same as the Mac OS, except the root mode. Accessing the Internet Assuming you have successfully logged into your gateway using SSH. -
Page 6: Connect Through Wi-Fi
1. Set pi password- used to set/change the password of the gateway. 2. Set RAK Gateway Channel Plan - used to configure the frequency, which the gateway will operate on, and the LoRaWAN Server which the gateway will work with. - Page 7 Documentation Center 2. Enable Client Mode/Disable AP Mode - the gateway will work in Wi-Fi Client mode after rebooting, while Wi-Fi AP Mode will be disabled. 3. Modify SSID and pwd for AP Mode - used to modify the SSID and password of the Wi-Fi AP. Only works if the Wi-Fi AP Mode is enabled.
- Page 8 Make sure to input the correct Wi-Fi SSID and Password, or you will not be able to connect to the RAK7248 again via SSH in Wi-Fi AP Mode. If stuck in this situation, follow the procedure listed in the Reverting to Wi-Fi AP Mode section, which is applicable for all Raspberry Pi-based gateways to work again in Wi-Fi AP mode.
- Page 9 Documentation Center Figure 17: Default gateway Ethernet IP Address Then configure the IP address of the router. This is the LAN interface IP address of the router. Figure 18: Router LAN IP Press OK and the success message will appear. After reboot, the gateway will connect to the router successfully through Ethernet.
-
Page 10: Optional Configuration
If you have entered either or both incorrect Wi-Fi SSID and Password in the Wi-Fi Client Mode setup for the RAK7248 WisGate Developer D4H Gateway to connect to the router, follow this set of steps to work again in Wi-Fi AP Mode and redo the setup. - Page 11 1. Set pi password - used to set/ change the password of the gateway. 2. Set up RAK Gateway Channel Plan - used to configure the frequency, which the gateway will operate on, and the LoRaWAN Server which the gateway will work with.
- Page 12 Documentation Center Figure 22: Set Pi password 2. Next, press Yes, and you will be asked to enter your new password twice then click Enter. Figure 23: Confirm password change 3. The success message for changing the password will then pop up.
- Page 13 Setup RAK Gateway Channel Plan This menu allows you to select your LoRa frequency band and one of the two available Networks Server options by choosing 2 Setup RAK Gateway Channel Plan. Figure 25: Choosing Setup RAK Gateway Channel Plan You can choose one of two supported LoRa Servers: TTN or ChirpStack.
- Page 14 Documentation Center Figure 26: Server is TTN If you choose TTN as the LoRa Server, you will see the same page, as shown in Figure 27. Visit the LoRa Alliance Regional Parameter for more information on your local frequency plan. This will allow you to choose the correct plan.
- Page 15 Documentation Center Figure 28: Selecting the TTN channel plan NOTE When a Channel plan is selected, the gateway is configured to connect to the nearest cluster to the region. If new clusters are presented, the channel plans will be updated. For now, the only available clusters are: eu1.cloud.thethings.network (European) au1.cloud.thethings.network (Australian)
- Page 16 Documentation Center 2. ChirpStack ADR Configure - used to enable/disable the Adaptive Data Rate (ADR) functionality. Figure 30: Configure ChirpStack channel plan First, select 1 ChirpStack Channel-plan configuration for configuring your frequency channel. Then, set the IP address of the ChirpStack. Figure 31: Regional Frequency Band Option...
- Page 17 Documentation Center Figure 32: Default ChirpStack IP Address NOTE The default IP Address is . The latest firmware/GitHub repository installs ChirpStack on the 127.0.0.1 Raspberry Pi. If you want to use an external ChirpStack, you need to set it to its IP Address. If you have selected ChirpStack ADR Configure instead, you can enable/disable the Adaptive Data Rate (ADR) functionality: Figure 1: ChirpStack ADR Enable/Disable...
Need help?
Do you have a question about the RAK7248 and is the answer not in the manual?
Questions and answers