Advertisement
Quick Links
Documentation Center
RAK7268V2/RAK7268CV2 Quick Start Guide
Prerequisites
What Do You Need?
1.
RAK7268/RAK7268C V2 WisGate Edge Lite 2 V2
2.
Ethernet Cable
(RJ-45 Port) for Ethernet connection
3. A Windows/macOS/Linux computer
⚠
WARNING
The SIM card slot of the cellular versions is not hot-swappable. Make sure the gateway is switched off
before inserting or ejecting the SIM card.
The SD card found in the SD card slot must not be ejected, as it might affect the performance of the
device, as different logs and data are stored on it.
Product Configuration
Power on the Gateway
1. Attach the LoRa Antenna.
First and foremost, screw the antenna onto the RP-SMA connector on the back panel of the RAK7268 /
RAK7268C V2 WisGate Edge Lite 2 V2.
⚠
WARNING
Do not power the device if the LoRa Antenna port has been left open to avoid potential damage to the
RAK7268 / RAK7268C V2 WisGate Edge Lite 2 V2.
2. Power the gateway ON.
It is recommended to use the 12 VDC adapter that comes with the RAK7268/RAK7268C V2 WisGate Edge Lite 2
V2. Optionally, you can use your own PoE cable and PoE injector since the device supports PoE.
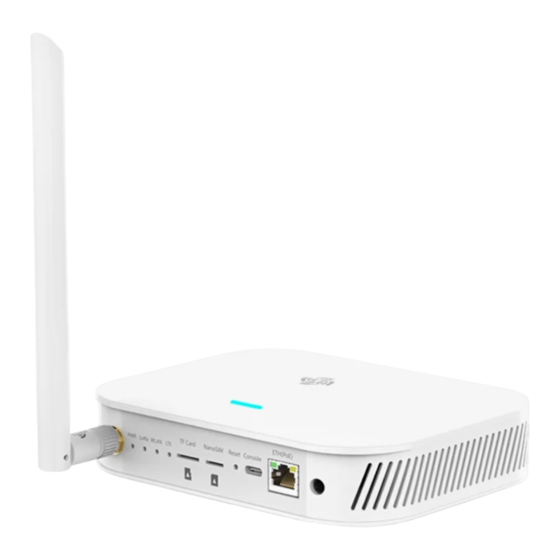
Casing and Ports
Figure 1: RAK7268/C V2 WisGte Edge Lite 2 V2 top view
Advertisement

Related Manuals for RAK RAK7268V2


Summary of Contents for RAK RAK7268V2
- Page 1 Documentation Center RAK7268V2/RAK7268CV2 Quick Start Guide Prerequisites What Do You Need? RAK7268/RAK7268C V2 WisGate Edge Lite 2 V2 Ethernet Cable (RJ-45 Port) for Ethernet connection 3. A Windows/macOS/Linux computer ⚠ WARNING The SIM card slot of the cellular versions is not hot-swappable. Make sure the gateway is switched off before inserting or ejecting the SIM card.
-
Page 2: Status Led Indicators
Documentation Center Figure 2: RAK7268/C V2 WisGte Edge Lite 2 V2 back view Status LED Indicators LEDs Status Indication Description PWR LED Power indicator - The LED is on when device power is on Breathing LED Breathing after system up ON - Linkup ETH LED OFF - Linkdown... - Page 3 Documentation Center LEDs Status Indication Description -ON - Connected -Flicker - Data receiving and sending Slow Flicker (1800 ms High / 200 ms Low) - Network searching LTE LED (functional only in RAK7268C Slow flicker (200 ms High / 1800 ms Low) - Idle Fast flicker (125 ms High / 125 ms Low) - Ongoing data transfer Reset Key Functions...
- Page 4 Documentation Center Figure 3: Accessing the gateway via Wi-Fi AP mode WAN Port (Ethernet) 1. Connect the Ethernet cable to the gateway port marked ETH and the other end to your PC. Figure 4: Accessing the gateway via Wi-Fi AP mode 2.
-
Page 5: Set Login Password
Documentation Center Figure 5: Internet properties 4. Select Use the following IP address and set the IP address (for this example to 169.254.15.100 Figure 6: Setting IP address of the PC In this example, you can access the gateway on the address. - Page 6 Documentation Center Should be at least 12 characters long; Has at least one special character (!“#$%&\‘()*+,-./:;<=>?@[]^_`{|}~); Has at least one number; Has at least one standard Latin letter (used in the English alphabet). Figure 7: Web UI login page 2. When the fields are filled in, click the Set password button to apply it. The Web UI is now accessible, and it will load the LoRaWAN Statistics page.
- Page 7 Documentation Center Figure 9: Login Page with set password Access the Internet Connect through Wi-Fi 1. Access the gateway's Web UI. Navigate to Network > WAN > Wi-Fi Menu. Expand the Wi-Fi field and click on Settings. Make sure to enable the Interface as it is disabled initially. Figure 10: Accessing the gateway via Wi-Fi AP mode For additional information, check the WisGateOS 2 User manual.
- Page 8 Documentation Center Figure 11: Connect through Wi-Fi credentials 2. You can either click the Scan button to choose your ESSID or manually type the ESSID of the network by clicking enter network (E)SSID manually. 3. Select the right Encryption method and enter the correct Key. NOTE: Assuming you have entered the correct parameter values you should get an IP address assigned by your Wi-Fi router's (AP) built-in DHCP server.
- Page 9 Documentation Center Figure 13: Connect through Ethernet settings Last Updated: 11/9/2022, 8:19:58 AM...
Need help?
Do you have a question about the RAK7268V2 and is the answer not in the manual?
Questions and answers