Table of Contents
Advertisement
Quick Links
Documentation Center
RAK7289V2/RAK7289CV2 Quick Start Guide
Prerequisites
What do you need?
1.
RAK7289 V2 WisGate Edge Pro
2. A Windows/Mac OS/Linux Computer
⚠
WARNING
The SIM card slot of the cellular versions is not hot-swappable. Make sure the gateway is switched off
before inserting or ejecting the SIM card.
The SD card found in the SD card slot must not be ejected, as it might affect the performance of the
device, as different logs and data are stored on it.
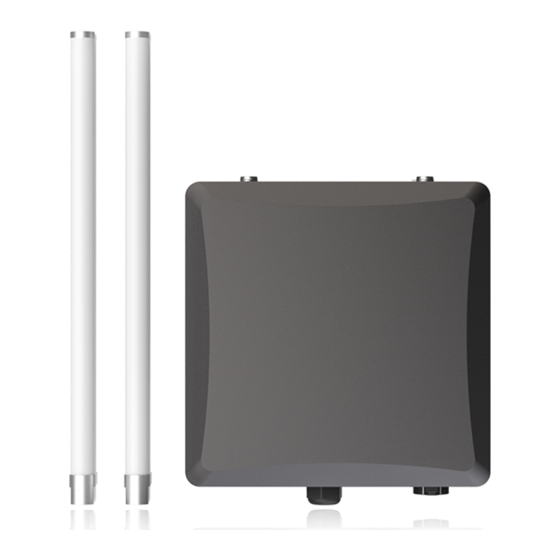
What is Included in the Package?
NOTE
Thе product does not include the LoRa antenna/s out of the box. The antennas are sold separately.
Product Configuration
Installation
Figure 1: RAK7289 V2 package contents
Advertisement
Table of Contents

Related Manuals for RAK RAK7289V2


Summary of Contents for RAK RAK7289V2
- Page 1 Documentation Center RAK7289V2/RAK7289CV2 Quick Start Guide Prerequisites What do you need? RAK7289 V2 WisGate Edge Pro 2. A Windows/Mac OS/Linux Computer ⚠ WARNING The SIM card slot of the cellular versions is not hot-swappable. Make sure the gateway is switched off before inserting or ejecting the SIM card.
- Page 2 Documentation Center This section provides the instructions on mounting and securing the mounting kit to the enclosure and the mounting pole. Mounting 1. Fix the bracket included in the mounting kit on the bottom of the enclosure with four M6*12 screws. Figure 2: Mounting the clamps to a pole NOTE The diameter of the pole that is supported by the brackets is 50-100 mm.
-
Page 3: Weather Protection
Documentation Center Figure 4: Connecting the PoE adapter Weather Protection To better protect the Ethernet cable gland and the antenna connector from the weather, you need to cover them with PVC tape. 1. Clean the surface area of the connector that will be wrapped. Wrap a layer of PVC tape with a 50% overlap according to the rotation direction of the connector. -
Page 4: Lightning Protection
Documentation Center Figure 6: Wrapping with waterproof tape 3. Wrap three additional layers with PVC tape with natural uncoiling force and a 50% overlap. Make sure to cover the head and the tail of the connector. Figure 7: Final PVC wrapping Lightning Protection In this section, how to set up lightning surge protection system, whether your RAK7289 V2 WisGate Edge Pro V2 is situated outdoor or indoor, will be discussed. -
Page 5: Recommended Equipment
Documentation Center Figure 8: Full lightning protection set-up Outdoor Surge Protection System Antenna Grounding - RAKwireless recommends a lightning arrestor to be installed on all the antenna N-type terminals. The arrestors have to be N-type Female to Male in order to fit the antenna and enclosure connectors. Make sure you use a 10 AWG or better wire to connect the screw terminals of the arrestors to the grounding rail mounted on the building wall (grounding bar in case of field deployment). -
Page 6: Power On The Gateway
Documentation Center arrestor on all LoRa N-type antenna terminals. Pulsar cable RAK9731 - RAK9731 Pulsar cable is used for RAK7289 V2 Lightning Protection. This cable is an N-Type Male - N-Type Female cable with 1.5 m, 3 m, 5 m, 10 m, or longer custom lengths. It is an LMR-400 coaxial cable with N-type connectors. - Page 7 Documentation Center Figure 10: Powering the gateway using PoE Access the Gateway In this section, several ways of accessing the gateway are provided to have different alternatives for you to choose from depending on the availability of the requirements needed. WARNING ⚠...
- Page 8 Documentation Center Figure 11: Accessing the gateway via Wi-Fi AP mode NOTE No password is required to connect via Wi-Fi. 2. Using your preferred Web browser, input the aforementioned IP address and you should see the Login Page. Login with the provided credentials. Username: root Password: root WAN Port (Ethernet)
- Page 9 Documentation Center Figure 12: Accessing the gateway via WAN Port (Ethernet) 2. The default IP is 169.254.X.X, where the last two segments are mapped from the last four bits of the MAC address of your gateway. For example, the last four bits of the MAC address are 0F:01 and the IP address is .
-
Page 10: Set Login Password
Documentation Center Figure 14: Setting IP address of the PC In this example, you can access the gateway on the address. 169.254.15.1 3.3 Set Login Password 1. For security reasons, upon the first login, you must set a login password. This is done by filling in the desired password and confirming it in the provided fields. -
Page 11: Access The Internet
Documentation Center Figure 16: LoRaWAN statistics page 3. On the next login, you need to use the set password for access. The default login username is root. Figure 17: Login Page with set password Access the Internet Connect Through WI-FI... - Page 12 Documentation Center Figure 18: Accessing the Internet using Wi-Fi 1. Access the gateway's Web UI. Navigate to Network > WAN > Wi-Fi. Expand the Wi-Fi block and click on Settings. Make sure the Interface is enabled. For additional information, check the WisGateOS 2 User manual Figure 19: Wi-Fi settings 2.
- Page 13 Documentation Center Figure 20: Accessing the Internet through Ethernet 1. Connect the Ethernet cable to the port marked ETH on the gateway and the other end to the PoE port of the PoE injector. 2. Connect the LAN port of the PoE injector to your router. The router's DHCP server should assign an IP Address to the gateway.
Need help?
Do you have a question about the RAK7289V2 and is the answer not in the manual?
Questions and answers