Advertisement
Quick Links
Documentation Center
Quick Start Guide
Prerequisites
What do you need?
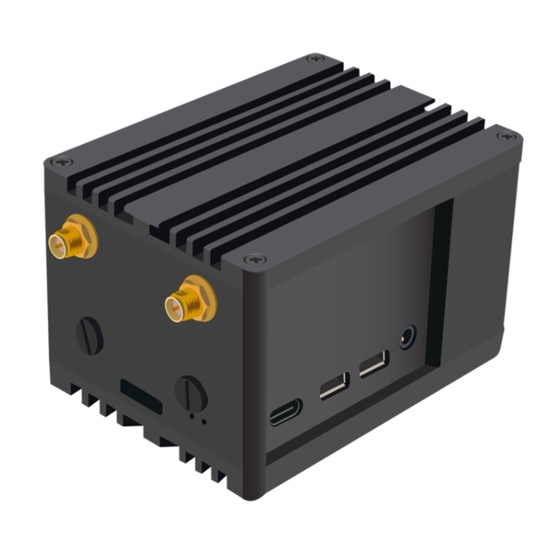
1. RAK7244 WisGate Developer D4 Gateway
2. 16GB SD Card (included) + Card Reader
3. 5V at least 2.5A Micro USB Power Supply
4. A Windows/Mac OS/Linux Computer
What's included in the Package?
Product Configuration
Accessing your Gateway
After burning the image into the SD Card, make sure you have inserted the SD Card with the Latest Firmware
installed to the RAK7244 WisGate Developer D4 Gateway and the LoRa and GPS Antenna attached to it. After
which, you can now safely power on the gateway. In this section, several ways in accessing the gateway are
provided to have different alternatives for you to choose depending on the availability of the requirements needed.
W ARNING
⚠
Before powering the Raspberry Pi 4 you should install the LoRa and GPS antennas. Not doing so might
damage the boards.
Wi-Fi AP Mode
By default, the gateway will work in Wi-Fi AP Mode which means that you can find an SSID named like
"Rakwireless_XXXX" on your PC Wi-Fi Network List.
Figure 1: RAK7244 WisGate Developer D4 Gateway Package Contents
Figure 2: RAKwireless Access Point
Advertisement

Related Manuals for RAK RAK7244


Summary of Contents for RAK RAK7244
- Page 1 After burning the image into the SD Card, make sure you have inserted the SD Card with the Latest Firmware installed to the RAK7244 WisGate Developer D4 Gateway and the LoRa and GPS Antenna attached to it. After which, you can now safely power on the gateway. In this section, several ways in accessing the gateway are provided to have different alternatives for you to choose depending on the availability of the requirements needed.
- Page 2 Documentation Center NOTE: “XXXX” is the last 2 bytes of your RAK7244’s WiFi MAC address. Connect to this Wi-Fi SSID using the password provided below. Take note also of the default IP address of the gateway provided below as this will be needed in connecting via SSH.
-
Page 3: Log Into The Gateway
Documentation Center Figure 4: Ethernet Properties By default, it will obtain an IP Address automatically. Click the Option "Use the following IP Address" and enter the IP Address: and press OK. 192.168.10.20 Figure 5: TCP/IPv4 Properties Now , you should be able to access your gateway from your PC successfully using the IP Address through SSH. - Page 4 Documentation Center Figure 6: Putty Software for SSH in Windows If you have connected to the gateway through Wi-Fi AP Mode, the IP Address is 192.168.230.1 If you have connected to the gateway through Ethernet, the IP Address is 192.168.10.10 It will then prompt you to enter the username and password.
- Page 5 Documentation Center Figure 8: Opening Terminal in Mac OS Open the terminal of Mac OS. Enter root mode by typing the following command: " " sudo -i Figure 9: SSH in Mac OS If you are not in root mode, enter " "...
-
Page 6: Accessing The Internet
1. Set pi password - used to set/change the password of the Gateway. 2. Set up RAK Gateway LoRa Concentrator - used to configure the frequency, which the Gateway will operate on, and the LoRaWAN Server which the Gateway will work with. - Page 7 Documentation Center Figure 12: Configuration options for WIFI There are 5 options to choose from in the Wi-Fi configuration menu: 1. Enable AP Mode/Disable Client Mode - the gateway will work in Wi-Fi Access Point Mode after rebooting while the Wi-Fi Client Mode will be disabled (this is the default mode). 2.
- Page 8 Please ensure to input the correct Wi-Fi SSID and Password or you will not be able to connect to the RAK7244 again via SSH in Wi-Fi AP Mode. If stuck in this situation, please follow this procedure listed in Reverting to Wi-Fi AP Mode section which is applicable for all Raspberry Pi based gateways to work again in Wi-Fi AP mode.
- Page 9 Documentation Center Figure 15: SSID of the Network you want to connect to Enter also the password. Just leave it empty if None. Figure 16: Password of the Wi-Fi Connect through Ethernet If you want to connect to router through Ethernet Cable, do the following steps: In the main configuration menu, choose “6 Configure LAN”.
-
Page 10: Optional Configurations
In the event that you have entered either or both icorrect Wi-Fi SSID and Password in the Wi-Fi Client Mode setup for the RAK7244 WisGate Developer D4 Gateway to connect to the router, follow these set of steps for you to work... -
Page 11: Configuring The Gateway
Documentation Center Remove the SD Card from your RAK7244 WisGate Developer D4 Gateway and insert it into your PC. Your PC should be able to detect it same with the image below: Figure 19: Creating rak_ap file to your SD Card Using your "Command Prompt"... - Page 12 1. Set pi password - used to set/change the password of the Gateway. 2. Set up RAK Gateway LoRa Concentrator - used to configure the frequency, which the Gateway will operate on, and the LoRaWAN Server which the Gateway will work with.
- Page 13 3. Alright, the success message for changing password will then pops up. Figure 24: Successful Password Change Setup RAK Gateway LoRa Concentrator This menu allows you to select your LoRa frequency band and one of the two available Networks Server options by choosing "2 Setup RAK Gateway LoRa concentrator"...
- Page 14 Documentation Center Figure 25: Choosing Setup RAK Gateway LoRa concentrator You can choose one of two supported LoRa Servers here: TTN or ChirpStack. Server is TTN Figure 26: Server is TTN TTN (The Things Network) - If you choose TTN as the LoRa Server, you will see the following page. Visit this article for more information on your local TTN frequency plan.
- Page 15 Documentation Center Figure 27: Selecting the TTN Channel Plan After choosing the correct frequency, the success message will appear as shown below. Figure 28: Successfully Changed the Frequency Server is Chirpstack Figure 29: Server Is Chirpstack...
- Page 16 Documentation Center ChirpStack - If you choose Chirpstack as your LoRa Server, you will see the following page with two options available: ChirpStack Channel Plan Configuration - used to configure your Regional Frequency Band. ChirpStack ADR Configure - used to enable/disable the Adaptive Data Rate (ADR) functionality. First, select "1 ChirpStack Channel-plan configuration"...
- Page 17 Documentation Center Figure 32: Chirpstack ADR Enable/Disable Connecting to the Things Network (TTN) The Things Network is about enabling low power devices to use long range gateways to connect to an open- source, decentralized network to exchange data with Application. Learn more about the Things Network through their documentation First, you should have connected your gateway into the internet through the router according to the method...
- Page 18 Documentation Center Figure 34: The Things Network Console Page All of your Registered Gateways will be displayed here in this page. Click "register gateway" Figure 35: Adding a Gateway to TTN...
- Page 19 This must be the same with the Gateway's True Gateway ID gateway-version otherwise you will fail to register your Gateway on TTN. Figure 37: RAK7244 - LPWAN Developer Gateway ID in SSH NOTE: Make sure to select the "I'm using the legacy packet forwarder" check box.
- Page 20 LoRaWAN networks. You can learn more about ChirpStack here For the RAK7244 WisGate Developer D4 Gateway there are 2 ways to use the ChirpStack: 1. Using the built-in ChirpStack There is a built-in ChirpStack in every RAK Developer gateway if you use the latest firmware.
- Page 21 Documentation Center Figure 39: IP address of your RAK7244 using IP Scanner There is a Web-based UI that comes with the ChirpStack instance. Simply open a browser and enter the following credentials: Browser Address: (Example: http://192.168.254.176:8080) <Gateway IP address>:8080 Username: admin Password: admin ⚠...
- Page 22 Documentation Center Everything should be pre-configured: Device profiles have been created, the Gateway has been registered with the server, etc. If you go to the Gateways tab and click on rak_gateway, you should see the Gateway details page. Figure 41: Available Gateways in Chirpstack Go to the rak_gateway and see the "Last seen"...
- Page 23 Chirpstack on. This can be done in item 2 in the menu Setup RAK Gateway LoRa concentrator. Assuming you have set it up correctly, Login to your ChirpStack to register your Gateway by opening the...
- Page 24 Documentation Center Figure 45: ChirpStack Registered Gateways Click "Create" to register your Gateway and fill up the necessary information. Figure 46: Registering your own Gateway Fill in the Gateway ID that we got from the Configuring the Gateway section, also called Gateway EUI. If you have properly configured your Gateway and there is a network connection between the external ChirpStack and your Gateway, you should see the following page and status:...
- Page 25 Documentation Center Figure 47: Successfully Registered the Gateway Congratulations! You have connected your gateway to an external ChirpStack Successfully! Last Updated: 9/13/2020, 2:53:36 PM...
Need help?
Do you have a question about the RAK7244 and is the answer not in the manual?
Questions and answers