Table of Contents
Advertisement
Quick Links
AURATON Tucana
Instruction manual version 20201122
The document contains information on the safety, installation, and use of the AURATON Tucana.
Weekly, wired thermostat
AURATON Tucana is a weekly, wired thermostat designed to work with a gas or electric heating
device.
ST
4 independently settable temperatures
Day, night, anti-freeze, holiday.
UV
&
9 independent temperature programs
Including 6 user-modifiable programs.
Backlit LCD display
LCD
Due to a backlit display, we can monitor the operation of the device even in a poorly lit
room (3 backlight colours to choose from).
Advertisement
Table of Contents

Related Manuals for AURATON Tucana


Summary of Contents for AURATON Tucana
- Page 1 Instruction manual version 20201122 The document contains information on the safety, installation, and use of the AURATON Tucana. Weekly, wired thermostat AURATON Tucana is a weekly, wired thermostat designed to work with a gas or electric heating device. 4 independently settable temperatures Day, night, anti-freeze, holiday.
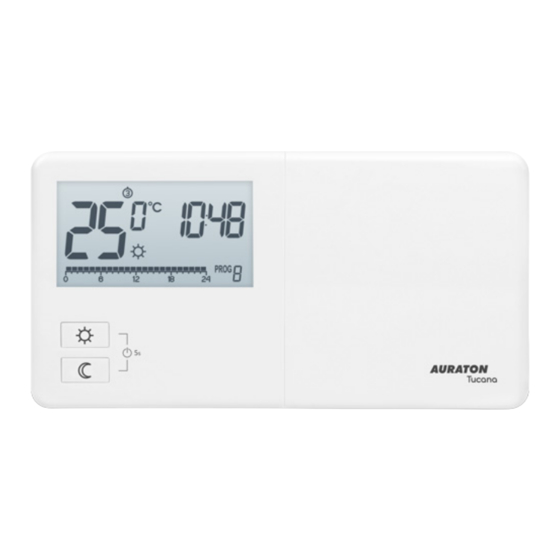
- Page 2 Description of the AURATON Tucana Weekly, wired thermostat On the right side of the front part of AURATON Tucana you will find a sliding cover. Slide it open to see the buttons. The cover can be removed for battery replacement.
- Page 3 It indicates the operation of AURATON Tucana in night mode. (see chapter: ‘Temperature programming’) Anti-freeze mode indicator ( It indicates the operation of AURATON Tucana in anti-freeze mode (see chapter: ‘Anti-freeze mode). Manual control indicator ( It indicates the operation of AURATON Tucana in manual mode (see chapters: ‘Manual control’...
- Page 4 The indicator is visible when the minimum permissible battery voltage level is exceeded. The batteries need to be replaced as soon as possible. IMPORTANT: In order to maintain any programmed parameters, the battery replacement operation should not exceed 30 seconds. Choosing the right location for AURATON Tucana...
-
Page 5: Battery Replacement
The correct operation of AURATON Tucana is largely influenced by its location. Using the device in a place with no air circulation or a place with direct sunlight may result in incorrect temperature control. AURATON Tucana should be installed on the internal wall of a building (a partition wall), in an environment with free air circulation. - Page 6 Insert the wall plugs (included). Tighten the left screw with a 3 mm clearance. Place AURATON Tucana through the screw head and slide to the right (note the keyhole-like opening on the rear cover of AURATON Tucana).
- Page 7 Tighten up the right screw so that it holds AURATON Tucana mounted securely.
- Page 8 2.7 mm (instead of 6 mm) and screw the screws directly into the wood. Turning AURATON Tucana on for the first time After inserting the batteries correctly into the battery compartment, the LCD screen will display all the...
- Page 9 After a while, AURATON Tucana will automatically go to the hour setting. An item flashing on the screen indicates that it is currently in editing mode. Use the buttons to set the desired hour and confirm the setting with the...
- Page 10 AURATON Tucana will go to the minute setting. Use the buttons again to set the desired minute value and confirm the setting by pressing the button. A flashing day of the week symbol appears in the upper left corner. Use the buttons to set the desired day and confirm the selection with the...
-
Page 11: Setting The Clock
NOTE: If no button is pressed for 60 seconds during the initial hour setting, AURATON Tucana will automatically enter its normal operating mode. NOTE: If no button is pressed for 10 seconds during the programming of any other functions, it is equivalent to using the button. -
Page 12: Selecting The Day Of The Week
Then press the button again. The minute segment starts flashing. Use the buttons to set the desired minute value. Confirm the above settings with the button. Selecting the day of the week To set the day of the week: Press the button. - Page 13 Use the buttons to select the correct day of the week. Confirm the above settings with the button. LO HI temperature If the ambient temperature is below 5°C the display will show „LO”.
- Page 14 If the ambient temperature is above 35°C the display will show „HI”.
- Page 15 – 21,0°C night temperature – 19,0°C anti-freeze temperature – 7,0°C Programming the day, night and anti-freeze temperatures AURATON Tucana allows you to program 3 types of temperature: Day temperature ( ) – from 5 to 30°C Night temperature ( ) –...
- Page 16 Deactivating the anti-freeze temperature To deactivate the anti-freeze temperature in AURATON Tucana, set the ‘dash symbol’ (below 0 °C or above 10 °C) on the display when programming this temperature.
-
Page 17: Introduction To Programming
Example: The figure above shows that from 6.00 A.M. to 11.00 P.M. Auraton Tucana will control the heating device in such a way that the room temperature will be day temperature ( ). -
Page 18: Factory Programs
Factory programs In order for AURATON Tucana to know when to turn on the day and night temperatures, you should be set to an appropriate program for each day of the week. For this purpose, you can use one of the three factory programs (from 0 to 2): Program no. -
Page 19: Program Selection
Sample AURATON Tucana setting from Monday to Sunday. Outside the intervals programmed, the night temperature will be set. Day of week Day temperature Monday 5:00 – 8:00; 15:00 – 23:00 Tuesday 5:00 – 8:00; 15:00 – 23:00 Wednesday 5:00 – 8:00; 15:00 – 23:00 Thursday 5:00 –... - Page 20 Press the button and then use the buttons to select the day of the week on which the program is to be executed. Press the button several times and select the desired program number. Programs 0-2 are factory ones, programs 3-9 can be modified by the user.
- Page 21 Confirm the selection with the button. Return to step 1 and repeat the procedure for the next day of the week. When each day of the week has been assigned an appropriate program, we can finish the programming. Modifying user programs To set a program: Press the button.
- Page 22 program is to be executed. Press the button several times and select program number 3 to 9 (user modifiable).
- Page 23 All (24) black rectangles will be lit on the timeline, each symbolising 1 hour. A visible rectangle means that the day temperature is to be achieved during a given hour. No rectangle above the timeline is tantamount to planning the night temperature. A flashing rectangle indicates the place where changes are being made on the timeline.
- Page 24 Use the buttons to highlight subsequent hours on the timeline and select the day or night temperature for each hour (we toggle between a lit rectangle and no rectangle with the button.
-
Page 25: Manual Control
After modifying the whole timeline, save the program with the button. NOTE: A program once modified can be assigned to different days of the week by selecting it on the desired day of the week. Manual control If you want to discontinue the current program operation and extend maintaining the day temperature for any reason, you can do it manually. -
Page 26: Holiday Mode
We sometimes leave our homes for longer periods. To avoid reprogramming the whole AURATON Tucana device, we can use the holiday mode, which makes AURATON Tucana achieve only one temperature during our absence. The holiday mode can last from a minimum of 1 hour and to a maximum of 99 days. - Page 27 The temperature field starts flashing. It can be set with the buttons. Confirm the selection with the button. If the selection is not confirmed, AURATON Tucana will automatically switch to the holiday mode set after 10 seconds. Press the button to exit the holiday mode. NOTE: The holiday temperature is independent of the day, night or anti-freeze temperatures.
- Page 28 In AURATON Tucana, you can set the anti-freeze temperature in the range of 0°C to 10°C (the factory setting of the anti-freeze temperature is 7°C). In the case of a prolonged period of absence, it is possible to activate the anti-freeze temperature mode.
-
Page 29: Configuration Settings
The RESET function of AURATON Tucana Pressing the RESET ( ) RESET button clears the time and day and restarts AURATON Tucana. The MASTER RESET function of AURATON Tucana The MASTER RESET function restores factory settings. It is activated by pressing the RESET ( ) RESET buttons simultaneously. - Page 30 Changing the backlight colour A flashing backlight means that the buttons can be used to change the backlight colour. Confirm the selection with the button. AURATON Tucana will go to the next parameter changing mode.
- Page 31 HI 2 – ±0.2 °C (preset), HI 4 – ±0.4 °C, HI P – PWM operating mode (see chapter “PWM operating mode”). Confirm your choice by pressing the AURATON Tucana will proceed to change the next parameter.
- Page 32 The delay change mode is signaled by a flashing 90:SE Use the buttons to activate or deactivate the delay. 90:SE – delay of 90 s. (preset) 0:SE – no delay Confirm your choice by pressing the AURATON Tucana will proceed to change the next parameter. Offset change...
- Page 33 The offset function allows you to calibrate the temperature indications with a tolerance of ± 3°C. For example, AURATON Tucana indicates that the room temperature is 23°C and a standard wall thermometer hanging next to it indicates 24°C. Changing the offset by +1 degree will make AURATON Tucana indicate the same temperatures as the wall thermometer.
- Page 34 + 20 = 80). In this case you should slow down the clock by setting C -80. Example 2: After a week of operation, the clock in AURATON Tucana is 2 minutes slow (2 x 60 = 120). In this case you should speed up the clock by setting C 120.
- Page 35 Knowing these values makes AURATON Tucana turn on and off the heating device in appropriate cycles to maintain the temperature to the set value as close as possible. Temperature Time Set temperature Room temperature IMPORTANT: AURATON Tucana can turn on the heating device despite the fact that the temperature in the room is higher than the set temperature in the PWM mode.
- Page 36 Heating device e.g. a gas furnace Electric heating device (MAX 230 V AC, 8 A) IMPORTANT! During the installation of AURATON Tucana, the power supply should be disconnected. It is recommended to have the receiver installed by a specialist. NOTE:...
-
Page 37: Cleaning And Maintenance
Cleaning and maintenance The outside part the device should be cleaned with a dry cloth. Do not use solvents (such as benzene, thinner or alcohol). Do not touch the device when your hands are wet. It may cause electric shock or serious damage to the device. - Page 38 The user shall return it to a collection point for electrical and electronic waste. Contact and address of the manufacturer: LARS, ul. Świerkowa 14 64-320 Niepruszewo www.auraton.pl Download User manual Declaration of conformity...
Need help?
Do you have a question about the Tucana and is the answer not in the manual?
Questions and answers