Advertisement
Precautions
Location
Using the unit in the following locations can result in a malfunction.
- In direct sunlight
- Locations of extreme temperature or humidity
- Excessively dusty or dirty locations
- Locations of excessive vibration
- Close to magnetic fields
Power supply
Please connect the designated AC adapter to an AC outlet of the correct voltage. Do not connect it to an AC outlet of voltage other than that for which your unit is intended.
Interference with other electrical devices
Radios and televisions placed nearby may experience reception interference.
Operate this unit at a suitable distance from radios and televisions.
Handling
To avoid breakage, do not apply excessive force to the switches or controls.
Care
If the exterior becomes dirty, wipe it with a clean, dry cloth. Do not use liquid cleaners such as benzene or thinner, or cleaning compounds or flammable polishes.
Keep this manual
After reading this manual, please keep it for later reference.
Keeping foreign matter out of your equipment
Never set any container with liquid in it near this equipment. If liquid gets into the equipment, it could cause a breakdown, fire, or electrical shock.
Be careful not to let metal objects get into the equipment. If something does slip into the equipment, unplug the AC adapter from the wall outlet. Then contact your nearest Korg dealer or the store where the equipment was purchased.
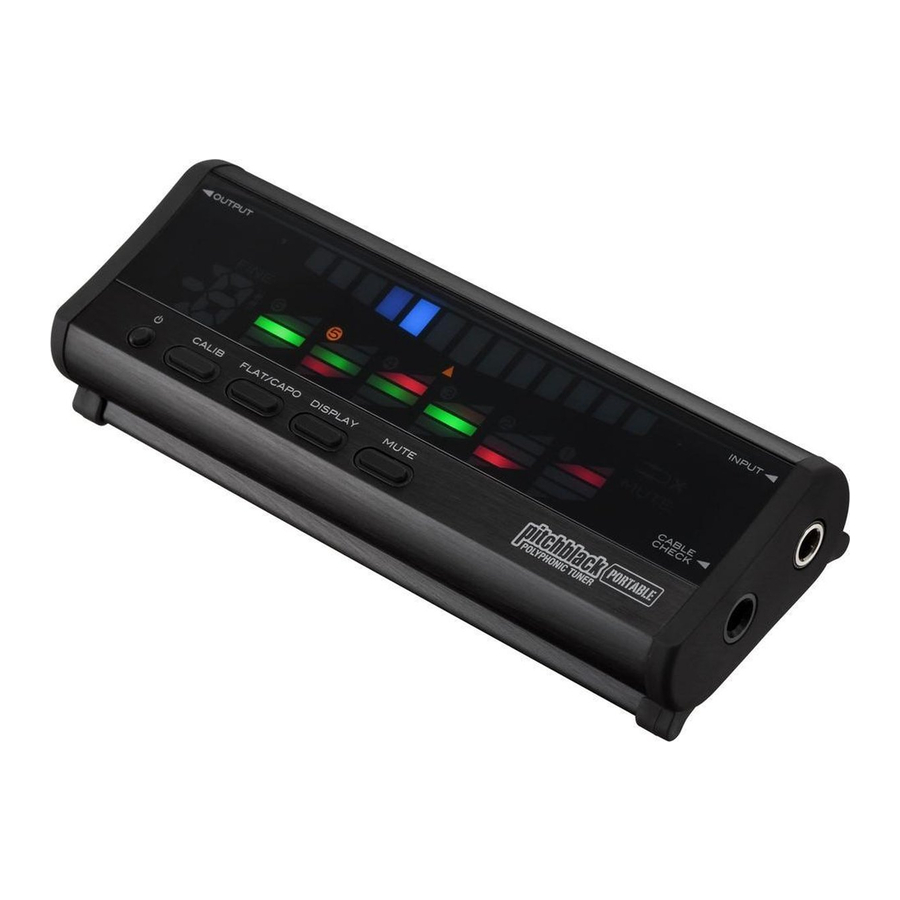
Controls

- STANDBY/ON button
- CALIB button
- FLAT/CAPO button
- DISPLAY button
- MUTE button
- Polyphonic Meter Display
- Meter Display
- FINE LED
- OUTPUT jack (mono)
- DC 9V IN jack
- DC 9V OUT jack
- Display
- TUNER ON LED
- INPUT jack (mono)
- CABLE CHECK LED
- CABLE CHECK jack
- MUTE LED
Installing the battery

- Open the battery cover that's located on the bottom of the tuner.
- Install the batteries making sure that the polarity is correct.
- Once the batteries are installed, close the cover.
 When the battery nears the end of its life, the TUNER ON LED will blink. When this happens, install a new battery as soon as possible.
Connections

Turn off the power to all devices before you connect an instrument to avoid damaging your equipment.
The INPUT, CABLE CHECK and OUTPUT jacks are mono. Stereo (TRS) cables will not work.
INPUT jack
Connect a cable from your instrument to the INPUT jack of the tuner.
OUTPUT jack
Connect a cable from the OUTPUT jack to your effect pedals or amp etc.
The signal that is input from the INPUT jack passes through the buffer and is output to the OUTPUT jack. By pressing the MUTE button, you can enable or disable the mute function for the signal that is output from the OUTPUT jack. When the mute function is enabled, the MUTE LED will light up and the signal will not be output from the OUTPUT jack.
TIP When the tuner is in the standby power mode, the signal will not be output from the OUTPUT jack.
DC 9 V IN jack
If you use an optional AC adapter for power, be sure that it is 9 volt (  ) and at least 600 mA.
Using an AC adapter other than what Korg recommends may cause a malfunction or damage.
DC 9 V OUT jack
If you're using an optional AC adapter, you can supply power to more than one effect pedal with an optional DC cascade cable.
When using an optional DC cascade cable, make sure that the total amount of current consumption for the connected pedals does not exceed 200 mA. Furthermore, pay attention to the required polarity of the effect pedals when connected.
Do not connect the AC adapter to the DC 9V OUT jack. Doing so will cause a malfunction or damage.
If the pitchblack PORTABLE is activated using a battery, you cannot supply power from the DC 9V OUT jack.
Cable check jack
Connect one end of a mono standard phone cable to the INPUT jack and the other end to the CABLE CHECK jack.

When the cable is connected, the cable check function will start and the results will be shown on the CABLE CHECK LEDs.
| Normal: |  |
| Disconnected or short circuit: |  |
TIP Stereo cables cannot be checked.
Tuning
- Connect your instrument to the INPUT jack.
- Press the STANDBY/ON button to turn on the power.
The TUNER ON LED will light up and the calibration settings (0–9) and flat/capo settings (-5–7) will appear in order on the display for a few seconds (lights up " blinks).
TIP If no user input is performed for up to 4 hours, the tuner will enter the standby power mode automatically.
- Set the calibration, flat/capo setting, and meter display setting as necessary.
- Play all the open strings on your instrument, and tune them so that the green LED in the polyphonic meter display lights up.
When you tune a string, the tuner will detect the string that you're currently tuning, and will show its precise pitch in the meter display.
TIP You can turn off the meter display by holding down the DISPLAY button for one second or longer.
TIP The tuner will automatically detect whether your instrument is a guitar or a 4/5/6-string bass. With normal tuning, the tuner will indicate E, A, D, G, B, E (from thick to thin strings) for a guitar. For a bass, the tuner will indicate Low-B, E, A, D, G, Hi-C.

- If you want to tune a single note on your instrument, tune while watching the meter display.
The display will indicate the note name that is closest to the pitch you input.
Adjusting the calibration
The pitchblack PORTABLE comes from the factory with the calibration set to A=440Hz. If an adjustment is necessary, you can do so within a range of 436–445Hz.
- Press the CALIB button.
The calibration indication "C" will appear, and then the current value will be shown in the display for several seconds. - While the current calibration setting is shown in the note name display, press the CALIB button again to adjust the setting.
Each time you press the CALIB button you will cycle through the following settings.
0: 440 Hz, 1: 441 Hz, 2: 442 Hz, 3: 443 Hz, 4: 444 Hz, 5: 445 Hz, 6: 436 Hz, 7: 437 Hz, 8: 438 Hz, 9: 439 Hz - When you have selected the desired calibration setting, wait approximately two seconds without pressing any buttons. The new setting will blink several times in the note name display indicating that the calibration has been set. The pitchblack PORTABLE will automatically return to tuner mode.
Flat/capo settings
You can use flat, drop D, and capo settings.
With the factory settings, "0: Normal tuning" is selected.
- Press the FLAT/CAPO button.
The flat/capo indication "F" will appear, and then the current setting will be shown in the display for several seconds (lit " blinking). - While this setting is shown, press the FLAT/CAPO button to select the desired flat or capo setting.
You can specify the number of semi tones by which the pitch is raised or lowered. You can also specify drop D tuning (only the guitar's 6th string is tuned to D).
0: Normal tuning
-1: Lowered one semitone ... -5: Lowered five semitones (flat tuning)
D: Drop D tuning
1: Raised one semitone ... 7: Raised seven semitones (capo support) - When you've made the desired setting, wait for two seconds without pressing any buttons.
The display indication will blink several times, and the flat/capo setting will be made. The tuner will then return to its normal state, allowing you to tune.
TIP Since the note name indicated in the display when a single note is detected reflects the flat/capo settings, flat/capo tuning can be performed by tuning to the same note as with normal tuning, even if flat/capo settings have been made. (However, this excludes drop D tuning.)
Meter display setting
You can specify the display pattern that's shown in the meter's display. You can choose one of three patterns. With the factory settings, "1:
Regular meter" is selected.
- Press the DISPLAY button.
The current setting is shown for several seconds in the display (lit"blinking). - While this setting is shown, press the DISPLAY button to select the desired display pattern. The setting will change each time you press the button.
- Regular meter

Tune your instrument so that the center LED of the meter display is lit up. The LED illumination will move from the center toward the right if the note is sharp, or from the center toward the left if the note is flat. - Strobe meter

Tune your instrument so that the illumination stops flowing in the meter display. The illumination will flow from left to right if the note is sharp, or from right to left if the note is flat. When functioning as the strobe meter, the FINE LED will light up and the differences in the 0.1 cent pitch can be displayed. - Half-strobe meter

Tune your instrument so that the stream stops and only the center LED is lit up. The right side of the meter display will strobe if the note is sharp, and the left side of the meter display will strobe if the note is flat. When the pitch is correct, only the center LED will light up.
- Regular meter
- When you've chosen the desired setting, wait for two seconds without pressing any buttons.
The display indication will blink several times, and the meter display setting will be made. The tuner will then return to its normal state, allowing you to tune.


Specifications
| Tuning: | 12-note equal temperament |
| Detection range: | E0 (20.60 Hz)–C8 (4186 Hz), sine wave |
| Calibration range: | A4 = 436–445 Hz (1 Hz steps) |
| Detection accuracy: | ±0.1 cent |
| Input impedance: | 1 M-ohm (tuner on) |
| Connects: | INPUT jack, OUTPUT jack, CABLE CHECK jack, DC 9V IN jack, DC 9V OUT jack (Maximum 200 milliamps) |
| Power supply: | two AA batteries (LR6) or AC adapter (9V,  , 600 milliamps or greater) , 600 milliamps or greater) |
| Battery life: | approximately 15 hours continuous use with tuner on (LR6, Polyphonic input continuously, Regular meter) |
| Current consumption: | maximum 130 mA |
| Dimensions (W x D x H): | 161mm x 60mm x 33mm / 6.34" x 2.36" x 1.30" (including rubber feet) |
| Weight: | 268g / 9.45 oz. (including battery) |
| Included items: | two AA batteries |
| Options (sold separately): | AC adapter (9V, , 600 milliamps) |
* Appearance and specifications are subject to change without notice for improvement.

Documents / ResourcesDownload manual
Here you can download full pdf version of manual, it may contain additional safety instructions, warranty information, FCC rules, etc.
Advertisement


Need help?
Do you have a question about the pitchblack PORTABLE and is the answer not in the manual?
Questions and answers