Advertisement
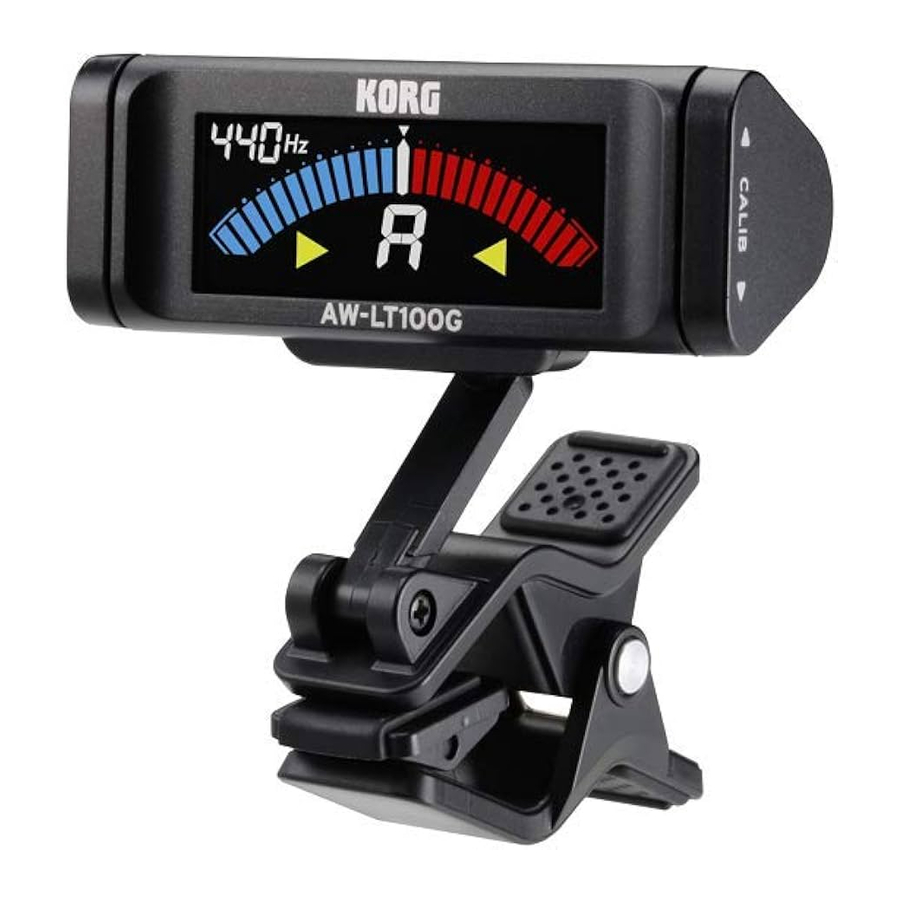
Parts of the AW-LT100G/AW-LT100B

Installing the battery
 When the battery becomes depleted, a battery indicator (
 ) will appear on the display. Immediately replace the battery with a new one.
Battery is not included, so please obtain it separately.

- Open the battery compartment cover on the rear of the tuner in the direction of the arrow.
- Insert the battery, making sure to observe the correct polarity, and then close the cover.
Attaching to the instrument and range of motion
The AW-LT100G/AW-LT100B tunes by picking up the vibrations of the instrument. Therefore, attach the AW-LT100G/AW-LT100B to the headstock of your instrument in order to tune it. Additionally, the AW-LT100G/AWLT100B can be freely moved so that the display is easy to read.
 The AW-LT100G/AW-LT100B may be damaged if you apply excessive force within its range of motion, or attempt to move it beyond its intended range of motion.

Please carefully attach the AW-LT100G/AW-LT100B to your instrument. Leaving the AW-LT100G/AW-LT100B attached for a long time may damage or mark the instrument's surface.
Depending on various factors such as age-related change or the surface finish, there is a possibility that your instrument may be damaged by attaching this product.
Tuning
Tuning procedure
- Turn the left shuttle switch upward. Each time you turn the shuttle switch, the AW-LT100G/AW-LT100B will be turned on or off.
If the power is left on for approximately 3 minutes without any user input, it will turn off automatically (Auto power-off function). - If necessary, change the reference pitch (calibration) and meter mode.
- Play a single note on your instrument.
The note name closest to the detected pitch appears in the note name indicator. Check that the correct note name appears in the display, and then tune your instrument while watching the meter.
The tuning indications differ depending on the selected meter mode setting.
Even if the pitch is within the range of detection, it may not be possible to detect the pitch of an instrumental sound that contains large numbers of overtones or a sound that has a rapid decay.
The meter may respond to vibrations it picks up from the environment.
Reference pitch settings (calibration) (*M)
Each time you turn the right shuttle switch upward (or downward), the reference pitch (calibration value) increases (or decreases) in 1 Hz steps.
Setting the meter mode (*M)
Each time you turn the left shuttle switch downward, the meter mode changes.
Regular ¬ Strobe ¬ Half strobe ¬ Regular...
- Regular meter
Tune your instrument until the meter segments up to the center (![]() ) light up. If the pitch is sharp, meter segments up to the right of the center light up. If the pitch is flat, meter segments to the left of the center light up.
) light up. If the pitch is sharp, meter segments up to the right of the center light up. If the pitch is flat, meter segments to the left of the center light up.

- Strobe meter
Tune your instrument until the meter segments stop running. Since the strobe meter has higher precision, it allows you to tune with greater accuracy. The illumination will flow from left to right if the note is sharp, or from right to left if the note is flat.

- Half-strobe meter
Tune your instrument until the meter segment at the center (![]() ) lights up. If the pitch is sharp, meter segments to the right of the center light up. If the pitch is flat, meter segments to the left of the center light up.
) lights up. If the pitch is sharp, meter segments to the right of the center light up. If the pitch is flat, meter segments to the left of the center light up.


Backlight
After turning the left shuttle switch upward to turn on the AWLT100G/AW-LT100B, you can change the brightness of the display by keeping the left shuttle switch turned upward for approximately 2 seconds.
Auto: The backlight will light brightly when sound is inputted or when a shuttle switch is operated. When there has been no sound input or shuttle switch operation for approximately three seconds after the power has been turned on, the backlight will turn off in order to prevent the battery from being depleted.
Soft: The backlight will light at a lower level of brightness in order to prevent the battery from being depleted.
Specifications
| Scale: | 12-note equal temperament |
| Range (sine wave): | AW-LT100G B1 (61.74 Hz)–E6 (1319 Hz) AW-LT100B E0 (20.60 Hz)–C5 (523.3 Hz) |
| Precision: | +/-0.1 cent |
| Reference pitch: | A4 = 436–445 Hz (1 Hz steps) |
| Dimensions (W x D x H): | 60 mm x 60 mm x 55 mm/2.36'' x 2.36'' x 2.17'' |
| Weight: | 32 g/1.13 oz. (including battery) |
| Power supply: | One AAA Battery |
| Battery life: | approximately 100 hours (backlight: Soft, tuner continuously operating, A4 input, when using alkaline battery) |
| Included items: | Owner's Manual |
*M Settings are remembered even when the power is off.
Specifications and appearance are subject to change without notice for improvement.
Precautions
Location
Using the unit in the following locations can result in a malfunction.
- In direct sunlight
- Locations of extreme temperature or humidity
- Excessively dusty or dirty locations
- Locations of excessive vibration
- Close to magnetic fields
Power supply
Be sure to turn off the power when the unit is not in use. Remove the battery in order to prevent it from leaking when the unit is not in use for extended periods.
Interference with other electrical devices
Radios and televisions placed nearby may experience reception interference. Operate this unit at a suitable distance from radios and televisions.
Handling
To avoid breakage, do not apply excessive force to the switches or controls.
Care
If the exterior becomes dirty, wipe it with a clean, dry cloth. Do not use liquid cleaners such as benzene or thinner, or cleaning compounds or flammable polishes.
Keep this manual
After reading this manual, please keep it for later reference.
Keeping foreign matter out of your equipment
Never set any container with liquid in it near this equipment. If liquid gets into the equipment, it could cause a breakdown, fire, or electrical shock. Be careful not to let metal objects get into the equipment.
Documents / ResourcesDownload manual
Here you can download full pdf version of manual, it may contain additional safety instructions, warranty information, FCC rules, etc.
Advertisement


Need help?
Do you have a question about the AW-LT100G and is the answer not in the manual?
Questions and answers