Advertisement
Quick Links
`
Fits: 1999-2016
Ford Superduty With 8Ft Long Bed
Qty
1
Driver/Left Side Box Board
1
Passenger/Right Side Box Board
1
Driver/Left Side Front Mounting Bracket
1
Passenger/Right Side Front Mounting Bracket
1
Driver/Left Side Rear Mounting Bracket
1
Passenger/Right Side Rear Mounting Bracket
1
Driver/Left Side Front Box Bracket
1
Passenger/Right Side Front Box Bracket
1
Driver/Left Side Rear Box Bracket
1
Passenger/Right Side Rear Box Bracket
Page 1 of 8
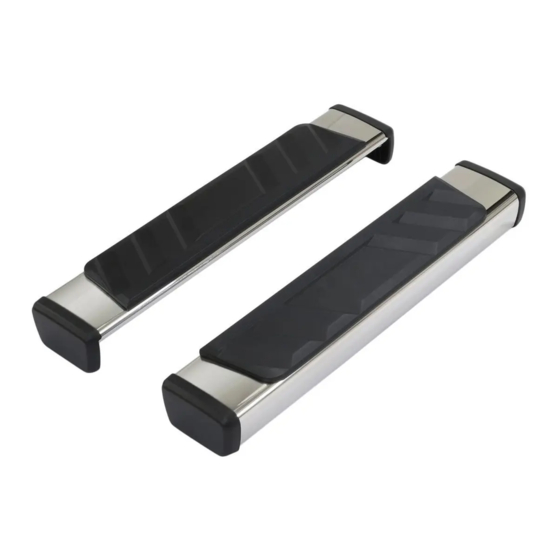
Part No. A5006S
Part Description
4" Side Bar
PARTS LIST:
Qty
8
8
8
8
2
8
16
8
8
8
4
Part Description
10mm Bolt Plates
10mm x 27mm x 3mm Flat Washers
10mm Hex Nuts
10mm Lock Washers
10mm Fish Wires
8mm Nylon Lock Nuts
8mm x 24mm x 2mm Flat Washers
8-1.25mm x 30mm Hex Bolts
8mm Combo Bolts
8mm Plastic Clips
Plastic Covers
Advertisement

Subscribe to Our Youtube Channel
Related Manuals for TrailFX A5006S


Summary of Contents for TrailFX A5006S
- Page 1 4" Side Bar Part No. A5006S Fits: 1999-2016 Ford Superduty With 8Ft Long Bed PARTS LIST: Part Description Part Description 10mm Bolt Plates Driver/Left Side Box Board 10mm x 27mm x 3mm Flat Washers Passenger/Right Side Box Board 10mm Hex Nuts...
- Page 2 Driver/Left Passenger/Right (8) 10mm Rear Rear Mounting Bolt Plates Mounting Bracket Bracket Driver/Left Passenger/Right Rear Box Rear Box Bracket Bracket Passenger/Right Driver/Left Front Front Mounting Mounting Bracket Bracket Driver/Left Passenger/Right Front Box Front Box Bracket Bracket (4) Plastic Driver/Left Box Board Covers Passenger/Right (8) Plastic...
- Page 3 Wire and insert the coiled end in through the factory oval hole and out of the rectangular channel, (Figures 2—3). Thread the coiled end of the fish wire onto (1) 10mm Bolt Plate, (Figures 4—5). Gently pull the coil back into the rectangular channel until the plate sits flatly on top of the opening of the factory hole.
- Page 4 Driver/Left Side Installation Pictured (Fig 4) 10mm Bolt Plate (Fig 3) Fish Wire out of rectangular channel pictured (Fig 5) Thread coiled end of Fish Wire onto Bolt Plate (Fig 6) Pull Fish Wire and Bolt Plate back into the oval hole Insert Bolt Plates Release tube from plastic into open end of...
- Page 5 Driver/Left Side Installation Pictured Rear (Fig 9) 2011-16 plastic vent tube holder removed Insert Bolt Plates into open end of square tube and out factory hole (See (Fig 10) Drill 1/2” hole at marked location Fig 2—7 on how to use fish wire) Rear Rear (Fig 11) 2011-16 driver side Bolt Plates Installed...
- Page 6 Driver/Left Side Installation Pictured (2) 8mm Hex Bolts (4) 8mm Flat Washers Mounting Points: 1st and 4th hole (2) 8mm Nylon Lock Nuts Rear Rear (Fig 16) driver side front mounting location pictured (Fig 15) Driver side rear Mounting and Box Bracket Installed Insert (2) Bolt Plates using (2) 10mm Bolt Fish Wire as necessary...
- Page 7 Driver/Left Side Installation Pictured Rear (Fig 21) Slide Cover over top of Bracket. (Fig 22) driver side Plastic Cover installed Attach Cover to Bracket with (2) Plastic Clips (2) 8mm Combo Bolts Rear Front (Fig 24) Attach Box Board to Brackets. (Fig 23) Inserts in bottom of Box Note: All cradles must face rear Board are closer to front end...
-
Page 8: Product Care
Ensure make model year, cab length and bed size of your vehicle is listed in the application. All installation steps are followed correctly. Check out these other TrailFX Products!! Keystone Automotive Operations Inc. (KAO) warrants this product to be free of defects in material and workmanship at the time of purchase by the original retail consumer.
Need help?
Do you have a question about the A5006S and is the answer not in the manual?
Questions and answers