Table of Contents
Advertisement
Advertisement
Table of Contents

Related Manuals for Hikmicro HM-TM36-LG/D


Summary of Contents for Hikmicro HM-TM36-LG/D
- Page 1 Thermal Camera Module Technical Manual...
-
Page 2: Table Of Contents
Table of Contents Chapter 1. Technical Performance ...................... 1 1.1 Technical Performance of HM-TM36-LG/D............... 1 1.2 Technical Performance of HM-TM36-LG/S ............... 2 Chapter 2. Appearance and Interface ....................5 2.1 Appearance of HM-TM36-LG/D ..................5 2.1.1 33 Pin ......................... 6 2.1.2 4 Pin ........................... - Page 3 3.8.17 AGC Mode ......................35 3.8.18 Menu Operation ....................35 Chapter 4. LVCMOS Communication Protocol .................. 37 4.1 Thermal Camera Module Video Output ................. 37 4.2 HM-TM36-LG/D Output ....................37 4.2.1 BT.656 ........................37 4.2.2 YUV+RAW ........................ 40 4.3 HM-TM36-LG/S Output ....................41 4.3.1 OLED ........................
-
Page 4: Chapter 1. Technical Performance
Chapter 1. Technical Performance The performance of HM-TM36-LG/D and HM-TM36-LG/S thermal camera modules are shown in Table 1-1 and Table 1-2. 1.1 Technical Performance of HM-TM36-LG/D Table 1-1 Performance of HM-TM36-LG/D HM-TM36-LG/D Model Parameter Thermal Camera Module Image Sensor Vanadium Oxide Uncooled Focal Plane Arrays Response 8 to 14 μm... -
Page 5: Technical Performance Of Hm-Tm36-Lg/S
Dimension (mm) See Chapter 2. Appearance and Interface Weight < 22 g (without lens and lens base) Note: The YUV+RAW output of HM-TM36-LG/D only supports the palette. 1.2 Technical Performance of HM-TM36-LG/S Table 1-2 Performance of HM-TM36-LG/S HM-TM36-LG/S Model Thermal Camera Module... - Page 6 Frame 50 fps Pixel Interval 12 μm Auto Correction (Timing Correction, Temperature Correction), Image Correction Manual Correction, Background Correction Nonuniformity Shutter Correction Correction Brightness Support Contrast Support Support AGC Mode Auto Support Image Param. Zoom ×1,×2,×4,×8 Palette Black Hot, White Hot, Red Hot, Fusion Support CVBS Support...
- Page 7 Working Temperature -40°C to 60°C, < 90% RH Humidity Storage Temperature -45°C to 75°C, < 90% RH Humidity Dimension (mm) See Chapter 2. Appearance and Interface Weight < 22 g (without lens and lens mount)
-
Page 8: Chapter 2. Appearance And Interface
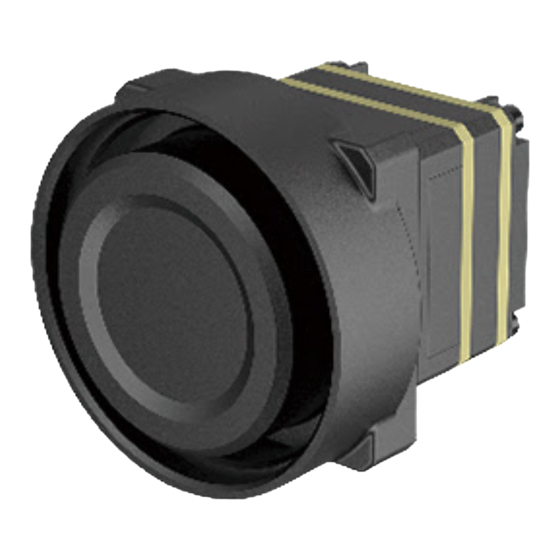
Chapter 2. Appearance and Interface 2.1 Appearance of HM-TM36-LG/D The appearance and dimension of HM-TM36-LG/D thermal camera module (with M25 lens mount) are shown in Figure 2-1. Figure 2-1 Dimension of HM-TM36-LG/D... -
Page 9: Pin
Figure 2-2 Interfaces of HM-TM36-LG/D 2.1.1 33 Pin In the HM-TM36-LG/D thermal camera module, the FPC connector model for the external 33 Pin is OK- F302-33115. The electrical interface description is shown in Table 2-1. Table 2-1 FPC Electrical Interface Description of 33 Pin... - Page 10 RAW_bit14 DATA14 LVCMOS_1.8 V RAW_bit15 DATA15 LVCMOS_1.8 V RAW_bit0 DATA0 LVCMOS_1.8 V RAW_bit1 Clock DATA1 LVCMOS_1.8 V LVCMOS_1.8 V RAW_bit2 DATA2 LVCMOS_1.8 V Vertical RAW_bit3 Synchronization DATA3 LVCMOS_1.8 V LVCMOS_1.8 V Horizontal RAW_bit4 DATA4 Synchronization LVCMOS_1.8 V LVCMOS_1.8 V RAW_bit5 DATA5 LVCMOS_1.8 V Serial...
-
Page 11: Pin
Figure 2-3 Dimension of 33 Pin Interface and FPC 2.1.2 4 Pin In the HM-TM36-LG/D thermal camera module, the key socket model for the external 4 Pin is 0.8WTB- 4AB-01. The appearance and dimension are shown in Figure 2-4. - Page 12 Figure 2-4 Dimension of 4 Pin Interface The electrical interface description of 4 Pin interface is shown in Table 2-2. Table 2-2 4 Pin Electrical Interface Description Signal Specification Description KEY1 LVCMOS_1V8 High level by default KEY2 LVCMOS_1V8 High level by default KEY3 LVCMOS_1V8 High level by default...
-
Page 13: Appearance Of Hm-Tm36-Lg/S
2.2 Appearance of HM-TM36-LG/S Figure 2-5 Dimension of HM-TM36-LG/S with M25 Lens Mount... - Page 14 Figure 2-6 Dimension of HM-TM36-LG/S with M34 Lens Mount...
- Page 15 Figure 2-7 Dimension of HM-TM36-LG/S without Lens Mount...
- Page 16 Figure 2-8 Dimension of HM-TM36-LG/S without Connector Figure 2-9 Dimension of HM-TM36-LG/S Backboard The interfaces of HM-TM36-LG/S are shown in Figure 2-10.
-
Page 17: Pin
6PIN PIN1 PIN6 PIN1 12PIN PIN12 PIN44 PIN2 45PIN PIN1 PIN45 Figure 2-10 Interfaces of HM-TM36-LG/S 2.2.1 6 Pin The connector model used with 6 Pin interface is GH-NAB 1.25 mm spacing crimp connector. The wire order and electrical description of the interface are shown in Table 2-3. Table 2-3 Electrical Interface Description of 6 Pin Wire to Board Connector Signal Specification... -
Page 18: Pin
Figure 2-11 Appearance and Dimension of 6 Pin Wire to Board Connector Interface 2.2.2 12 Pin The FPC socket model used with 12 Pin interface is FH12-12S-0.5SH(55). The wire order and electrical description of the interface are shown in Table 2-4. Table 2-4 Electrical Interface Description of 12 Pin Wire to Board Connector Signal Specification... -
Page 19: Pin
AGND CVBS Analog Video AGND LVCMOS_1.8 V IIC Date LVCMOS_1.8 V IIC Clock The appearance and dimension of 45 Pin Wire to Board Connector Interface are shown in Figure 2-12. Figure 2-12 Appearance and Dimension of 45 Pin Wire to Board Connector Interface 2.2.3 45 Pin The FPC socket model used with 45 Pin interface is FH26W-45S-0.3SHW (60). - Page 20 Logical Circuit Power Supply LVCMOS_1.8 V 3.3 V Pixel Array Power Supply 1.8 V Connect to 1.8 V by Default No Internal Connetion Cbcr7 Connet to GND by Default Cbcr6 Video Clock Signal PCLK Cbcr5 LVCMOS_1.8 V OLED Color Data Horizontal Synchronization HSYNC...
- Page 21 The appearance and dimension of 45 Pin are shown in Figure 2-13. Figure 2-13 Appearance and Dimension of 45 Pin Wire to Board Connector Interface The appearance and dimension of the corresponding FPC wire for 45 Pin interface are shown in Figure 2-...
- Page 22 Figure 2-14 Appearance and Dimension of 45 Pin Wire to Board Connector Interface...
-
Page 23: Cables
2.3 Cables The external cables, and the specification of 1.25 mm spacing crimp connector interface are shown in Figure 2-15. Figure 2-15 External Cables of HM-TM36-LG/S The corresponding relation of the cables and interfaces are shown in Table 2-6. Table 2-6 Electrical Interface Description of 6 Pin Wire to Board Connector Color Green Metal surface with a... -
Page 24: Chapter 3. Serial Port Communication
Chapter 3. Serial Port Communication 3.1 Communication Type The thermal camera module adopts UART asynchronous serial communication. 3.2 Communication Format The thermal camera module serial port communication format is shown in Table 3-1. Table 3-1 Serial Port Communication Format Name Definition Baud Rate 115200 bps... -
Page 25: Receiving Data Package
Table 3-2 Definition of Each Field of Communication Data Package Position Field Digit Description Value (Byte) BEGIN Command Package Start 0xF0 SIZE Length: N+4 Device Device address 0x36 Address Class Command Class Command Address Address Subclass Subclass Command Command Address Address Write: 0x0 Read/Write... -
Page 26: Communication Protocol Requirement
Table 3-3 Definition of Communication Data Package Field Field Digit Description Value Position (Byte) Command Package BEGIN 0xF0 Start SIZE Length: N+4 Depend on Length Device Address Device Address 0x36 Thermal Address: 0x36 Class Command Command Address Address Subclass Command Subclass Command Address Address... -
Page 27: Control Command
3.6 Control Command The thermal device sends commands to the thermal camera module through serial port, and the thermal camera module realizes the corresponding action. At the same time, the thermal camera module will return the corresponding status, and the specific serial port command is shown in Table 3-4. - Page 28 control. 0x03, Auto-switch open, referred to timing mode and temperature difference mode. (Write Only) Duration of minutes, 2-byte Shutter Auto-switch Time 0x36 0x7C 0x05 0x0A 10 minutes by default, as 0x00 Interval 0x0A. 0x02 Vegnetting Collection Manual collection of uniform 0x36 0x7C 0x0C...
- Page 29 0xF), 0x3N move digits downwards the cursor (N is 0x1 to 0xF), 0x4N move digits leftwards the cursor (N is 0x1 to 0xF), 0x5N move digits rightwards the cursor (N is 0x1 to 0xF), Send dead pixel coordinates. 4 Palettes 0x0: White Hot 0x36 0x78...
-
Page 30: Control Command Communication Example
(CVBS) 0x0a: Hold M key(OSD) 0x0b: Hold C key 3.7 Control Command Communication Example This section will introduce how the thermal camera module communicates through specific examples. The thermal camera module brightness should be set to 100: Send Command: Thermal Camera Module Feedback Command: 3.8 Thermal Module Control Command The thermal camera module will send back corresponding result after receiving query command from the user device. -
Page 31: Dde Detail Strength
Class Subclass Device Read/Write Attached Command Command Remark Address Standard Data Address Address 0x36 0x7C 0x03 0x00 Manual Background Correction Return: Device Class Subclass Return Attached Data Remark Address Command Command Standard Address Address 0x36 0x7C 0x03 0x03 3.8.3 DDE Detail Strength DDE Detail Strength: Device Class... -
Page 32: Dnr Temporal Level
Device Class Subclass Return Attached Data Remark Address Command Command Standard Address Address 0x36 0x78 0x15 0x03 3.8.5 DNR Temporal Level DNR Temporal Level Adjustment: Device Class Subclass Read/Write Attached Data Remark Command Command Address Standard Address Address 0 to 100, 50 by DNR Temporal Level 0x36 0x78... -
Page 33: Dpc
Device Class Subclass Read/Write Attached Data Remark Address Command Command Standard Address Address 0 to 100, 50 by Contrast 0x36 0x78 0x03 0x00 default. Return: Device Class Subclass Return Attached Data Remark Address Command Command Standard Address Address 0x36 0x78 0x03 0x03 3.8.8 DPC... -
Page 34: Data Switching
--Move coordinates leftwards: F0 05 36 78 1A 00 04 CC FF --Move coordinates leftwards for N digits: F0 05 36 78 1A 00 4x CHK FF --Move coordinates rightwards: F0 05 36 78 1A 00 05 CD FF --Move coordinates rightwards for N digits: F0 05 36 78 1A 00 5x CHK FF --Coordinates center: F0 05 36 78 1A 00 06 CE FF c. -
Page 35: Vignetting Correction
Device Class Subclass Read/Write Attached Data Remark Address Command Command Standard Address Address 0x03: Auto-switch open, automatic control 0×01: Auto-switch 0x36 0x7C 0x04 0x00 open, schedule control 0×02: Auto-switch open, temperature difference control Return: Device Class Subclass Return Attached Data Remark Address Command... -
Page 36: Restore(Write Only)
Device Class Subclass Read/Write Attached Data Remark Address Command Command Standard Address Address 0x36 0x74 0x10 0x00 Return: Device Class Subclass Return Attached Data Remark Address Command Command Standard Address Address 0x36 0x74 0x10 0x03 3.8.13 Restore(Write Only) Restore to Default Settings: Device Class Subclass... -
Page 37: Zoom
Return: Device Class Subclass Return Attached Data Remark Address Command Command Standard Address Address 0x36 0x78 0x20 0x03 3.8.15 Zoom Zoom Adjustment: Device Class Subclass Read/Write Attached Data Remark Address Command Command Standard Address Address 0x0: ×1 0x1: ×2 0x36 0x70 0x12 0x00... -
Page 38: Agc Mode
Device Class Subclass Return Attached Data Remark Address Command Command Standard Address Address 0x36 0x70 0x11 0x03 3.8.17 AGC Mode Auto Mode: Device Class Subclass Read/Write Attached Data Remark Address Command Command Standard Address Address 0x36 0x78 0x05 0x00 Histogram Return: Device Class... - Page 39 For detailed operation information, refer to Chapter 5. Key Operation 2. Serial port command: M key: F0 05 36 70 17 00 00 BD FF C key: F0 05 36 70 17 00 01 BE FF + key: F0 05 36 70 17 00 02 BF FF Hold + key: F0 05 36 70 17 00 03 C0 FF - key: F0 05 36 70 17 00 04 C1 FF Hold - key: F0 05 36 70 17 00 05 C2 FF...
-
Page 40: Chapter 4. Lvcmos Communication Protocol
4.2 HM-TM36-LG/D Output The HM-TM36-LG/D thermal camera module contains a 16 bit LVCMOS digital video output. The video output can switch between BT.656 internal synchronization and YUV + RAW external synchronization. The frequency of pixel clock is 27 MHz for BT.656 output, and for YUV + RAW output, the frequency of pixel clock is 54 MHz. - Page 41 Valid data includes odd field and even field. Each field has 288 lines. For each line, there are 1440 bytes, of which 720 bytes are Y data, 360 bytes Cr data and 360 bytes Cb data. The value of Y data is from 16 to 235, the value of Cb or Cr data is from 16 to 240.
- Page 42 Valid data Valid Line 720(Y)+360(Cb)+360(Cr) 4Bytes 280Bytes 4Bytes 1440Bytes 720(Y)+360(Cb)+360(Cr) 720(Y)+360(Cb)+360(Cr) Figure 4-2 Blanking The sequence of valid data in Figure 4-2 is shown in Figure 4-3: Y : Cb : Cr = 4 : 2 : 2. It means each pixel has an individual Y value. Neighbor pixels have Cb and Cr of the same value. Figure 4-3 Data Sequence of Valid Area The data sequence of a field in PAL is shown in Figure 4-4.
-
Page 43: Yuv+Raw
Figure 4-5 BT.656 Output Timing 4.2.2 YUV+RAW For the HM-TM36-LG/D thermal camera module with the YUV + RAW video data output, the video output is external synchronization data, and the frequency of pixel clock is 54 MHz. YUV+RAW output combines two data into one stream and attaches data to RAW to provide parameters of thermal camera module. -
Page 44: Hm-Tm36-Lg/S Output
Resolution 768 × 292, 292 lines, 768 pixels in each line First line in valid data Second line in valid data 292 line in valid data Figure 4-8 Data Format The description of LVCMOS signal in YUV+RAW output is shown in Table 4-3. Table 4-3 LVCMOS Signal Description Signal Function Description... -
Page 45: Chapter 5. Key Operation
Chapter 5. Key Operation There are four keys for the thermal camera module: M key, C key, + key, and – key, and the functions vary among different menus and interfaces. Note: The thermal camera module can be operated through serial port command of corresponding key operation, refer to 3.8.18 Menu Operation. -
Page 46: Submenu
Figure 5-1 Main Menu Press M key to select or unselect the menu function. The selected function will be blued and fixed in the center of the main menu. Note: If you have selected the Restore, press M key again to continue. If you press other keys, you will exit the current operation. -
Page 47: Dpc Interface
Figure 5-2 Reticle Interface Press M key to switch the parameter on the interface: Reticle Type, X coordinate and Y coordinate. In the adjustment of Reticle Type, press + key or - key to adjust the reticle cursor type. ... - Page 48 Figure 5-3 DPC Interface Press M key to switch the moving axis: X-axis and Y-axis. In the adjustment of X Axis, press + key and - key to adjust the position of the cursor in X-direction. In the adjustment of Y Axis, press + key and - key to adjust the position of the cursor in Y-direction. ...
-
Page 49: Chapter 6. Faq
Chapter 6. FAQ Frequently asked questions in device use. Why is there no image for CVBS output after the device is powered on? Check if the power adaptor is right. Check if the cable is well connected. Check if the CVBS output is enabled in client software. Why cannot the thermal camera module tool connect with the device? ... - Page 50 UD25725N...
Need help?
Do you have a question about the HM-TM36-LG/D and is the answer not in the manual?
Questions and answers