Advertisement
Quick Links
INSTALLATION
GUIDE
BBP084
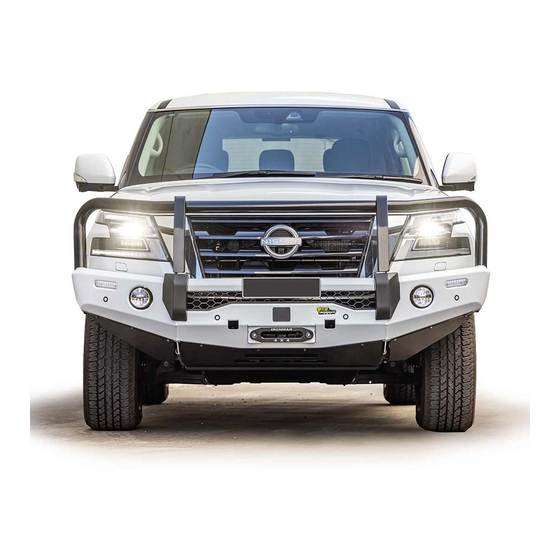
PREMIUM BULLBAR TO SUIT NISSAN PATROL Y62 SERIES 5
• Ironman 4x4 BBP084 Premium Bull Bar to suit Nissan Patrol Y62 Series 5.
• It will take approximately 4 hours to install.
NOTE: This product has been tested for air bag compatibility
and therefore the mounting system MUST NOT be modified
IMPORTANT: Bull bar installations should only be done by a qualified person
and it's the responsibility of this person to ensure correct fitment.
©Copyright 2022 Ironman 4x4 Pty Ltd. No part of this publication may be reproduced or replicated without the prior written consent of Ironman 4x4 Pty Ltd
Advertisement

Related Manuals for Ironman4x4 BBP084


Summary of Contents for Ironman4x4 BBP084
- Page 1 BBP084 PREMIUM BULLBAR TO SUIT NISSAN PATROL Y62 SERIES 5 • Ironman 4x4 BBP084 Premium Bull Bar to suit Nissan Patrol Y62 Series 5. • It will take approximately 4 hours to install. NOTE: This product has been tested for air bag compatibility...
-
Page 2: Before Installation
Installation Guide Installation Guide BBP084 Before Installation PLEASE NOTE: It is always good practice to disconnect the battery while working on 12-Volt systems. Please check the owner’s manual to see vehicle-specific requirements as some models may need battery backup. Caution: Auto electrical work should only be carried out by a competent person. Vehicle wire colours are listed as a guide and may vary on some makes and models. - Page 3 Installation Guide BBP084 Bullbar Accessories • Synthetic rope winch WWB9500SR/ WWB12000SR • Winch extension cable WWB031 / WWB032 • Bull bar multi-Function light patch loom IBBPL084 WARNING • Ironman 4x4 includes specific mounting hardware to ensure correct fitment to your 4WD. The correct fitment of these components is critical for your safety.
- Page 4 QTY-6 QTY-2 QTY-4 QTY-2 QTY-1 QTY- QTY- QTY- QTY- QTY- Installation Guide BBP084 Tools Required Parts List Tools Required Tools Required Parts List Parts List Air hacksaw Screwdriver set Metric spanner set Metric socket set Tape measure Drill and drill bits...
-
Page 5: Parts List
Installation Guide BBP084 Parts List Page 5 of 21 ©Copyright 2022 Ironman 4x4 Pty Ltd. No part of this publication may be reproduced or replicated without the prior written consent of Ironman 4x4 Pty Ltd... - Page 6 Installation Guide BBP084 Before Installation, check bull bar application is compatible with your vehicle. Remove and retain the number plate, if fitted, to be reinstalled later, also remove factory number plate holder. Disconnect negative battery terminal if applicable. Unwrap the bull bar and ensure all hardware is provided, including mounting brackets.
- Page 7 Installation Guide BBP084 It is advised to apply masking tape all the way across the front of the bumper and under the headlights. Remove the 6 x clips along the top of the bar reinforcement. Remove the bolt from rear corner of...
- Page 8 Installation Guide BBP084 On the right hand side next to the bar harness, disconnect the washer nozzle with care (hose connector). Depress and pull. 10. Unclip grille- it is advised to start on the outside headlight mould section. Once headlight sections are unclipped, depress the inner lower grille clips and remove grille.
- Page 9 Installation Guide BBP084 12. If the vehicle has a front radar, carefully unplug, and remove the radar and radar bracket. Note: Ensure you do not drop the radar. 13. Remove the 4 x 13mm support bracket bolts & the upper support bolts from bracket to radiator support.
- Page 10 Installation Guide BBP084 14. Unclip the side air duct and trim down. The air duct must be trimmed to allow room to fit the cradle. 15. Drill a 10mm hole into the lower chassis rail. Debur and paint. Page 10 of 21...
- Page 11 Installation Guide BBP084 16. Fit the right-hand side chassis bracket with M12 through bolts and the 2 x single nut plates on the inside of the rail, Now secure the 2 x M10 bolts with double nutplate Repeat on the opposite side. Don’t tighten yet.
- Page 12 Installation Guide BBP084 19. Once happy with position torque all bolts to torque settings on page 4. 20. Winch option Install the winch into the cradle. Using the supplied winch control box bracket, mount winch control box to the middle reinforcement...
- Page 13 Installation Guide BBP084 21. It is advised to paint under the guard liner where seen in a satin black paint. 22. Position cutting template in place under headlight and align with guard edge and grill line. Use bodyline on bumper as reference to mark cut line on assembly as shown.
- Page 14 Installation Guide BBP084 24. De-bur cut sections on the bumper and apply pinch mould. 25. Refit the grille and plug the front camera back in if applicable to this vehicle. Note: a minimum of 20-25mm gap between bumper and bar wing needs to be achieved.
- Page 15 Installation Guide BBP084 29. Clean inside the Bull bar, around sensor holes and mounting surface of parking sensor holders using grease and wax remover. 30. Apply adhesion promoter to mounting surfaces around sensor holes and on sensor holders. This step is important to ensure sensor holders adhere properly to the bull bar.
- Page 16 Installation Guide BBP084 32. Clip in parking sensors into parking sensor housings. 33. If the vehicle has factory radar, follow the steps below. If the vehicle doesn’t have radar move on to step. 34. Fit radar cover to bull bar, if the vehicle does not have a radar, still fit the supplier radar cover to the bar.
- Page 17 Installation Guide BBP084 36. Using supplied radar bracket (number 16 of the parts list) fit behind the radar and secure. 37. Connect blinkers, parkers & fog lights if applicable. There is an optional plug-n-play wiring harness available for purchase. IBBPL084 Please refer to IBBPL084 fitting instructions.
- Page 18 Installation Guide BBP084 40. Reconnect wiring harness, washer nozzle, radar and parking sensor harness. 41. Fit center plate using 4 x Black M8 bolts at the front and 4 x M12 bolts at the back with the cradle. 42. Hold the side plate in position and mark a cut line, repeat on the opposite side.
- Page 19 Installation Guide BBP084 43. Remove the side plate and trim the side guard liner. Repeat on the opposite side. 44. Fit side plates using 5 x Black M8 bolts on the outside and 1 x Black M8 bolt to cradle.
-
Page 20: Wiring Diagrams
Installation Guide BBP084 Wiring Diagrams DRL/PARKING/INDICATOR LIGHTS Daytime Running Light Brown Park Light Yellow Indicator Light White Ground If vehicle is not fitted with DRL, leave red wire disconnected FOG LIGHTS Ground Lamp Fuse Connector Relay Black Blue Battery Lamp... - Page 21 Installation Guide BBP084 Once Bull Bar is Installed Ensure all bolts are tensioned correctly, it is good practice to do a vehicle pre trip check before heading away or every 10k kms. Visually inspect bull bar and hardware, retention bull bar hardware or when needed.
Need help?
Do you have a question about the BBP084 and is the answer not in the manual?
Questions and answers