Polycom HDX Manual
Hide thumbs
Also See for HDX:
- User manual (49 pages) ,
- Deployment manual (27 pages) ,
- Reference manual (13 pages)
Table of Contents
Advertisement
Quick Links
Polycom HDX Reference Guide
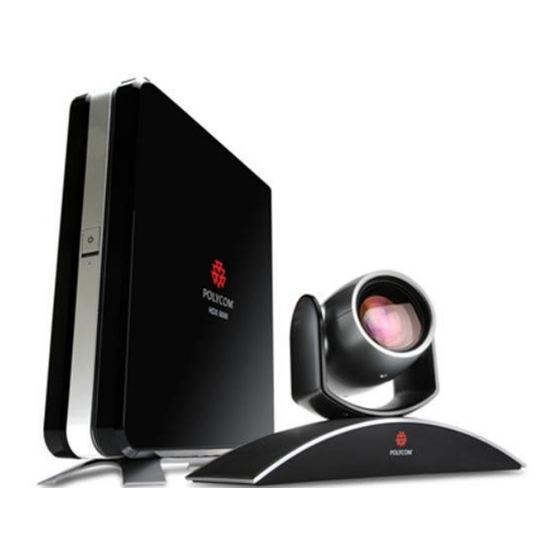
Equipment Components
Camera
The camera is usually located at the top of the equipment and is what captures the
video feed that is transmitted to other videoconference systems that are connected to
the event. For both clinical carts and room-based systems, the camera can be controlled
by using the arrows on the remote control.
Codec
The codec is the main brain of the system controlling the camera, monitor and any
other medical peripherals plugged into the system. If the codec is switched off, then
no videoconferencing is possible. The codec derives its name from the functions
that it serves. It both codes video signals that are sent to the other sites as well as
decodes video signals that it receives from the far site.
Monitor
The monitor is purely a display screen and works in conjunction with the codec.
Consequently, it is important to emphasize that if the codec is turned on, then the
monitor should be turned on as well. This ensures that if someone connects to an
event early, you will be able to see them on the monitor. Please note that turning
off the monitor does not turn off the system.
Microphone
The microphone has a range of 20 to 25 feet. The microphone is extremely powerful
and can pick up peripheral sound such as whispering, tapping pens, and swiveling
chairs. Ideally, the microphone can be placed underneath the monitor or at the end of
a table. Never place the microphone directly in front of the monitor speakers as
this will create audio feedback.
Network and
Power
The network cable must be plugged into a dedicated OTN jack. If you plug the
network cable into a regular network jack, then the system will not function.
Consequently, you need to know precisely where the OTN jacks are located before
moving the system to different locations. For the clinical cart, use the Uninterrupted
Power Supply (UPS) to power the system entirely on or off. For a room-based system,
use a surge-protected power bar.
March 2023 | pg. 1
Advertisement
Table of Contents
Troubleshooting

Subscribe to Our Youtube Channel
Related Manuals for Polycom HDX


Summary of Contents for Polycom HDX
- Page 1 Polycom HDX Reference Guide Equipment Components Camera The camera is usually located at the top of the equipment and is what captures the video feed that is transmitted to other videoconference systems that are connected to the event. For both clinical carts and room-based systems, the camera can be controlled by using the arrows on the remote control.
- Page 2 Polycom HDX Reference Guide Plug the power cable into the power outlet in the wall. Plug the network cable into the network outlet in the wall. The network cable must be plugged into the OTN dedicated network outlet. Verify that the Power is turned On. The power bar supplies the whole system.
- Page 3 Polycom HDX Remote Control March 2023 | pg. 3...
- Page 4 Hooking up your Laptop and Content Sharing Connect the presentation cable from the videoconference system to the laptop Power on your laptop/computer. Press the same keys you would use when displaying your desktop through a projector, usually one of the following combinations: Fn+F4 (or) Fn+F7 (or) Fn+F8 or Windows + P To display the laptop: Press the Content button on the remote control.
- Page 5 Note: For the Polycom HDX 7000 equipment there is the added step of selecting the appropriate peripheral device. 1. When you press the Content button, you will have two options that include camera and laptop. 2. Navigate to the second option by using the right arrow on the remote control. Select the laptop by pressing the enter button (circular button with a dot).
- Page 6 Connecting or Reconnecting using the Remote Control If you have been disconnected from an OTN event in progress or you are joining a scheduled event, please follow these simple steps to be connected: 1. Ensure your video system is turned on. 2.
- Page 7 Equipment Troubleshooting The system doesn’t work / won’t power up Ensure that the system is plugged into the power outlet. • • Verify that the network cable is plugged into the appropriate port in the wall. • Check that the cables are securely plugged into the back of the codec. If the problem persists, contact Ontario Health (OTN) at 1-855-654-0888 for technical support.
- Page 8 Technical Support When to call for Technical Support Contact your organizational IT staff or Telemedicine Coordinator when: Your internet is down. Network cable is broken or missing. You cannot find the remote control. You do not know which network jack to plug into. ...
Need help?
Do you have a question about the HDX and is the answer not in the manual?
Questions and answers