Table of Contents
Advertisement
Quick Links
Rugged Smart Handheld Terminal
DT-X450
User's Guide
Be sure to read "Safety Precautions" inside this guide before trying to use your Rugged Smart
Handheld Terminal.
Accessories
Options
Using the Main
Functions
Options
Series
Part Names
Rebooting
Resetting
Getting Ready
to Use
DT-X450
Specifications
E
Advertisement
Table of Contents

Related Manuals for Casio DT-X450 Series


Summary of Contents for Casio DT-X450 Series
- Page 1 Rugged Smart Handheld Terminal DT-X450 Series User’s Guide Accessories Part Names Getting Ready Options to Use Using the Main Rebooting DT-X450 Functions Resetting Specifications Options Be sure to read “Safety Precautions” inside this guide before trying to use your Rugged Smart Handheld Terminal.
- Page 2 Trademarks and Licenses Bluetooth is a registered trademark owned by Bluetooth SIG, Inc. and licensed to CASIO COMPUTER CO., LTD. Google™, the Google logo, Android™ and the Android logo are trademarks or registered trademarks of Google LLC. SD, SDHC, SDXC, microSD, microSDHC and microSDXC are trademarks of SD-3C LLC.
-
Page 3: Table Of Contents
Contents Important ......................2 Warning Label ..................... 2 Safety Precautions ..................3 Regulatory Information ................9 Operating Precautions................10 About the Waterproofing/Dustproofing ............. 13 Accessories and Options ................14 Part Names ...................... 15 Getting Ready to Use ..................17 Attaching the Hand Strap and Stylus ............17 Attaching the Anti-slip Hook .............. -
Page 4: Important
Important Information in this document is subject to change without advance notice. CASIO Computer Co., Ltd. makes no representations or warranties with respect to the contents or use of this manual and specifically disclaims any express or implied warranties of merchantability or fitness for any particular purpose. -
Page 5: Safety Precautions
Safety Precautions Congratulations upon your selection of this CASIO product. Be sure to read the following Safety Precautions before trying to use it for the first time. Your neglect or avoidance of the warning and caution statements in the subsequent pages causes the danger of fire, electric shock, malfunction and damage on the goods as well as personal injury. - Page 6 Warning Avoid contact with fire • Do not bring the terminal into contact with fire. Doing so could cause the battery to burst and result in a fire or injury. Prohibitions Storage and Operation Locations Do not store or use the product in any of the locations described below. •...
- Page 7 Using the Wireless Data Communication Function Warning Interference with the Operation of Other Equipment (Using Wireless Data Communication) • Should you notice radio interference or other problems on other devices is being caused while using this product, do not use the wireless function. •...
- Page 8 • The battery pack and the terminal subjected to extremely low air pressure may result in an explosion, the leakage of explosion or the leakage of flammable liquid or gas. • Replace only with the same type of battery pack recommended by CASIO. Dispose of used battery packs according to the local regulation.
- Page 9 Power Supply / AC Adapter Warning • Do not use the terminal at a voltage other than the specified voltage. Also, do not connect the terminal to a multi-plug power strip. • Never modify, sharply bend, twist, or pull on the power cord. Prohibitions •...
- Page 10 Backup of All Important Data Caution • Note that CASIO Computer Co., Ltd. shall not be held liable to you or any third party for any damages or loss caused by deletion or corruption of data due to use of the terminal, malfunction or repair of the terminal or its peripherals, or due to the batteries going dead.
-
Page 11: Regulatory Information
10 Norwich Street, London, EC4A 1BD, U.K. www.casio.co.uk Hereby, “CASIO COMPUTER CO., LTD.” declares that the radio equipment type “DT-X450” is in compliance with the relevant statutory requirements. The full text of the declaration of conformity is available at the following internet address:... -
Page 12: Operating Precautions
Operating Precautions Your terminal and its options are precision. Improper operation or rough handling can cause problems with data storage and other problems. Note and observe the following precautions to ensure proper operation. • Do not continue using the battery once it is exhausted. Doing so could result in data loss or corruption. - Page 13 — If the battery pack is repeatedly charged, the life span becomes short. To avoid the repetition of charging the battery pack, be sure that the remaining capacity is low before you start charging. — Be sure to charge the battery pack within the recommended temperature range. Charging the battery pack in a temperature outside of the recommended range causes deterioration.
- Page 14 • <For system administrators> Update the OS to keep the system up to date. • Updating the system also applies any security updates. • CASIO COMPUTER Co., Ltd. will also provide updates to the OS at regular intervals or as deemed necessary by Casio.
-
Page 15: About The Waterproofing/Dustproofing
The DT-X450 Series models are waterproof and dustproof. Important! The water- and dust-proofing performance of this product is based on CASIO testing procedures. Note also that this performance applies to the product at the time of shipment (delivery to the customer) and is not guaranteed inclusive of the environment in which the product is used. -
Page 16: Accessories And Options
Rugged Smart Accessories Handheld Terminal Make sure all items listed below are included before using the DT-X450 Series terminal for the first time. • Hand Strap • Stylus (with retaining cord to prevent stylus loss) • Anti-slip Hook • Battery Pack •... -
Page 17: Part Names
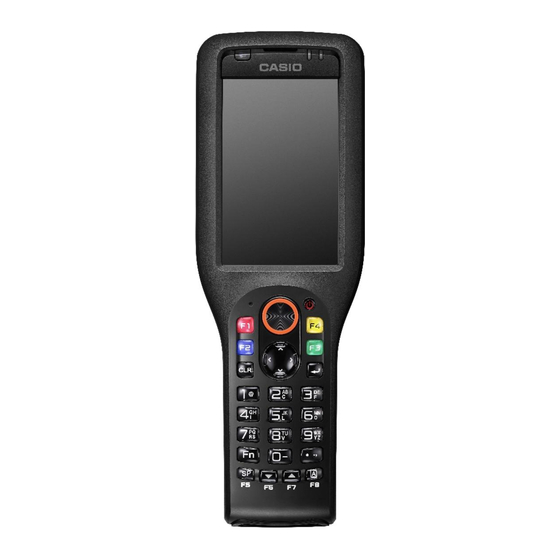
z Part Names Smart Handheld Terminal (DT-X450) <Top> <Left> <Front> <Right> <Back> (With the battery pack cover fitted) 1 2 3 24 2526 <Bottom> <Back> (With the battery pack cover removed) The illustration shows DT-X450-WC21. - Page 18 Speaker Outputs alarm tones and other sounds. Charging Status LED Show charging status Notification LED Show notifications Illuminance/ Measure brightness and proximity of object Proximity Sensor The screen displays texts, operations, indicators and so forth. In Screen (Touch Panel) addition, operations can be performed and data can be input on the screen using stylus.
-
Page 19: Getting Ready To Use
30 Battery Cover Lock Switch Open battery cover by sliding 31 Battery Cover Cover battery pack Strap Holes/Anti-slip Hook/ Used to attach the hand strap, stylus, anti-slip hook and hand Hand Belt Hook Mount belt hook. Used for USB communication or to supply power to the terminal Power Supply/ and to charge the battery pack via either Cradle or Cradle-type Data Communication Terminal... -
Page 20: Attaching The Anti-Slip Hook
Attaching the Anti-slip Hook How to attach the Anti-slip Hook 1. First check that the anti-slip hook is oriented so that the projections are facing towards you, as shown in the illustration. Then push the hook ends into the strap holes/anti-slip hook/hand belt hook mount in the terminal. - Page 21 Important! Always keep backup of all important data! • The battery pack powers normal operation and also provides power required to maintain memory contents, while the backup battery provides backup power to maintain memory contents. Because of this, you should not remove the battery pack if the backup battery is dead.
- Page 22 3. Replace the battery pack cover ( ) and return the left and right battery pack cover lock switches to the “LOCK” position ( ), as shown in the illustration. Precautions for Use • Do not use any battery packs other than the specified one. •...
-
Page 23: Turning The Power On/Off And Sleep
6. Remove the battery pack in the direction indicated by the arrow. 7. Install the replacement battery pack following steps 2 to 3 of the battery pack installation procedure. Precautions for Use • In the Hot Swap mode, even if the battery pack is removed, your work state is saved up to 4 minutes with the memory (RAM) backup function. -
Page 24: Charging The Battery Pack
Charging the Battery Pack You can charge the battery pack while it is installed in the DT-X450 using the optional USB AC Adapter, USB cradle, Ethernet cradle or multiple battery charger. Check charging status LED to confirm DT-X450 charging status. You can also use the USB cradle, Ethernet cradle or dual battery charger to charge the battery pack. - Page 25 Charging the battery pack installed in the DT-X450 DT-X450 Charging status LED display Orange: Charging Green: Charging complete Red: Standby due to battery pack error or because the ambient temperature is outside the charging temperature range. (Charging begins when the temperature returns to the charging temperature range.) Orange flashing: Charging (DT-X450 cannot start up because the charge remaining in the...
- Page 26 Multiple Battery Charger AC adapter AD-S12500A Power cord AC-CORD3-EU AC-CORD3-UK AC-CORD3-AU • You can connect up to three Multiple Battery Chargers. DT-X450 Charging status LED display Orange: Charging Green: Charging complete Red: Standby due to battery pack error or because the ambient temperature is outside the charging temperature range.
-
Page 27: Using The Main Functions
z Using the Main Functions This section describes the most frequently used functions of this terminal. • Calibrating Touch Panel Alignment (page 25) • Using the Imager (DT-X450-20/C21/WC21/C31/WC31) (page 26) • Using a SIM Card (DT-X450-WC21/WC31) (page 27) • Using a microSD Card (page 29) •... -
Page 28: Using The Imager (Dt-X450-20/C21/Wc21/C31/Wc31)
• Press the stylus against the center of the target mark (+ mark) as indicated on the screen. Press the stylus against the target mark on the screen 5 times to display the next screen. Then hold down the center of the target twice. Using the Imager (DT-X450-20/C21/WC21/C31/WC31) 1. -
Page 29: Using A Sim Card (Dt-X450-Wc21/Wc31)
Using a SIM Card (DT-X450-WC21/WC31) DT-X450 supports nanoSIM cards. To use WAN functions, a SIM card must be installed. The SIM card slot is located in the battery pack compartment, so you must remove the battery pack before installing or removing a SIM card. Installation 1. Turn the terminal off (shutdown). - Page 30 Removal 1. Turn the terminal off (shutdown). 2. Remove the battery pack. (Steps 5 and 6 in the battery pack replacement procedure on page 20) 3. Flip back the SIM card cover. 4. Pull the SIM card out of the card slot, as shown in the figure. 5. Close the SIM card cover. 6. Install the battery pack. (Steps 2 and 3 in the battery pack installation procedure on page 19)
-
Page 31: Using A Microsd Card
Precautions for Use • When installing a SIM card, check the orientation of the card and ensure that you install it correctly. Using excessive force when installing or removing a SIM card could damage the card. • Touching the IC area when installing a SIM card could result in damage to the card due to soiling or an electrostatic charge. -
Page 32: Handling The Nfc (Dt-X450-C21/C31/Wc21/Wc31)
Handling the NFC (DT-X450-C21/C31/WC21/WC31) The NFC is a technology of contactless IC card for short range communication that enables writing data to card and reading data from the card by applying the card close to the NFC Reader. The integrated NFC can read a contactless IC card used typically for employment identification, etc. -
Page 33: Performing Communications
Performing Communications ® Bluetooth Communication ® Bluetooth interface can also be used to transfer data between two terminals. ® With Bluetooth the two terminals should be located within about five meters from each other, as long as there is nothing blocking the path between them. Important! Observe the following precautions to help ensure that Bluetooth communication is successful. -
Page 34: Rebooting Or Resetting The Terminal
z Rebooting or Resetting the Terminal If the terminal no longer operates normally due to a problem such as an operating error or severe impact, use the procedure below to attempt to restore normal operation. 1. Reboot 2. Forced Reboot 3. -
Page 35: Dt-X450 Specifications
z DT-X450 Specifications WC21 Remark WC31 2.0GHz Octa Core Android 11 Memory RAM: 4GB FROM: 64GB Display (3.2 inches), 480 x 800-dot TFT Color LCD 2D Scanner Scanner *1 (Imager) Camera – 13M pixels Auto Focus Microphone Voice sound input Speaker For voice sound input and voice call at phone WLAN *2... - Page 36 WC21 Remark WC31 Dust / IP67 level water-resistance External dimensions Approx. 46mm x 197mm x 32mm Weight Approx. 260g Vibrator notification of scanner Proximity sensor / Light Ambient sensor / Acceleration sensor / Sensors Gyro sensor / Geomagnetic sensor Maximum monthly rate : 2min10sec (Use main battery) Maximum monthly rate : 8min38sec (Use sub batery only)
- Page 37 Scanner Specifications Item Specification Method CMOS Imager, 1280 × 800, monochrome 2D Scanner (Imager) Aimer method Laser 650nm, < 1mW Redirected downward: Laser emit DT-X450-20/C21/WC21: 25 degree angle DT-X450-C31/WC31: 60 degree 1D : 0.127mm Resolution 2D Stacked : 0.169mm 2D Matrix : 0.191mm 0.45 (minimum) or greater 1D : 33 ~ 420mm (0.25mm resolution) Readable...
- Page 38 WLAN Specifications Item Specification Remark WLAN 2412 MHz – 2472 MHz (1 ~ 13ch) 802.11a/b/ 5180 MHz – 5320 MHz (36 ~ 64ch) g/n/ac Frequency 5500 MHz – 5700 MHz (100 ~ 140ch) Range 5745 MHz – 5825 MHz (149 ~ 165ch) (802.11d: Allowed frequency range can be used according to countries or regions.) 802.11a/g: 54Mbps (maximum)
- Page 39 Item Specification W-CDMA Communication Audio, Data Packet Downlink: 42Mbps (maximum) Baud rate Uplink: 11Mbps (maximum) BAND 1 (1920-1980MHz/2110-2170MHz) Frequency BAND 6 (830 - 840MHz/875 - 885MHz) range Band BAND 8 (880-915MHz/925-960MHz) Communication Audio, Data Packet Protocol GSM/GPRS/EDGE Frequency EGSM900 (880-915 MHz/925-960 MHz) range Band DCS1800 (1710-1785 MHz/1805-1880 MHz) GPS Specifications...
-
Page 40: Options
z Options This section describes the options available for this terminal. These options allow the DT-X450 to be used in a wider range of applications. Screen Protect Sheet (HA-S90PS10) 1. Wipe off any dirt from the screen. 2. The screen protect sheet consists of three layers as shown in the figure. Screen protect sheet Release... -
Page 41: Hand Belt (Ha-S95Hb)
4. Hold tape and remove the release film( Hand Belt (HA-S95HB) How to attach the Hand Belt 1. First check that the hand belt hook is oriented so that the projections are facing towards you, as shown in the illustration. Then push the hook ends into the strap holes/anti-slip hook/hand belt hook mount in the terminal. -
Page 42: Usb Ac Adapter (5V2A) (Ad-S50200A)
Removing the Hand Belt 1. Press on the projecting part of the terminal and disengage the metal hand belt fitting, as shown in the illustration. 2. Peel apart the hook and loop fastener and pull the hand belt back through the hand belt hook. 3. -
Page 43: Ac Adapter (5V4A) (Ad-S50400A), Ac Adapter (12V5A) (Ad-S12500A)
AC Adapter (5V4A) (AD-S50400A), AC Adapter (12V5A) (AD-S12500A) The AC adapter for the USB and Ethernet cradles must be fitted with a suitable power plug for the region where the terminal will be used. Installation 1. Insert the protruding part of the AC adapter plug into the recess in the top of the AC adapter ( ) until the plug clicks into place... -
Page 44: Usb Cradle (Ha-S60Io)
USB Cradle (HA-S60IO) The USB cradle can be used to connect the DT-X450 to devices such as a computer or USB device. It can also be used to supply power to the DT-X450 and to charge the battery pack. Part Names and Operation <Top>... - Page 45 4. Align the terminals on the bottom of the DT-X450 with the power supply terminals in the USB Cradle before inserting the DT-X450 ( Push the DT-X450 fully into the USB Cradle until the mount hooks in the cradle engage the mount holes in the DT-X450( When placing the DT-X450 in the USB cradle, move the stylus retaining cord and hand strap...
- Page 46 USB Cradle (HA-S60IO) Specifications 1. USB specifications Standard : USB 2.0 High Speed Transmission speed : 480 Mbps (maximum) 2. Charging specifications Charging method : Constant-voltage constant-current charging Charging time : Approx. 4 hours 3. AC adapter specifications Standard : AD-S50400A Input : 100-240V AC, 50/60Hz, 0.7A Output...
-
Page 47: Ethernet Cradle (Ha-S62Io)
Ethernet Cradle (HA-S62IO) The optional Ethernet Cradle (HA-S62IO) makes it possible to transmit file data between DT-X450 and a PC via a USB or LAN connection (download or upload). You can also use the Ethernet Cradle to charge the battery pack installed in DT-X450. Part Names and Operation <Top>... - Page 48 Installing and Connecting the Power Supply Use the optional AC adaptor(AD-S50400A) to supply power to the charger. Use the selector switch on the left side of the Ethernet Cradle to select the port to be used. Set the switch to the “LAN” position when using the LAN port on the cradle.
- Page 49 Precautions for Use • Even if the battery in the DT-X450 is already fully charged, charging will begin when you set the DT-X450 in the Ethernet cradle. It may take several minutes for the fully charged status to be indicated. •...
-
Page 50: Multiple Battery Charger (Ha-S36Dchg)
Multiple Battery Charger (HA-S36DCHG) The optional Multiple Battery Charger (HA-S36DCHG) can concurrently charge two battery packs installed in the respective DT-X450s. Part Names and Operation <Side> <Top> <Bottom>... - Page 51 Accessories Use these bundled items to join multiple chargers together. • Bottom bracket • Side bracket • Screws (for brackets) Two each for one bracket AC Adaptor Jack Connect the AC adaptor (sold separately) here. Power Switch Turns the power on and off. Multiple Battery Charger Use these connectors to connect Multiple Battery Chargers to each Connection Port...
- Page 52 Charging Battery Pack Use the optional AC adaptor(AD-S12500A) to supply power to the charger. AC adapter AD-S12500A Power cord AC-CORD3-EU AC-CORD3-UK AC-CORD3-AU 1. Plug the connector from the AC adaptor into the AC adaptor jack on the charger with the engraved side of the connector facing upwards.
- Page 53 Precautions for Use • Even if the battery in the DT-X450 is already fully charged, charging will begin when you set the DT-X450 in the Ethernet cradle. It may take several minutes for the fully charged status to be indicated. •...
- Page 54 2. Connect the two Multiple Battery Chargers as shown below. Connectors 3. Fix the side and bottom brackets in place with two screws on each bracket. Brackets You can repeat the above steps to connect up to 3 Multiple Battery Chargers. * Attach the connection brackets so that the front side faces outwards.
-
Page 55: Dual Battery Charger (Ha-S32Dchg)
Dual Battery Charger (HA-S32DCHG) The optionally available Dual Battery Charger (HA-S32DCHG) can be used to simultaneously charge two battery packs. Part Names and Operation <Left> <Top> <Right> <Bottom> Accessories Use these bundled items to join multiple chargers together. • Bottom bracket •... - Page 56 Off: The battery pack is not installed. Red: Charging Green: Charging complete Red/green alternate flashing: Standby because the battery pack is faulty, Charging Status LED is installed incorrectly or is outside the charging temperature range (Charging begins when temperature returns to the charging temperature range) AC Adaptor Jack Connect the AC adaptor (sold separately) here.
- Page 57 Charging status LED display for the four-bay battery charger Off: The battery pack is not installed. Red: Charging Green: Charging complete Red/green alternate flashing: Standby because the battery pack is faulty, is installed incorrectly or is outside the charging temperature range (Charging begins when temperature returns to the charging temperature range) Connecting Multiple Dual Battery Chargers...
-
Page 58: Usb Type-C Cable (Ha-S81Usbc)
3. Turn over the connected Dual Battery Chargers and attach a connection bracket, securing it in place with screws. You can repeat the above steps to connect up to 3 Dual Battery Chargers. Specifications 1. Charging specifications Charging method : Constant-voltage constant-current charging Charging time : Approx. -
Page 59: Battery Pack (Ha-S20Bat)
If the battery pack fails to hold its operating duration after it has been fully charged, replace it with a new one. The battery pack may reach the end of its service life. • When buying a battery pack, you should purchase a Casio genuine battery pack. Battery Pack Specifications Model:... - Page 60 ENGLISH Disposal of Waste Electrical & Electronic Equipment of products for Household use The symbol (crossed out wheeled-bin) on your product indicates that the product shall not be mixed or disposed with your household waste, at their end of use. This product shall be handed over to your local community waste collection point for the recycling of the product.
- Page 61 Nederlands Afvalverwijdering van Elektrische & Elektronische Apparatuur voor Huishoudelijk Gebruik Het symbool (doorgekruisde afvalbak op wielen) op het product geeft aan dat het product aan het einde van haar levensduur niet samen met of in de vorm van huishoudafval mag worden weggegooid. Het product moet naar een verzamelplaats (milieudepot) worden gebracht waar dergelijke producten worden gerecycled.
- Page 62 Česky Nakládání s nepotřebnými domácími elektrickými a elektronickými zařízeními Symbol (přeškrtnutá popelnice na kolečkách) na Vašem výrobku označuje, že výrobek se po ukončeni jeho používání nesmí míchat a vyhazovat společně s běžným odpadem z domácnosti. Tento výrobek je třeba odložit na určené sběrné místo ve vaší oblasti pro provedení recyklace tohoto výrobku. Pro další...
- Page 63 Slovenščina Odlaganje odpadkov električne in elektronske opreme izdelkov za gospodinjstvo Oznaka (prekrižan smetnjak na kolesih) na vašem izdelku označuje, da se tega izdelka po končani uporabi ne sme mešati ali odvreči z ostalimi gospodinjskimi odpadki. Ta izdelek je potrebno oddati vaši lokalni deponiji z odpadki za predelavo takšnih izdelkov. Za podrobnejše podatke se obrnite na državni urad za odstranjevanje odpadkov v vaši državi.
- Page 64 Srpski Odlaganje otpada iz električne i elektronske opreme i proizvoda za domaćinstvo Simbol (precrtana kanta za otpatke sa točkićima) na vašem proizvodu označava da se proizvod po isteku svog radnog veka ne sme pomešati, niti bacati zajedno sa otpadom iz domaćinstva. Ovaj proizvod se mora predati na mestu za prikupljanje otpada za reciklažu u vašoj lokalnoj zajednici.
- Page 65 Italiano Smaltimento delle pile esaurite Il simbolo (un bidone con ruote sbarrato da una croce) sulla vostra pila indica che la pila, giunta alla fine del suo utilizzo, non deve essere smaltita insieme ad altri rifiuti non classificati, ma deve essere raccolta separatamente e consegnata al punto di raccolta rifiuti della propria comunità locale o presso altri punti di raccolta disponibili per il suo riciclaggio.
- Page 66 Dansk Bortskaffelse af udtjente batterier Symbolet (en overstreget affaldsspand med hjul) på batteriet angiver, at batteriet ikke må bortskaffes sammen med andet usorteret affald, men skal indsamles separat og afleveres på din lokale genbrugsstation eller på andre tilgængelige opsamlingssteder for genbrug, når det er udtjent. Hvis der er trykt et kemisk symbol under symbolet, angiver det, at batteriet indeholder kemiske substanser (Hg = kviksølv, Cd = cadmium eller Pb = bly).
- Page 67 Slovenščina Odlaganje odpadnih baterij Simbol (prečrtana kanta za smeti) na vaši bateriji nakazuje, da se baterij ne sme odlagati med nesortirane odpadke, pač pa jih je potrebno zbirati ločeno in oddati v veš lokalni center za odstranjevanje posebnih odpadkov ali na druga razpoložljiva mesta, kjer ob koncu obdobja uporabe baterije reciklirajo.
- Page 68 Το πλήρες κείμενο της δήλωσης συμμόρφωσης ΕΕ διατίθεται στην ακόλουθη ιστοσελίδα στο διαδίκτυο: http://doc.casio.com/ Spanish Por la presente, “CASIO COMPUTER CO., LTD.” declara que el tipo de equipo radioeléctrico “DT-X450” es conforme con la Directiva 2014/53/UE. El texto completo de la declaración UE de conformidad está disponible en la dirección Internet siguiente: http://doc.casio.com/ French Le soussigné, “CASIO COMPUTER CO., LTD.”, déclare que l'équipement radioélectrique du type “DT-X450”...
- Page 69 Portuguese O(a) abaixo assinado(a) “CASIO COMPUTER CO., LTD.” declara que o presente tipo de equipamento de rádio “DT-X450” está em conformidade com a Diretiva 2014/53/UE. O texto integral da declaração de conformidade está disponível no seguinte endereço de Internet: http://doc.casio.com/ Romanian Prin prezenta, “CASIO COMPUTER CO., LTD.”...
- Page 70 CASIO COMPUTER CO., LTD. 6-2, Hon-machi 1-chome Shibuya-ku, Tokyo 151-8543, Japan PN430161-003 MO2212-C 2022 CASIO COMPUTER CO., LTD.
Need help?
Do you have a question about the DT-X450 Series and is the answer not in the manual?
Questions and answers