
Subscribe to Our Youtube Channel
Related Manuals for MONARCH INSTRUMENT 6180-022


Summary of Contents for MONARCH INSTRUMENT 6180-022
- Page 1 Instruction Manual Smart Laser Sensor 15 Columbia Drive Amherst, NH 03031 USA Phone: (603) 883-3390 • Fax: (603) 886-3300 E-mail: support@monarchinstrument.com Website: www.monarchinstrument.com...
- Page 2 [730 m] away. Can be a distraction up to 4.5 miles [7.3 km] away. NEVER point any laser towards aircraft or vehicles; it is unsafe and illegal. Manufacturer: Safe Use Guidance: Monarch Instrument Class 3R lasers are safe when 15 Columbia Drive handled carefully. Do not look Amherst, NH 03031 USA into the beam.
-
Page 3: Table Of Contents
11.0 ACCESSORIES .............. 13 Symbols on the unit and in this manual: Direct current Warning Laser Beam Alternating current Caution Read Manual Monarch Instrument’s Limited Warranty applies. www.monarchinstrument.com for details. Warranty Registration and Extended Warranty Coverage information is available online at www.monarchinstrument.com. -
Page 4: Overview
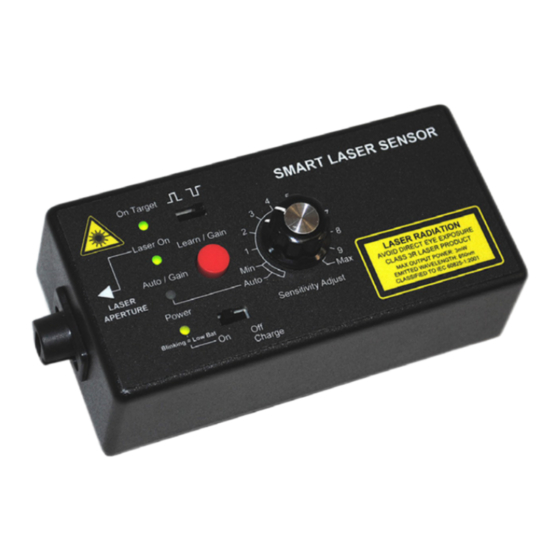
1.0 OVERVIEW The Smart Laser Sensor (SLS) is a self-contained unit intended to be used to make non-contact speed measurements from rotating targets at distances up to 65 feet (19.8 m) or to provide non-contact reference points to balancing equipment. Refer to Section 6.0 for an overview of operation. The unit will output one (TTL Compatible) pulse per revolution and has the ability to compute the RPM internally and output the ASCII values to any equipment capable of receiving an RS232 input. -
Page 5: Quick Start Guide
3. Auto/Gain LED On solid whenever the unit is in the Auto mode. It also blinks from 1 to 8 times to indicate the current gain whenever the gain is changed. 4. Power LED (Dependent on the Power switch location) On position: GREEN when the batteries are charged. -
Page 6: Connection Detail
Aim the laser dot perpendicular to the target - reflective tape, contrasting color or keyway. If the On Target LED (1) is not on, push and hold the red Learn/Gain button (6) until the On Target LED (1) blinks regularly. Note that at higher RPMs the LED will be on solid. - Page 7 Refer to Table 1 and Figure 3 (below) for the output socket connection detail. Description Wire Color (of cable) RS232 Receive (input to sensor) Common Orange [BNC -] SO (PNP Output) TTL compatible output Yellow [BNC +] RS232 Transmit (output from sensor) White OC (NPN Output) Black...
-
Page 8: Operation
5.0 OPERATION Note: Refer Figure 1 for switch and button locations. Turn the unit on by moving the Power switch (8) to the On position. The unit may be operated from the internal batteries and/or the charger/ power supply. The internal batteries will be trickle charged when using the AC charger/power supply. -
Page 9: Auto Mode
5.1 Auto Mode Number of blinks Gain Make sure the Sensitivity Adjust knob (7) is fully counterclockwise and the Auto/Gain 1 Strong Signal LED (3) is on. Aim the laser at your target. Press and hold the Learn/Gain button (6) until the On Target LED (1) blinks regularly or is on solid (depending on the RPM of the target). -
Page 10: Advanced Feature (Target Polarity)
6.0 ADVANCED FEATURE (TARGET POLARITY) The input circuitry can be set to optimally work with two different target types: a reflective (white, shiny) target on a mostly non-reflective (black, dull) background or a non-reflective (black, dull) target or a mostly reflective (white, shiny) background. -
Page 11: Rs232
In areas of high ambient light (outdoors), performance can be enhanced at long distances by slipping a piece of black tube with a minimum inner diameter of 0.6 inches, over the nose piece to act as an extension nose piece. This tube should not deflect the beam in any way. 8.0 RS232 Baud rate = 9600, 8 bits, 1 stop bit, no parity. -
Page 12: Specifications
10.0 SPECIFICATIONS Specifications* SLS Smart Laser Sensor Laser Specifications: Class 3R (per IEC 60825-1 Edition 3 2014) Complies with 21CFR 1040.10 and 1040.11 except for Classification deviations pursuant to Laser Notice No. 50, date June 24, 2007. Maximum Laser Output <5mW Pulse Duration Continuous... - Page 13 General: Operating Range: Up to 65 feet depending on target reflectivity 1/2" reflective tape up to 65 ft. [19.8 m] or up to 75° from target (T-5) @3600 RPM White/black contrast up to 3 ft. [91 cm] or up to 45° from target @ 3600 RPM Black mark on dental up to 4 in.
- Page 14 General (continued): PR Universal Charger: Input 100-240 V , 50-60 Hz Output ; dry location use only Check charger label for power information. Pulse Output: Source Output - Square Wave 0 to 3.9 V typical Source Output (SO) @ 15 mA (PNP to 4.2 V, 4.7 K ohms to common) TTL Compatible Open Collector - Switches to common, External pull Open Collector (OC)
-
Page 15: Installation Environment
Dimensions: 10.1 Installation Environment Installation Category II per IEC 664 Pollution Degree Level II per IEC 61010-1 Temperature: 32 to 104 °F (0 to +40 °C) operating 14 to 158 °F (-10 to +70 °C) storage Humidity: Maximum relative humidity of 80% for temperatures up to 88 °F (31 °C) decreasing linearly to 50% relative humidity at 104 °F (40 °C) 10.2 Compliance... -
Page 16: Accessories
T-5 Reflective Tape (6180-070) 5 ft. [1.5 m] roll, 0.5 inch wide 15 Columbia Drive, Amherst NH 03031 USA Tel.: (603) 883-3390 // Fax: (603) 886-3300 Email: support@monarchinstrument.com Website: www.monarchinstrument.com 1071-4859-115 0423 © Copyright 2016-2023 Monarch Instrument All rights reserved.
Need help?
Do you have a question about the 6180-022 and is the answer not in the manual?
Questions and answers