Table of Contents
Advertisement
Quick Links
Advertisement
Table of Contents

Subscribe to Our Youtube Channel
Related Manuals for MONARCH INSTRUMENT Nova-Pro IR 850


Summary of Contents for MONARCH INSTRUMENT Nova-Pro IR 850
- Page 1 Instruction Manual Nova-Pro IR 850 ® Infrared Stroboscope/Tachometer PATENTED TECHNOLOGY 15 Columbia Drive Amherst, NH 03031 USA Phone: (603) 883-3390 • Fax: (603) 886-3300 E-mail: support@monarchinstrument.com Website: www.monarchinstrument.com...
- Page 2 SAFEGUARDS AND PRECAUTIONS 1. Read and follow all instructions in this manual carefully, and retain this manual for future reference. 2. Do not use this instrument in any manner inconsistent with these operating instructions or under any conditions that exceed the environmental specifications stated.
- Page 3 Warranty Registration and Extended Warranty Coverage information is available online at www.monarchinstrument.com. Monarch Instrument holds the following US trademarks and registrations, all rights reserved: illumiNova®, Nova-Pro®, Nova-Strobe™, DataChart™, Track-It™. This product is protected by United States Patent No. 10,080,268.
-
Page 4: Table Of Contents
TABLE OF CONTENTS: 1.0 INTRODUCTION ..............1 2.0 USER INTERFACE ...............3 3.0 GETTING STARTED .............5 3.1 Power ................5 3.1.1 Continuous Operation ..........5 3.2 Input/Output Connections ..........6 4.0 MODES OF OPERATION .............7 4.1 Strobe Mode ..............7 4.1.1 Joystick ..............7 4.1.2 Touch Keypad Entry..........8 4.1.3 Doubling or Halving the Flash Rate ......8 4.1.4 External Input ............9 4.2 Lamp Mode ..............10... - Page 5 5.5 Memory (MEMRY) MENU ..........19 5.5.1 Save Memory ............20 5.5.2 Recall Memory .............20 6.0 STROBE BRIGHTNESS ............21 6.1 Calculating Blur ............21 6.2 Brightness in Degrees of Rotation ........22 6.3 Brightness in Pulse Duration ........22 7.0 BATTERY PACK ..............23 7.1 Low Battery Functionality ..........23 7.2 Charging the Battery ............24 8.0 AC POWER OPTION ............24 9.0 WALL POWER SUPPLIES ..........24...
-
Page 6: Introduction
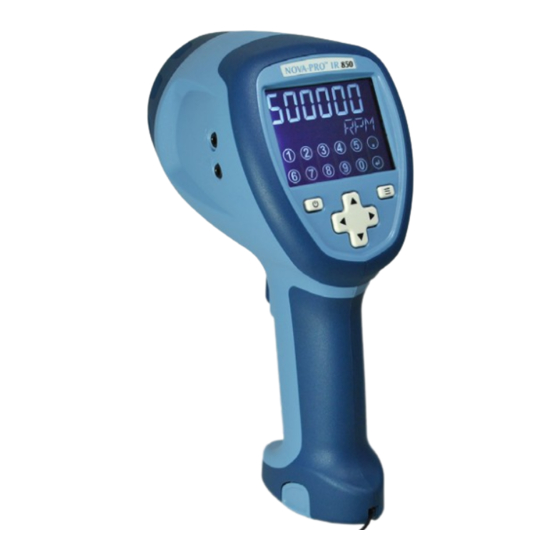
(Tach Mode). The features of the Nova-Pro IR 850 are highlighted in Figure 1 and Table 1. Figure 1 Nova-Pro IR 850 Features... - Page 7 Table 1 Nova-Pro IR 850 Features Bezel Bezel is removable to add/remove the optional Laser Module; Infrared Radiation emitted from LEDs Lens Internal laser used to sync the flash to Laser Module an external marker on the object under inspection; can also be used in...
-
Page 8: User Interface
2.0 USER INTERFACE The Nova-Pro IR 850 user interface consists of a large backlit display with touch keypad, dedicated keys on the user interface panel, and a trigger to activate the unit when the power is on. The user interface is described in Figure 2 and Table 2. - Page 9 Table 2: Nova-Pro IR 850 User Interface 6-digit display used to display flash rate and other numeric values Lock icon — active when the device is locked On-Target indicator — active when the input/laser is locked on to a target; also used to indicate current selection in the menus Laser icon —...
-
Page 10: Getting Started
3.0 GETTING STARTED 3.1 Power The Nova-Pro IR 850 comes standard with a removable Battery Pack that should be charged before use (see section 7.0 Battery Pack). The Battery Pack is keyed to ensure correct insertion into the Nova-Pro and Battery Charging Station. -
Page 11: Input/Output Connections
3.2 Input/Output Connections The Nova-Pro IR 850 has input and output jacks on the side that can be used for external Out ( ) triggering or synchronization (daisy-chaining In ( ) two or more strobes). These jacks accept 1/8” [3.5 mm] phone plugs (input-stereo, output-mono). -
Page 12: Modes Of Operation
4.0 MODES OF OPERATION The Nova-Pro IR 850 has four modes of operation: STROBE, LAMP, LASER and TACH (Tachometer). The mode can be changed in the Mode Menu (see section 5.2 MODE Menu). Each are described in the sections below: 4.1 Strobe Mode... -
Page 13: Touch Keypad Entry
4.1.2 Touch Keypad Entry Press the MENU button to display the numeric keypad. The flash rate will default to 0 and show the units you are entering. Note that this is a capacitive touch sensitive keypad and will not respond if the user is wearing gloves. -
Page 14: External Input
Figure 5 Object Rotating at 3,000 RPM Note: If doubling or halving the flash rate causes the strobe to exceed its range, the display flash rate will remain at the current flash value. 4.1.4 External Input Whenever an external source (sensor, signal generator or another strobe) is plugged into the input jack ( pointing towards jack) and the unit is in Strobe Mode, the signal from... -
Page 15: Lamp Mode
Figure 6 Strobe with External Sensor 4.2 Lamp Mode For full time activation of the Infrared light source, the Nova-Pro IR 850 has a Lamp Mode that creates a bright, constant light for inspection. Be aware that this mode uses considerably more battery power and that you should never look directly into the light source. -
Page 16: Laser Mode (Optional)
4.3 Laser Mode (Optional) The Laser Mode is only available when the Laser Module is installed. This mode uses the LASER to trigger the strobe flash and is similar to the External Input Mode. Laser icon will blink when Laser Mode is enabled and be on solid when trigger is pulled and laser is on. -
Page 17: Tachometer (Tach) Mode
4.4 Tachometer (TACH) Mode The TACH (Tachometer) Mode requires the Laser Module to be installed OR an external input (sensor) be plugged in. This mode uses the Laser or External signal to measure rotational speed. TACH Tachometer icon will show in display when the Nova-Pro is in TACH Mode. -
Page 18: Menus
5.0 MENUS Gradients Reversed in direction for EMF file - swap layers for regular viewing The menu that displays is dependent on the unit’s current operating mode and whether the Laser Module is installed. Using extrenal laser TACHometer STROBE MODE MODE SEtUP MODE input #... - Page 19 POWER button to turn on. MODE appears on screen, then MENU again to enter various MODES. etween various TACH, STROBE, ON, and LASER modes. STROBE LASER MODE MODE MODE ON LAMP SEtUP MODE input # KEYPAD X2 / ≑2 SEtUP MODE BRITE DEGS, TIME...
-
Page 20: Menu Overview
5.1 MENU Overview To enter the menus, press the MENU button once or three times depending on the current mode (see overview) until the word SEtUP appears on the top line of the display. To select the current item shown on the lower line press the MENU button again. -
Page 21: Brightness (Brite) Menu
5.3 Brightness (BRITE) Menu Refer to section 6 for details on Brightness and Flash Duration before using this feature. The Brightness (BRITE) menu option sets the flash duration which affects the brightness. Flash duration can be adjusted in degrees of rotation (proportional flash duration —... -
Page 22: Miscellaneous (Misc) Menu
5.4 Miscellaneous (MISC) Menu This menu item contains seldom used options. The miscellaneous items are: DECPT (Decimal Point), UNITS, INPUT, OUTP (Output) and BKLIT (Backlight). Press the MENU button to enter the MISC menu. Use the ▲ and ▼ arrows on the joystick to scroll through the miscellaneous options. -
Page 23: Units Menu
5.4.2 UNITS Menu This menu option selects the engineering units used to display the flash rate or speed. The choices are: FPM - Flashes per Minute (not available in TACH Mode) FPS - Flashes per Second (same as Hz, not available in TACH Mode) RPM - Revolutions per Minute RPS - Revolutions per Second (same as Hz) Press the MENU button to enter the UNITS menu. -
Page 24: Output (Outp) Menu
5.4.4 Output (OUTP) Menu This menu sets the pulse polarity of the output signal that will trigger a device connected to the output jack. The options are nEG for negative pulse or POS for positive pulse. Press the MENU button to enter the OUTP menu. The current edge setting is shown on the top line with OUTP on the lower line. -
Page 25: Save Memory
Press the MENU button to enter the MEMRY menu. Use the right arrow ► on the joystick to toggle between SM (Save Memory) or RM (Recall Memory). 5.5.1 Save Memory To STORE the current strobe setting into a memory location: Once in the Memory (MEMRY) menu, press the ►... -
Page 26: Strobe Brightness
6.0 STROBE BRIGHTNESS The strobe’s brightness depends on how wide the strobe’s flash pulse is; the wider the pulse, the brighter the flash from the LEDs appears to be. There is however, a downside to the wider pulses. All strobes work by giving short bursts of light (the pulse width) at a rapid repetition rate (the flash rate). -
Page 27: Brightness In Degrees Of Rotation
When setting the pulse duration in degrees, what you set is what you get. Refer to the image on the right for the difference between a 1° and 5° (of rotation) flash duration. There are two methods of adjusting the flash pulse width and hence the brightness and consequently the blur. -
Page 28: Battery Pack
7.0 BATTERY PACK The Nova-Pro IR 850 comes standard with one rechargeable Lithium-Ion battery pack, external charging station, and power supply. The Battery Pack is shipped in a mostly discharged state and has tape over the terminals. REMOVE TAPE BEFORE USE... -
Page 29: Charging The Battery
(115 V ac to 230 V ac) using the appropriate interchangeable plug. 9.0 WALL POWER SUPPLIES The wall power supplies provided with the Nova-Pro IR 850 have interchangeable plugs allowing them to be used with AC outlets in different countries. -
Page 30: Specifications
• Avoid touching the plug blades when inserting or removing the power supply from the AC outlet • Indoor use only 10.0 SPECIFICATIONS Specification* Nova-Pro IR 850 Infrared Stroboscope Flash Range (FPM/RPM) 30 to 999,999 6-digit numeric and 5-digit alphanumeric LCD with Display touch keypad;... -
Page 31: Operating Environment
Specification* Nova-Pro IR 850 Infrared Stroboscope Battery pack: 9.5 hours typical Operating Time (6000 FPM, 2° duty cycle) Removable/rechargeable UN38.3 compliant Li-ion Power Supply (battery) battery pack; battery: 7.4 V 2.8Ah (21 W) 115/230 Vac 50/60Hz AC adapter with 6 ft. [2 m]... -
Page 32: Eu Declaration Of Conformity
10.2.2 EU Declaration of Conformity Please visit our website www.monarchinstrument.com to download our EU Declaration of Conformity for this product. 10.2.3 Energy Efficiency This product complies with the U.S. Department of Energy’s energy conservation standards specified in the Code of Federal Regulations 10 CFR 430.32(z) and is registered in the DoE CCMS database. -
Page 33: Accessories And Sensors
11.0 ACCESSORIES AND SENSORS There are many accessories available to enhance the functionality and keep your Nova-Pro up and running. See Monarch’s website for info: Accessories webpage. AC Power Adapter PN: 6281-015 Charging Station PN: 6281-012 Battery Pack PN: 6281-010 Input/Output Cable PN: 6280-038... - Page 34 Sensors: See Monarch’s Sensors webpage for details. ROLS-P Remote Optical Laser Sensor w/ 8 ft. [2.5 m] cable RLS-P Rugged Laser Sensor w/ removable 9.8 ft. [3 m] cable with watertight M12 connector ROS-P Remote Optical Sensor w/ 8 ft. [2.5 m] cable ROS-P-25 Remote Optical Sensor w/ 25 ft.
- Page 35 This page intentionally left blank.
- Page 36 The Professional’s Choice Monarch Instrument is committed to excellence and quality in manufacturing, sales, and service. ™ Track-It Data Loggers Panel Tachometers Portable Tachometers Frequency Portable Strobes Fixed Mounted Converters Strobes ™ Speed Sensors DataChart Paperless Recorders 15 Columbia Drive, Amherst NH 03031 USA Tel.: (603) 883-3390 // Fax: (603) 886-3300...
Need help?
Do you have a question about the Nova-Pro IR 850 and is the answer not in the manual?
Questions and answers