Table of Contents
Advertisement
Quick Links
Advertisement
Table of Contents

Related Manuals for TRI tool 603SBCM


Summary of Contents for TRI tool 603SBCM
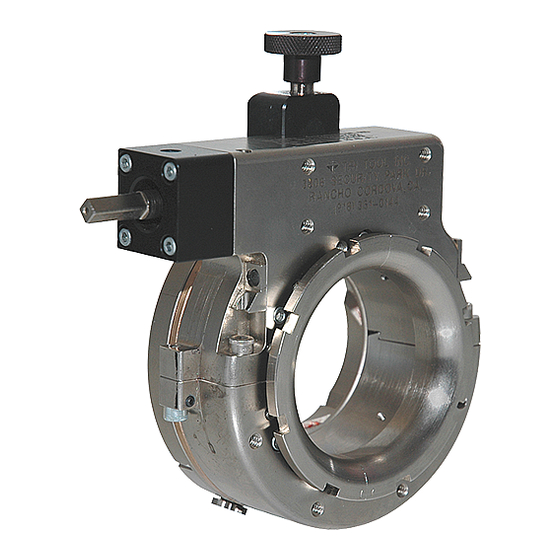
- Page 1 Operation Manual...
- Page 2 ABOUT TRI TOOL TECHNOLOGIES At Tri Tool, we are committed to your success through relentless innovation and powerful partnership. We insist on developing tools and equipment that exceed your expectations of performance, precision, safety, and durability. As a full-service engineering firm, we are here to support you every step of the way.
-
Page 3: Table Of Contents
TABLE OF CONTENTS Tri Tool Inc. Warranty Tool Bit Resharpening Policy About The Manual Safety General Description Specifications 9 Component Overview Set Up and Installation Operation Cutting Speeds and Feeds Tool Bits Collets Maintenance Storage Troubleshooting Accessories Illustrated Parts Breakdown... -
Page 4: Tri Tool Inc. Warranty
TRI TOOL INC. TRI TOOL INC. Warranty LIMITED WARRANTY: All products manufactured by Seller are warranted to be free from defects in materials and workmanship under normal use. The period of this warranty shall be three years from the date of shipment for all products, except for welding and Non- Standard Products which shall be one year from the date of shipment. -
Page 5: Tool Bit Resharpening Policy
Model 603SBCM Clamshell Buyer’s notice of a defective Goods must identify the specific Goods affected, and the nature of the defect. It is required when returning the defective Goods, that it is suitably packed, fully insured, and transportation and insurance prepaid in accordance with instructions issued by Seller. Seller, at its sole option, will either repair or replace any Goods authorized for return to Seller. -
Page 6: About The Manual
The instructions and descriptions in this manual were accurate when the manual was written. However, the information in the manual is subject to change without notice. Check for updated information before you start any job. The Tri Tool Inc. web site has the most current information. - Page 7 Model 603SBCM Clamshell SAFETY GLASSES: Indicates a hazardous situation that requires the use of safety glasses. GLASSES HOT SURFACE: Indicates a hazardous situation that hot surfaces may be present. HOT SURFACE GLOVES: Indicates a hazardous situation that requires glasses. GLOVES ARC FLASH &...
-
Page 8: Safety
TRI TOOL INC. 2. SAFETY PRECAUTIONS In General Use standard safety equipment such as: hard hats, safety shoes, safety harnesses, protective clothes, and other safety devices when appropriate. Operate this tool only in accordance with specific operating instructions. WARNING: Do not override the dead-man switch on the power unit. Locking down, obstructing, or in any way defeating the dead-man switch on the power drive unit may result in serious injury. - Page 9 Before you start operating the equipment, do no-load tests and feed function checks. Tool Use Use the right tool and tool bit for the job. Contact Tri Tool to help with your application. Keep the tool bits fully engaged in the tool bit holders. Loose bits are sharp and can cause cuts or punctures.
-
Page 10: General Description
TRI TOOL INC. 3. GENERAL DESCRIPTION The 603SBCM Low Profile Clamshell is a split-frame pipe lathe for severing and beveling in- line pipe with a range of 1 1/4” pipe through 3” tube with minimal radial and axial clearances. Easily adjustable precision bearing surfaces, preload and stabilize the rotating head to provide long life, low maintenance, stability, and precision. -
Page 11: Specifications
1.69" (127.8 mm) (42.9 mm) 6.73" Basic Machine Width (170.9 mm) Figure 1: Model 603SBCM Low Profile Clamshell Envelope Drawing Weight Basic Machine: 6.2 lbs (2.81 kg) Motor: 5.4 lbs (2.43 kg) Main Drive Gear: Worm Drive Motor Mount: Bayonet Type Clamping: Collet Type Pipe Size Range: 1 1/4"... -
Page 12: Component Overview
TRI TOOL INC. 5. COMPONENT OVERVIEW Clamshell The clamshell is the main part of the machine. Contained within it is the collet that secures the clamshell to the pipe, two tool bit mounting blocks and feed mechanisms, a tripper pin that is engaged or disengaged to either feed or not feed the tool bits into the pipe, and the drive shaft to rotate the machining head with mounting provisions for the air motor. -
Page 13: Set Up And Installation
Model 603SBCM Clamshell 6. SET UP AND INSTALLATION Hand Tools • Feed Sprocket Driver • 9/64" Hex Wrench for Tool Bit Screws • 5/32" Hex Wrench for Clamshell Screws • One (1) Spanner Wrench and Torque Wrench for Collet Nut • Ratchet Wrench and 1/4" Square Socket for Drive Shaft •... - Page 14 TRI TOOL INC. 4. Use the sprocket driver to fully retract the two tool blocks. 5. Ensure that the following are available: • Air Supply, 32 CFM at 90 PSI • Lube oil added at 2 to 4 drops per minute. • Cutting fluid, if permitted. (Cutting speeds will need to be reduced if no cutting fluid is used.) Install the Clamshell •...
- Page 15 Model 603SBCM Clamshell Set the Tool Bit Position The tool bit will move .025" for one full turn of the feed sprocket. 1. Use the feed sprocket wrench to lower the severing tool bit until it touches the pipe. 2. Turn the wrench in the opposite direction until the backlash in the feed screw is removed.
-
Page 16: Operation
TRI TOOL INC. 7. OPERATION DANGER: Do not override the deadman switch on the power unit. Locking down, obstructing, or in any way defeating the deadman switch on the power drive unit may result in serious injury. DANGER DANGER: When an installed pipe is severed, it may move. Secure the pipe on both sides of the sever line to decrease the risk of personal injury and equipment damage. - Page 17 Model 603SBCM Clamshell Remove the Tool from the Pipe 1. Using the feed sprocket driver, retract the tool bits until they are clear of the pipe surface. 2. Remove the tool from the pipe. If the machine must be disassembled to remove it from the pipe, do the following: 1.
-
Page 18: Cutting Speeds And Feeds
TRI TOOL INC. 8. CUTTING SPEEDS AND FEEDS Use 200 surface inches per minute (5080 surface millimeters per minute) for: Ÿ Stainless steels in general when no coolant is allowed, all heavy-wall tube and some chrome/molybdenum steels. Use 250 surface inches per minute (6350 surface millimeters per minute) for: Ÿ... -
Page 19: Tool Bits
99-5997C4 Socket Weld Outside 99-5998C4 * Requires 33-2930 SCREW, CAP, #8-32 X 5/8 SS Note: A ‘Right Hand Bevel’ is on the same side of the cut as the 603SBCM. A ‘Left Hand Bevel’ is on the opposite side of the cut from the 603SBCM. 92-1237 Rev. 230124... -
Page 20: Collets
TRI TOOL INC. 10. COLLETS COLLETS Pipe Size DIA Decimal DIA Metric Collet P/N 3.000" 76.2 mm 30-2939 2.875" 73.0 mm 30-3132 2 1/2" 2.680" 68.1 mm 30-3133 2.480" 63.0 mm 30-2947 2.375" 60.3 mm 30-2948 2" 2.000" 50.8 mm 30-3134 1.920"... -
Page 21: Maintenance
The air supply for the Model 603SBCM requires an adequate filter/lubricator (FRL) to be used. The motor warranty is void if damage occurs from contaminated air or lack of lubrication. Use only Tri Tool supplied replacement parts for repairs. Service Intervals Before Each Use Ÿ Adjust the tool module slides. Ÿ If the Tool Block collects debris, clean the tool block and the feed screws before each cutting operation. - Page 22 TRI TOOL INC. Remove the Tripper Pin 1. Loosen the 33-0954 Half Dog Set Screw. 2. Loosen the 30-0125 Ball Plunger. 3. Remove the Tripper Shaft assembly (P/N 14-0097) from the Tripper Block Assembly (P/N 47-1521). 4. Remove the Cap Screw (P/N 33-2649) and the Knob (P/N 42-0217) from the Tripper Shaft (P/N 20-0803). 5. Insert the Tripper Shaft into the Pin Removal Tool (optional accessory 08-0804). 6. Thread the Pin Removal Screw into the block, tighten with a 5/16" hex wrench (P/N 36- 0011) until the pin is removed.
- Page 23 Model 603SBCM Clamshell Install a new Tripper 1. Unscrew the Pin Removal Screw. 2. Remove the Tripper Shaft (P/N 20-0803) from tool. 3. Start the Dowel Pin (P/N 32-0220) in Tripper Shaft, insert tapered end. 4. Insert the Tripper Shaft and Dowel Pin into Tool.
- Page 24 TRI TOOL INC. Reassemble the Tripper Shaft Assembly 1. Apply Locktite 242 to Cap Screw (P/N 33-2649). 2. Insert Tripper Shaft Assembly in Tripper Block (P/N 48-1322). 3. Apply 242 Locktite to Half Dog Set Screw (P/N 33-0954). Screw in all the way and back off 1/4 turn. 4. Apply 242 Locktite to Ball Plunger Screw (P/N 30-0125). Screw in all the way and back off 1/2 turn.
- Page 25 Model 603SBCM Clamshell Adjust the Main Bearing 1. Loosen all main bearing locking screws one full turn with the 7/64" wrench. The locking screws are labeled A through F. Refer to Fig. 5. 2. Back off the main bearing adjustment screws 1/2 turn with the 5/64" wrench. The main bearing adjustment screws are labeled 1 through 12.
-
Page 26: Storage
TRI TOOL INC. 12. STORAGE General Storage 1. Thoroughly clean the tool by removing all chips and debris. 2. Remove any tool bits with the 9/64" hex wrench and store them appropriately in their container. 3. Inspect the tool by checking for loose, worn, or damaged components. 4. Lubricate and spray the tool with a rust preventative prior to storage. -
Page 27: Troubleshooting
Model 603SBCM Clamshell 13. TROUBLESHOOTING Problem: Tool Bit Chatters The tool bit is loose or overextended. The tool bit is damaged. The tool holder is too loose in the slides. The cutting speed is too fast. The clamping pads are loose on the pipe or tube. - Page 28 TRI TOOL INC. Problem: Loss of Air Power The air supply pressure is too low. The air filter is plugged. The air line size is insufficient. The air line is too long. Problem: Loss of Hydraulic Power The hydraulic supply pressure is too low. The hydraulic filter is plugged. The hydraulic line size is insufficient. The hydraulic line is too long.
-
Page 29: Accessories
Model 603SBCM Clamshell 14. ACCESSORIES The following accessory is available from Tri Tool Inc. AUTO-DISENGAGE TRIPPER (05-0686) Parts List, Auto-Disengage Tripper (P/N 05-0686) Item Part Description 05-0686 AUTO-DISENGAGE TRIPPER 92-1237 Rev. 230124... -
Page 30: Illustrated Parts Breakdown
TRI TOOL INC. 15. ILLUSTRATED PARTS BREAKDOWN Parts List, 603SBCM Tool Kit (P/N 05-0430) Item Part Description 01-1818 MODEL 603SBCM CLAMSHELL 08-0804 BLOCK ASSEMBLY, PIN REMOVAL/INSTALL 14-0091 SHAFT ASSEMBLY, FLEXIBLE HD 30-2948 COLLET, SS, 603SBCM, 2.375" (60.31 MM) 30-3132 COLLET, SS, 603SBCM, 2.875" (73.0 MM) 30-3161 COLLET, SS, 603SBCM, 1.660"... - Page 31 Model 603SBCM Clamshell 603SBCM CLAMSHELL (01-1818) Parts List, 603SBCM Clamshell (P/N 01-1818) Item Part Description 02-2421 603SBCM SUB-ASSEMBLY 38-0216 SPROCKET ASSEMBLY, FEED 47-1521 TRIPPER BLOCK ASSEMBLY 49-0433 HOLDER, TOOL 33-2647 SCREW, CAP, #8-32 X 3/8" LG, SST 33-2930 SCREW, CAP, #8-32 X 5/8" SS 33-2531 SCREW, BUTTON, #4-40 X 3/16" LG 33-2644 SCREW, CAP, #4-40 X 1/4", SS NOT SHOWN 05-0397 WRENCH KIT, 603SBCM 92-1237 Rev.
- Page 32 TRI TOOL INC. 603SBCM SUB-ASSEMBLY (02-2421) Parts List, 603SBCM Sub-Assembly (P/N 02-2421) Item Part Description 19-1086 HOUSING, MAIN, HD 24-2368 PLATE, THRUST, HD 28-0367 SEAL, FELT, 3/32" X 1/8" X BULK 10.80 29-0064 BEARING, BALL, 5/8" X 1 1/16" X 9/32" 29-0190 BEARING, THRUST, 5/16" X 3/4" X 5/64" 29-0475 BEARING, MAIN 29-0404 BEARING, NEEDLE 33-2645 SCREW, CAP, #6-32 X 1/2", SST 33-2646 SCREW, CAP, #6-32 X 1", SST 33-2489 SCREW, BUTTON, #4-40 X 1/8"...
- Page 33 Model 603SBCM Clamshell Parts List, 603SBCM Sub-Assembly (P/N 02-2421) (continued) Item Part Description 33-0488 SCREW, SET, #10-24 X 1/4", CUP PT 33-0903 SCREW, SET, 1/4-20 X 5/16", HALF DOG 33-1605 SCREW, SET, #8-32 X 1/4", HALF DOG 33-2266 SCREW, CAP, #4-40 X 1/8" 33-2501 SCREW, SPLITLINE, HD 33-2502 SCREW, SET, #6-32 X .250, H DOG 34-0202 WASHER, THRUST, 5/16" X 3/4" 35-0605 NUT, CLAMP 39-0932 GEAR, MAIN 39-0916 GEAR, WORM 43-0577 COVER, WORM...
- Page 34 TRI TOOL INC. HOUSING, MAIN (19-1086) Parts List, Housing, Main (P/N 19-1086) Item Part Description 32-0598 PIN, ALIGN, 3/16" DIA X 5/16" 33-2649 SCREW, CAP, #10-24 X 5/8", SST 92-1237 Rev. 230124...
- Page 35 Model 603SBCM Clamshell NUT, CLAMP (35-0605) Parts List, Nut, Clamp (P/N 35-0605) Item Part Description 32-0220 PIN, DOWEL, 1/8" DIA X 3/8" 92-1237 Rev. 230124...
- Page 36 TRI TOOL INC. GEAR, MAIN (39-0932) Parts List, Gear, Main (P/N 39-0932) Item Part Description 32-0598 PIN, ALIGN, 3/16" DIA X 5/16" 33-2649 SCREW, CAP, #10-24 X 5/8", SST 92-1237 Rev. 230124...
- Page 37 Model 603SBCM Clamshell BLOCK ASSEMBLY, TRIPPER PIN REMOVAL/INSTALL (P/N 08-0804) Block Assembly, Tripper Pin Removal/Install (P/N 08-0804) Item Part Description 33-2503 SCREW, TRIPPER PIN REMOVAL 32-0210 PIN, DOWEL 48-1882 BLOCK, TRIPPER PIN REMOVAL 33-2490 SCREW, PIN INSTALLATION NOT SHOWN 36-0011 5/16"...
- Page 38 TRI TOOL INC. SHAFT ASSEMBLY, FLEXIBLE H.D. (P/N 14-0091) Parts List, Shaft Assembly, Flexible HD (P/N 14-0091) Item Part Description 20-0844 SHAFT, DRIVE, FLEX 20-0845 SHAFT, ADAPTER, FLEX 20-0904 SHAFT, FLEXIBLE, 18" HEAVY DUTY 27-0726 ADAPTER, SQUARE, FLEX SHAFT 27-0727 ADAPTER, BAYONET, FLEX SHAFT 32-0034 PIN, ROLL, 5/32" DIA X 5/8" 32-0035 PIN, ROLL, 5/32" DIA X 3/4" 33-0498 SCREW, SET, 1/4-20 X 3/16", CUP PT 33-0903 SCREW, SET, 1/4-20 X 5/16", HALF DOG 40-0143 SPRING, MUSIC WIRE, LC-085K-3M 92-1237 Rev. 230124...
- Page 39 Model 603SBCM Clamshell BLOCK ASSEMBLY, TRIPPER (P/N 47-1521) Parts List, Block Assembly, Tripper (P/N 47-1521) Item Part Description 14-0097 SHAFT ASSEMBLY, TRIPPER 30-0125 PLUNGER, BALL, 1/4-20 X 17/32" 33-2650 SCREW, CAP, #10-24 X 3/4", SST 33-0954 SCREW, SET, #10-24 X 1/4", HALF DOG 48-1322 BLOCK, TRIPPER 92-1237 Rev. 230124...
- Page 40 TRI TOOL INC. SHAFT ASSEMBLY, TRIPPER (P/N 14-0097) Parts List, Shaft Assembly, Tripper (P/N 14-0097) Item Part Description 20-0803 SHAFT, TRIPPER 32-0220 PIN, DOWEL, 1/8" DIA X 3/8" 33-2649 SCREW, CAP, #10-24 X 5/8", SST 42-0217 KNOB 92-1237 Rev. 230124...
- Page 41 Model 603SBCM Clamshell MOTOR ASSEMBLY, BAYONET (P/N 57-0269) Parts List, Motor Assembly, Bayonet (P/N 57-0269) Item Part Description 20-0806 SHAFT, DRIVE 27-0703 ADAPTER, BAYONET 33-0498 SCREW, SET, 1/4-20 X 3/16", CUP PT 40-0143 SPRING, MUSIC WIRE, LC-085K-3 53-0045 VALVE, FLOW CONTROL, 1/4" NPT 54-0149 COUPLING, MAIL, QD, HOSE TO PIPE 54-0201 CAP, YELLOW...
- Page 42 TRI TOOL INC. WRENCH ASSEMBLY, SPROCKET (P/N 36-0314) Parts List, Wrench Assembly, Sprocket (P/N 36-0314) Item Part Description 32-0220 PIN, DOWEL, 1/8" DIA X 3/8" 36-0315 WRENCH, SPROCKET 92-1237 Rev. 230124...
- Page 43 Model 603SBCM Clamshell WRENCH ASSEMBLY, TORQUE BAR (P/N 36-0344) Parts List, Wrench Assembly, Torque Bar (P/N 36-0344) Item Part Description 32-0220 PIN, DOWEL, 1/8" DIA X 3/8" 63-0215 BAR, TORQUE 92-1237 Rev. 230124...
- Page 44 TRI TOOL INC. Parts List, Wrench Kit (05-0397) - NOT SHOWN Item Part Description 05-0397 WRENCH KIT 36-0314 WRENCH ASSEMBLY, SPROCKET 36-0344 WRENCH ASSEMBLY TORQUE BAR 36-0003 WRENCH, L, 3/32" HEX 36-0006 WRENCH, L, 9/64" HEX 36-0020 WRENCH, T, 5/32" HEX 36-0091 WRENCH, RATCHET, 1/4" DRIVE 36-0334 WRENCH, SPANNER 36-0261 WRENCH, DRIVE, 1/4" 36-0262 SOCKET, 1/4"...
- Page 46 • Disconnect power sources before servicing or moving the equipment. • Remove all loose articles of clothing and jewelry before operating the equipment. Be Safety Conscious! 3041 Sunrise Blvd. Rancho Cordova, CA 95742 +1(916) 288-6100 • +1(800) 345-5015 www.tritool.com ©Copyright Tri Tool Inc. PN 81-0542 (04-21)
Need help?
Do you have a question about the 603SBCM and is the answer not in the manual?
Questions and answers