ClearOne Converge 560 User Manual
Hide thumbs
Also See for Converge 560:
- Solution manual (32 pages) ,
- Datasheet (2 pages) ,
- Datasheet (2 pages)
Table of Contents
Advertisement
Quick Links
Advertisement
Table of Contents

Related Manuals for ClearOne Converge 560


Summary of Contents for ClearOne Converge 560
- Page 1 Converge 560/590 USER’S MANUAL...
- Page 2 © 2005 ClearOne Communications, iinc. All rights reserved. No part of this document m ay be reproduced in any form or by any means without written permission from ClearOne Communications. Printed in the United States of America. ClearOne reserves specific privileges.
-
Page 3: Table Of Contents
The Converge 560/590........ - Page 4 TABLE OF CONTENTS (CONTINUED) ............71 WEB INTERFACE Accessing the web interface .
-
Page 5: Introduction
Converge--these microphones can be table mics, portable mics, or whatever type of microphone would be most suitable for the situation at hand. The Converge 560 includes two breakout boxes connected together and the Converge 590 has three breakout boxes connected together. - Page 6 1-801-974-3760. > Note: ClearOne is not responsible for product damage incurred during shipment. You must make claims directly with the carrier. Inspect your shipment carefully for obvious signs of damage. If the shipment appears damaged, retain the original boxes and packing material for inspection by the carrier.
-
Page 7: Product Overview
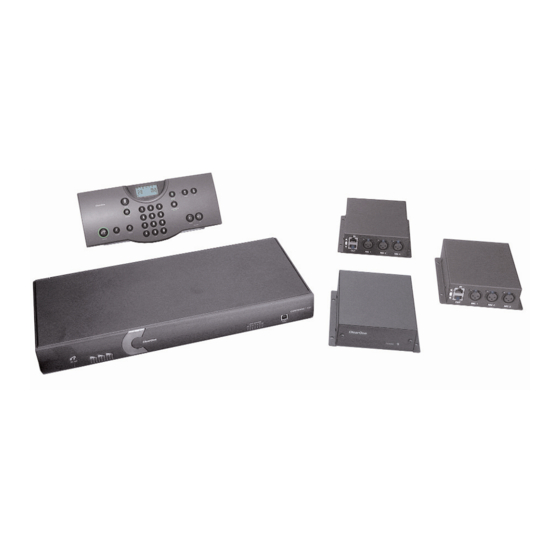
PRODUCT OVERVIEW The following paragraphs give an overview of the Converge 560/590’s componenets. RF (RADIO FREQUENCY) CONTROLLER/WIRED CONTROLLER The RF controller/wired controller allows you to manage all calls, program user preferences and adjust settings for your Converge. DOWN MUTE MENU... - Page 8 MIXER (FRONT) Converge mixer (front) FIGURE 1.4 Telephone L L ED. This indicator lights red when the Converge is powered, but the telco is on hook (not in use). The indicator lights green when the telco is off hook (in use) and flashes green during an incoming call.
- Page 9 MICROPHONE BREAKOUT BOX FRONT VIEW MIC 1 MIC 2 MIC 3 REAR VIEW Converge breakout box FIGURE 1.6 Power I I ndicator. Indicates whether the breakout box is powered on or not--a green light indicates ON. Microphone C C onnectors. You can connect up to three mics--the mics can be tabletop mics, button mics, portable mics, etc.
-
Page 10: Basic Room Design
ClearOne delta mics, then it is recommended that the ceiling loudspeakers be installed directly above the microphones. For example, if you have a Converge 590 with three ClearOne delta mics, you would install the ceiling loudspeakers above the first and third mics. -
Page 11: Installation Overview
INSTALLATION OVERVIEW Carefully consider the following items in order to ensure yourself of a smooth installation process. READ THE USER MANUAL Please read through this manual to familiarize yourself with the Converge system. Refer to the Help file in RAV-Ware for information on the software. Read through all requirements and safety information to be sure you set up and configure your Converge correctly. - Page 12 NETWORK INFORMATION To use Converge over a local area network (LAN), you need to know if the LAN uses Dynamic Host Configuration Protocol (DHCP) or if you need a static IP address. If the LAN uses DHCP , there is no need to make any network adjustments. If the LAN does not use DHCP , gather the following information prior to LAN setup: •...
-
Page 13: Connecting The Converge
CONNECTING THE CONVERGE BASIC CONNECTIONS Connecting the Converge should be a smooth process. Once basic connections for audio conferencing are made, the system is ready to use. SETTING UP AUDIO CONFERENCING If you are installing the mixer into a rack, remove the side panels, rotate them and then reattach. - Page 14 Connect the second and third microphone breakout boxes using the 18” Cat. 5 cables. (Third breakout box on the Converge 590 only). Mixer RECORD / PLAYBACK LINE MIC 1 MIC 1 MIC 2 MIC 3 MIC POD IN Breakout Box #3 12VDC 2.5A Breakout Box #2 SPEAKER...
- Page 15 Using the RJ-11 cable, connect an analog telephone jack to the Line jack on the mixer. TELEPHONE CAMERA RS-232 CONTROL LINE Connect telephone cable FIGURE 2.6 > Note: For instructions on connecting to a digital phone line, refer to page 20. Using an RJ-11 cable (not supplied), connect an analog telephone set to the Set jack on the mixer (optional).
- Page 16 Using the power supply cords, connect the mixer to an electrical outlet. 12VDC 2.5A Connection to electrical outlet FIGURE 2.9 10. If using the wired controller, connect the controller to the mixer’s RS-232 serial port using the supplied RJ-11 to DB-9 adapter (see figure 2.10). If using the RF controller, attach the external antenna and turn it until it is upright (see figure 2.11).
-
Page 17: Auxiliary Devices
11. If using the RF controller, insert four AAA batteries into the battery compartment in the bottom of the unit. Batteries Back of Controller Insert batteries FIGURE 2.12 AUXILIARY DEVICES The mixer allows connection to a number of different audio and video peripherals, such as video codecs, VCRs, cameras and computers. - Page 18 To connect a sound card Using an RCA cable, connect the Line I I n on the Converge mixer to the line out on a sound card. Using an RCA cable, connect the Line O O ut on the Converge mixer to the line in on a sound card.
- Page 19 CONNECTING VCRS AND DVD PLAYERS You can record your audio/video conference or play audio using a playback device such as a VCR or DVD player. To connect to record/playback For recording, connect the Left and Right Audio Out on the Converge to the left and right audio in on the VCR or DVD player.
- Page 20 CONNECTING FOR SERIAL CONTROL You can connect a computer or a control device, such as an AMX or Crestron, to the Converge mixer through the serial control port. See page 83 for a list of the serial commands. To connect to a computer through the serial port Connect computer to Control port on the back of the mixer using a 9-pin straight- through serial cable.
- Page 21 If you have a digital (PBX) telephone service, you need to run an analog extension from the PBX (recommended for best performance) or use a digital-to-analog telephone line converter. For more information, contact ClearOne Technical Support. > Note: If you connect the Converge through a digital-to-analog line converter, you will not be able to use the tabletop controller or the RAV-Ware dialing interface to make calls.
- Page 22 Technical Services: 800.283.5936...
-
Page 23: Rav-Ware Software Configuration
RAV-WARE SOFTWARE CONFIGURATION GETTING STARTED WITH RAV-WARE Please ensure that you have administrative privileges before attempting to install RAV-Ware on computers running Windows 2000 or later. You should also review the ™ System Requirements on page 9 to ensure software will run correctly and that you have all the necessary network information. -
Page 24: Rav-Ware Overview
RAV-WARE OVERVIEW ClearOne’s RAV-Ware software provides an easy interface for configuring system settings and customizing the audio in your Converge 590/560 conferencing system. While the Converge system is designed to work out of the box for audio conferencing, RAV-Ware is required to adjust audio levels and equalizer settings for the Converge components as well as the auxiliary audio devices. -
Page 25: Rav-Ware Connections
• If you are connected through the network, you will be prompted to enter a user name and password. The default user name is ClearOne and the default password is RAV (user name and password are not case sensitive). -
Page 26: Rav-Ware Files
TO CREATE A NEW FILE Click the New F F ile toolbar icon or select New F F ile from the File menu. Select either the Converge 560 or Converge 590 depending on your system.This will open the Configuration Screen where you can set user preferences for your Converge system. -
Page 27: Network Find
You will see a password prompt window. Enter the User n n ame and Password of the networked system. The default user name is ClearOne and the default password is RAV. Click OK. The system icon will appear in the Connection list and the Configuration screen will open. -
Page 28: Configuring System Settings
In the Networking tab, create a unique net- work name and enter it in the Device Name field. (Default is ClearOne-XX where XX is the last two digits of the MAC address.) Clear the Use D D HCP option and enter the IP, Subnet and Gateway addresses. - Page 29 To change the User Name and Password In the Networking tab, click User/Password. Specify the User N N ame. Type the Password. Retype the password to confirm. Click OK to save changes and close the window. Note: This option is only available when you are con- >...
- Page 30 To change RF frequency channel (RF Controller only) In the Frequency tab, select a frequency. Click OK to save settings and close the window. Note: The channel frequency allows the mixer > to communicate with the controller. The frequency used by RAV-Ware must match the frequency used by the controller.
- Page 31 Changing this code to a country other than the intended country of operation might cause the Converge to be non-compliant. To adjust telephone level Select Receive A A LC. Clearone recommends keeping Receive ALC (automatic level control) selected. This feature adjusts the far-end audio to keep it at a constant level.
-
Page 32: Customizing Converge Components
The Converge 590 has three breakout boxes representing three sets of three microphones each; the Converge 560 has two breakout boxes representing two sets of three microphones each. Control for all of the microphones is done through the breakout box tabs: Level, Processing, and Gating. - Page 33 BREAKOUT BOX LEVEL TAB From this tab (see figure 3.6), you can view the make and model of the mic that has been dragged and dropped from the device toolbox onto the specific microphone connection of the breakout box. You can determine if a mic is gated on or muted by the Gating indicator being green or red, respectively.
- Page 34 To disable Noise Cancellation (NC) Noise Cancellation enhances speech clarity by attenuating the amount of background noise in the signal. ClearOne recommends keeping NC enabled. Click NC to disable noise cancellation; the LED turns off. The default setting with NC enabled;...
- Page 35 To enable Speech Lift Speech lift enables the microphone channel to be reinforced to the loudspeaker output channel. Click the Speech L L ift button. The indicator will turn green when speech lift is enabled. To adjust Speech level Speech level sets the attenuation level for the amplifier output of the selected microphone.
- Page 36 > Note: No filters exist until you click Add F F ilter to add filters to the graph. • Type selects the filters type. The only type available for the Converge 560/590 is parametric EQ (PEQ). • Frequency selects the center frequency (in Hertz) for the filter you are configuring.
- Page 37 You can control the gating mode, set the gate ratio, hold time, and attenuation, set the decay rate, and control chairman override from this tab (see figure 3.9). Microphone settings: gating tab (Converge 560 shown) FIGURE 3.9 To set Gate Mode Set Gate Mode allows you to set the gate mode.
- Page 38 Converge 560/590 automixing gate functions FIGURE 3.10 To set Hold Time Adjust hold time allows you to set how long the channel stays gated on after the mic gates off (see figure 3.10). Using the slider, adjust the hold time to the desired level.
- Page 39 LOUDSPEAKERS You can adjust your loudspeaker equalization, change volume levels and enable ClearEffect in the Loudspeaker window. Equalization in RAV-Ware is similar to the bass and treble adjustments on a stereo. Increasing or decreasing the low, mid and high frequencies and levels allows you to customize loudspeaker audio and provide the optimal listening experience for your users.
- Page 40 Click the Mixer C C onsole icon in the Configuration screen. The Mixer Console window appears (see figure 3.11). Mixer Console (Converge 560 shown) FIGURE 3.11 To create a mix of audio Select which audio is to be included in each output mix. A check mark indicates the audio will be included in the output mix.
-
Page 41: Microphone Configurations
EFFECTS OF USING AN EXTERNAL AMPLIFIER If you connect an external amplifier to the Converge unit on either the Line Out jack or the Record Out jack, the mixer console options change. • If you place an external amplifier on the Line Output, the options to route any audio to the loudspeakers and to route the microphones to the Line Output are no longer available. -
Page 42: Line Input And Output
To select a preconfigured line-level device Click the Device T T oolbox button to display preconfigured devices (see figure 3.12). Line input device list (Converge 560 shown) FIGURE 3.12 Click the plus sign (+) to expand the category that matches your device type. - Page 43 ADJUSTING LINE INPUT/OUTPUT SETTINGS If your device is not listed in the Device Toolbox you can manually customize and config- ure the audio of your auxiliary devices in the Line Input and Line Output windows. Line input and output devices include video codecs, CD players, amplifiers and sound cards. To access Line Input Settings Open the Line Input window by clicking on the Line I I nput device icon.
-
Page 44: Record And Playback
To select a preconfigured record/playback device Click the Device T T oolbox button to display preconfigured devices. Expand the record/playback category to see a list of record/playback devices (see figure 3.13). Record/playback device list (Converge 560 shown) FIGURE 3.13 Technical Services: 800.283.5936... - Page 45 Click the device name and drag it to the Configuration screen. Drop over the Record or Playback icon. The label and icon will change based on the selected device. > Note: You are not limited to record and playback devices with these connectors. The Record and Playback jacks are line input and line output jacks and can be connected to video codecs, CD players and amplifiers.
-
Page 46: Camera Controls
The Converge 590 supports nine camera positions and a home posi- tion. The Converge 560 supports six camera positions and a home position. Note: The PTZ camera can still be controlled manually from the camera or video >... - Page 47 ClearOne recommends setting the camera delay to at least two seconds (Converge 560 shown) to prevent the camera from changing positions at every sound.
-
Page 48: Dialer And Phonebook Usage
DIALER AND PHONEBOOK USAGE The Converge system includes a Phonebook that stores up to 20 names and phone numbers. Phonebook entries may be entered through RAV-Ware or using the Controller. The Dialer in RAV-Ware mimics the Controller and can be used to make calls, mute microphones, and adjust the loudspeaker volume. - Page 49 DIALER While most calls will be made using the controller, you can also manage all your calls from the Dialer in RAV-Ware. You can dial a number, redial the last dialed call and disconnect calls. You can also use flash settings, mute the microphones and adjust loudspeaker volume.
- Page 50 To make a call from the Phonebook Using the mouse, select the number in the phonebook. The number appears in the display window. Click the ON/OFF button to dial the call. Tip: You can also double-click the name in the phonebook. The phone will be taken >...
-
Page 51: Advanced Features
Converge checks all compo- nents. When the check is complete, lights will indicate the status of each component. Green indicates the component is connected and functioning. Red indicates a problem with the component. (Converge 560 shown) RAV-Ware Software Configuration... - Page 52 EVENT LOG The Event Log keeps record of a user-selectable events. You select which events you want recorded and RAV-Ware keeps a log, allowing you to periodically review events and make sure the system is running smoothly. You can also save the Event Log as a .txt file. Check the Event Log when there are communication errors or for other troubleshooting.
- Page 53 ERROR MESSAGES When the Converge system encounters an error, an error icon will appear in the lower left-corner of the screen. Review this log to troubleshoot problems. To view Error Messages Click the Error icon in the lower-left corner of the Converge window.
- Page 54 DEVICE TOOLBOX EDITOR The Device Toolbox Editor allows you to add your auxiliary devices to RAV-Ware. You can add video codecs, sound cards, record/playback devices, amplifiers, and microphones to customize your system and easily access these devices for future Converge installations. To open the Device Toolbox Editor From the Tools menu, select Edit D D evice List or right-click on the Device Toolbox...
-
Page 55: Using The Converge
USING THE CONVERGE USING THE CONTROLLER Most phone specific functions, such as dialing a call or adding a phonebook entry, will be managed from the controller. Phonebook and dialer actions can be done through Rav-Ware as well. See page 48 for more information. TO ANSWER A CALL Press on the controller to answer the call. - Page 56 TO USE THE STATUS KEY (RF CONTROLLER ONLY) Press and hold for two seconds to display the status of the Converge. ClearOne 55 If the phone is not in use (on-hook) the 10/13/04 14:33 PM LCD will display the device name, the 8013568518 date and time and the local number.
-
Page 57: Programming Phone Preferences
TO SEND A FLASH SIGNAL Press to use call transfer, call waiting, or conference calling. > Note: This feature is dependent on your PBX service or local phone service. Refer to your PBX vendor or local telephone service for details. TO ADJUST THE SPEAKER VOLUME Press to increase the volume. - Page 58 ACCESSING THE MENU The main menu (see figure 4.1) gives you three options: Phonebook, Settings and Configuration. An asterisk indicates your position in the menus and a down arrow indicates that the menu continues. Once in menu mode, use the arrow keys to navigate. moves the cursor up.
- Page 59 To edit a Phonebook entry Press to access the menu options. Press to select Phonebook. Sales Team 8886451234 Scroll to Edit and press Save Scroll to a desired name and press Editing a contact Make changes to the name and number using the keypad. Press to advance to the Save option.
- Page 60 To adjust the Ringer Level Press to access the menu options. Scroll to Settings and press Ringer Level Scroll to Ringer Level and press to adjust the volume. Ringer level Press to save and return to the Settings menu. > Note: Ringer volume is indicated by a horizontal bar on the LCD screen and you will hear it from the speakers.
- Page 61 CONFIGURATION The configuration menu provides options for selecting countries, languages and RF (for wireless units) as well as configuring the Flash setting. To select a Country Press to access the menu options. Scroll to Configuration and press USA/Canada Press again to select Country. Europe Australia/New Zealand Select the country where the Converge is...
- Page 62 To select a frequency on RF Controller Press to access the menu options. Scroll to Configuration and press Frequency 1 Scroll to Frequency and press Frequency 2 Frequency 3 Choose a frequency from 1-8. Select a frequency Press to save the frequency and return to the Configuration menu.
- Page 63 To perform RF Radio Test on RF Controller Press to access the menu options. Scroll to Configuration and press RF Radio Test ------- Scroll to RF Radio Test and press Exit Press to exit and return to the RF radio test Configuration menu.
- Page 64 To check the Converge controller version Press to access the menu options. Scroll to Configuration and press Version 1.0.0 Scroll to Version and press . The version of the Controller firmware will Exit display. Version Select Exit to return to the Configuration window.
-
Page 65: Web Interface
Open a web browser and enter the IP a a ddress or Network N N ame of the Converge in the address bar. Enter your User N N ame and Password. The default user name is ClearOne and the default password is RAV. The Converge web interface opens. -
Page 66: Dial
DIAL You can make all your calls from the Dialer in the web interface. You can dial a number, redial the last dialed call and disconnect calls. You can also use flash settings, mute the microphones, adjust volume, and dial from the phonebook. TO OPEN A DIALER WINDOW Click the Dial button in the left channel navigation. - Page 67 TO END A CALL Click the ON/OFF button. TO REDIAL Click the REDIAL button. The phone will automatically be taken off-hook and the last dialed number will be called. TO SEND A FLASH SIGNAL If your telephone service includes call transfer, call waiting or conference calling, you can use the Flash key.
-
Page 68: Event Log
EVENT LOG The Event Log keeps record of a user-selectable events. You select the events you want recorded in RAV-Ware. You then can download the log for review in the web interface. Check the Event Log when there are communication errors or for other troubleshooting. TO OPEN EVENT LOG Click the Event L L og button in the menu pane. -
Page 69: System Check
SYSTEM CHECK The System Checks window allows you to check your Converge system to be sure all parts of your system are connected and working properly. TO OPEN THE SYSTEM CHECKS Click the System C C hecks button. System checks FIGURE 5.4 TO RUN SYSTEM CHECKS Click the Start button. - Page 70 LOG OUT Click the Log O O ut button. Log out FIGURE 5.5 Click Yes, L L og O O ut or No, G G o B B ack to return to the main screen. Technical Services: 800.283.5936...
-
Page 71: Appendix
APPENDIX MAINTENANCE Unplug all components before cleaning. Do not use liquid or aerosol cleaners. Use a soft, damp cloth to clean the microphones and controller. If storing for an extended period of time, remove the batteries. TROUBLESHOOTING The following paragraphs describe ways to troubeshoot difficulties with your Converge product, if necessary. - Page 72 RF CONTROLLER The following paragraphs outline RF controller troubleshooting. Controller doesn’t communicate with the mixer The RF Controller performs best when the Converge mixer is positioned within line of sight and with the antenna pointed up. Check the signal strength indicator in all areas of the room where the controller will be used.The signal strength indicator is on the LCD screen and the maximum number of bars is four.
- Page 73 If the speaker plays, the problem is the original wire that was connected to that speaker. GENERAL The following paragraphs outline general troubleshooting. Physical damage to Converge All repairs must be done by a ClearOne technician. Call ClearOne technical support for more information. Appendix...
-
Page 74: Camera Pinouts
CAMERA PINOUTS Camera pinouts are provided in the following paragraphs. 8-PIN MINI DIN CONNECTOR Pin Number Control Pin Number Control not used not used 8 Pin Mini DIN 8 Pin Mini DIN Pin 2 CTS Pin 1 RTS Pin 1 RTS Pin 2 CTS Pin 5 RXD Pin 3 TXD... -
Page 75: Specifications
SPECIFICATIONS D D i i m m e e n n s s i i o o n n s s L L i i n n e e O O u u t t p p u u t t M M i i x x e e r r (WxDxH) Connection: Unbalanced RCA 17"... - Page 76 M M i i x x e e r r AEC tail time: 128 ms Noise cancellation: (6 - 15 dB) Gating: Adaptive ambient, 1st mic priority, look ahead gating, NOM attenuation, manual on, override on, chairman override. T T e e l l e e p p h h o o n n e e I I n n t t e e r r f f a a c c e e Conditions: All measurements taken with ALC disabled Connection: RJ-11 (Set and Line Jacks)
-
Page 77: Serial Commands
Example: A command to disable automatic gain control for Mic 2 on a Converge 560 device “0” will have the command line: #C0 AGC 2 M 0. In this command line, C=Converge 560, 0=unit 0, AGC=command, 2=channel, M=Mic Input group, 0=off state. If a command calls for a “null”... - Page 78 The following tables define the relationship between alpha and numeric representations. Text commands use the alpha designation, and binary commands use the numeric. In addition, different groups have different allowable channel ranges. Converge 590 Converge 560 Group Alpha Number Channel Range...
- Page 79 METER TYPE DEFINITIONS Alpha Numeric Level position Level position Level position Level position Level position for Mic Channel for Line Inputs for Outputs for Telco Transmits for Telco Receives Post Processing Level after PEQ Level after PEQ Level after gain Level after gain Meter and gain...
- Page 80 CONVERGE SERIAL COMMANDS Command Function Selects/reports setting of auto answer AARINGS Selects/reports setting of the number of rings to auto answer ACONN Selects/reports status of audible connect/disconnect indication Selects/reports setting of auto disconnect Selects/reports acoustic echo canceller setting AECREF Enables/disables or reports current status of AEC reference Selects/reports AGC BATTERYLVL Reports battery level on remote...
- Page 81 CONVERGE SERIAL COMMANDS (CONTINUED) Command Function GREPORT Selects/reports gate status report frequency HOOK Sends a hook flash HOOKD Selects/reports hook flash duration LABEL Selects/reports label of specified channel or unit LOCALNUM Sets/reports current value of local number LOGMASK Sets or reports the unit event log mask Reports in, out or processor level LVLREPORT Selects/reports level status...
- Page 82 AA - AUTO ANSWER ENABLE/ DISABLE This command selects/reports the setting of auto answer. A A R R G G U U M M E E N N T T D D E E T T A A I I L L S S N N a a m m e e T T y y p p e e S S i i z z e e...
- Page 83 ACONN - AUDIBLE CONNECT / DISCONNECT INDICATION This command selects/reports the status of the audible connect/disconnect indication. A A R R G G U U M M E E N N T T D D E E T T A A I I L L S S N N a a m m e e T T y y p p e e S S i i z z e e...
- Page 84 AEC - ACOUSTIC ECHO CANCELLER ENABLE/ DISABLE This command selects/reports the setting of Acoustic Echo Canceller. A A R R G G U U M M E E N N T T D D E E T T A A I I L L S S N N a a m m e e T T y y p p e e S S i i z z e e...
- Page 85 AGC - AUTOMATIC GAIN CONTROL This command selects/reports the setting of automatic gain control. A A R R G G U U M M E E N N T T D D E E T T A A I I L L S S N N a a m m e e T T y y p p e e S S i i z z e e...
- Page 86 BAUD - BAUD RATE This command selects/reports the baud rate of the serial port. A A R R G G U U M M E E N N T T D D E E T T A A I I L L S S N N a a m m e e T T y y p p e e S S i i z z e e...
- Page 87 CAMBAUD - CAMERA CONTROL BAUD RATE This command selects/reports the baud rate of the camera control serial port. A A R R G G U U M M E E N N T T D D E E T T A A I I L L S S N N a a m m e e T T y y p p e e S S i i z z e e...
- Page 88 CAMFLOW - CAMERA CONTROL FLOW CONTROL This command selects/reports the flow control of the camera control serial port on the unit. Hardware flow control is implemented using DTR and DSR. A A R R G G U U M M E E N N T T D D E E T T A A I I L L S S N N a a m m e e T T y y p p e e S S i i z z e e...
- Page 89 CAMPRESET - CAMERA PRESET Executes a camera preset. There is no query for this command. A A R R G G U U M M E E N N T T D D E E T T A A I I L L S S N N a a m m e e T T y y p p e e S S i i z z e e...
- Page 90 CAMPRESETSET2 - CAMERA PRESET SETUP 2 This command sets or reports the current camera preset. ARGUMENT DETAILS N N a a m m e e T T y y p p e e S S i i z z e e V V a a l l u u e e s s U U n n i i t t s s Preset...
- Page 91 CAMSWITCHLAG - CAMERA SWITCH TIME LAG This command set the switch time lag for voice tracking. A A R R G G U U M M E E N N T T D D E E T T A A I I L L S S N N a a m m e e T T y y p p e e S S i i z z e e...
- Page 92 CAMZOOM - CAMERA ZOOM This command sets or reports the current Zoom of the camera on the camera control port. A A R R G G U U M M E E N N T T D D E E T T A A I I L L S S N N a a m m e e T T y y p p e e S S i i z z e e...
- Page 93 CAMTRACK - CAMERA TRACK This command selects/reports the camera voice tracking mode. A A R R G G U U M M E E N N T T D D E E T T A A I I L L S S N N a a m m e e T T y y p p e e S S i i z z e e...
- Page 94 CLOCK - CLOCK SET This command sets or reports the current time. A A R R G G U U M M E E N N T T D D E E T T A A I I L L S S N N a a m m e e T T y y p p e e S S i i z z e e...
- Page 95 COUNTRY - COUNTRY SELECTION This command sets/reports the country for compliance. A A R R G G U U M M E E N N T T D D E E T T A A I I L L S S N N a a m m e e T T y y p p e e S S i i z z e e...
- Page 96 DECAY - DECAY ADJUST This command selects/reports the setting of the decay rate for a microphone input. A A R R G G U U M M E E N N T T D D E E T T A A I I L L S S N N a a m m e e T T y y p p e e S S i i z z e e...
- Page 97 DEVICETYPE - SETS THE TYPE OF DEVICE CONNECTED TO AN INPUT OR OUTPUT This command enables / disables or reports the current type of device connected to an input or out- put. A A R R G G U U M M E E N N T T D D E E T T A A I I L L S S N N a a m m e e T T y y p p e e S S i i z z e e...
- Page 98 DID - DEVICE ID This command reports the device ID. This command is read-only. A A R R G G U U M M E E N N T T D D E E T T A A I I L L S S N N a a m m e e T T y y p p e e S S i i z z e e...
- Page 99 ENETDNSA - ETHERNET DNS SERVER ADDRESSES This command selects/reports the DNS servers IP addresses of the Ethernet port on the unit. A A R R G G U U M M E E N N T T D D E E T T A A I I L L S S N N a a m m e e T T y y p p e e S S i i z z e e...
- Page 100 ENETSUBN - ETHERNET SUBNET MASK This command selects/reports the Subnet mask of the Ethernet port on the unit. A A R R G G U U M M E E N N T T D D E E T T A A I I L L S S N N a a m m e e T T y y p p e e S S i i z z e e...
- Page 101 EQSEL - EQUALIZATION ENABLE This command enables/disables or reports the current status of the equalization on the input or output. A A R R G G U U M M E E N N T T D D E E T T A A I I L L S S N N a a m m e e T T y y p p e e S S i i z z e e...
- Page 102 FILTSEL - FILTER SELECT This command turns on and off the filters for a microphone. A A R R G G U U M M E E N N T T D D E E T T A A I I L L S S N N a a m m e e T T y y p p e e S S i i z z e e...
- Page 103 GAIN - GAIN ADJUSTMENT This command changes or reports back the gain for a channel. A A R R G G U U M M E E N N T T D D E E T T A A I I L L S S N N a a m m e e T T y y p p e e S S i i z z e e...
- Page 104 GHOLD - GATE HOLD TIME ADJUST This command sekects/reports the setting of the hold time for a microphone input. A A R R G G U U M M E E N N T T D D E E T T A A I I L L S S N N a a m m e e T T y y p p e e S S i i z z e e...
- Page 105 GRATIO - GATE RATIO ADJUST This command sekects/reports the setting of the gate ratio for a microphone input. A A R R G G U U M M E E N N T T D D E E T T A A I I L L S S N N a a m m e e T T y y p p e e S S i i z z e e...
- Page 106 HOOK - HOOK FLASH This command sends a hook flash. T T h h e e r r e e i i s s n n o o q q u u e e r r y y f f o o r r t t h h i i s s c c o o m m m m a a n n d d . . A A R R G G U U M M E E N N T T D D E E T T A A I I L L S S N N a a m m e e T T y y p p e e...
- Page 107 LABEL - LABEL This selects/reports the label of the specific channel or the unit. A A R R G G U U M M E E N N T T D D E E T T A A I I L L S S N N a a m m e e T T y y p p e e S S i i z z e e...
- Page 108 LOGMASK - EVENT LOG MASK This command sets or reports the unit event log mask. A A R R G G U U M M E E N N T T D D E E T T A A I I L L S S N N a a m m e e T T y y p p e e S S i i z z e e...
- Page 109 LVLREPORT - LEVEL REPORT This command selects/reports the status of level reporting for the specified channel. A A R R G G U U M M E E N N T T D D E E T T A A I I L L S S N N a a m m e e T T y y p p e e S S i i z z e e...
- Page 110 MANUFACTURER - MANUFACTURER IDENTIFICATION LABEL This selects/reports the manufacturer identification label of the specific channel. A A R R G G U U M M E E N N T T D D E E T T A A I I L L S S N N a a m m e e T T y y p p e e S S i i z z e e...
- Page 111 MLINE - MIC/LINE COARSE GAIN SETTING This command selects/reports the setting of coarse gain. A A R R G G U U M M E E N N T T D D E E T T A A I I L L S S N N a a m m e e T T y y p p e e S S i i z z e e...
- Page 112 MUTE - MUTE This command selects/reports the setting of mute on a channel. A A R R G G U U M M E E N N T T D D E E T T A A I I L L S S N N a a m m e e T T y y p p e e S S i i z z e e...
- Page 113 NCSEL - NOISE CANCELLATION SELECT This command enables/disables or reports the current status of noise cancellation. A A R R G G U U M M E E N N T T D D E E T T A A I I L L S S N N a a m m e e T T y y p p e e S S i i z z e e...
- Page 114 OFFA - OFF ATTENUATION MODE This command selects/reports the off attenuation mode of a microphone channel. A A R R G G U U M M E E N N T T D D E E T T A A I I L L S S N N a a m m e e T T y y p p e e S S i i z z e e...
- Page 115 PHONEBOOKADD - ADDS AN ENTRY TO THE PHONEBOOK This command saves an entry in the Phonebook. There is no query. No two entries can share the same label. An argument error will be returned if an entry already has the name. To change an entry, you must first delete it and then add it again.
- Page 116 PHONEBOOKDEL - DELETES AN ENTRY TO THE PHONEBOOK This command deletes an entry in the Phonebook. There is no query. A A R R G G U U M M E E N N T T D D E E T T A A I I L L S S N N a a m m e e T T y y p p e e S S i i z z e e...
- Page 117 PP - PHANTOM POWER This command reports the setting of phantom power. A A R R G G U U M M E E N N T T D D E E T T A A I I L L S S N N a a m m e e T T y y p p e e S S i i z z e e...
- Page 118 RESET - RESET Resets the unit. There is no query for this command. A A R R G G U U M M E E N N T T D D E E T T A A I I L L S S None B B I I N N A A R R Y Y F F O O R R M M D D E E T T A A I I L L S S COMMAND ID:...
- Page 119 RFFREQ - RF FREQUENCY SELECTION This command sets/reports the frequency for the RF link to the Remote. The remote must be set to the same setting. A A R R G G U U M M E E N N T T D D E E T T A A I I L L S S N N a a m m e e T T y y p p e e S S i i z z e e...
- Page 120 RING - RING INDICATION This command indicates a ringing line. This command is reportable only. It cannot be queried or set. A A R R G G U U M M E E N N T T D D E E T T A A I I L L S S N N a a m m e e T T y y p p e e S S i i z z e e...
- Page 121 RINGERSEL - AUDIBLE RING MELODY SELECTION This command sends/reports the audible ring melody. A A R R G G U U M M E E N N T T D D E E T T A A I I L L S S N N a a m m e e T T y y p p e e S S i i z z e e...
- Page 122 SILENCEPRST - SILENCE CAMERA PRESET This command associates a camera preset with silence for voice tracking. A A R R G G U U M M E E N N T T D D E E T T A A I I L L S S N N a a m m e e T T y y p p e e S S i i z z e e...
- Page 123 SPLIFT - SPEECH LIFT This command selects/reports the setting of the speech lift enable processing for each microphone channel. A A R R G G U U M M E E N N T T D D E E T T A A I I L L S S N N a a m m e e T T y y p p e e S S i i z z e e...
- Page 124 STEREOMIX - SETS THE INPUT TO BE A STEREO MIX This command enables/disables or reports the stereo mix status of the playback input. A A R R G G U U M M E E N N T T D D E E T T A A I I L L S S N N a a m m e e T T y y p p e e S S i i z z e e...
- Page 125 SYSRESULT - SYSTEM CHECK RESULT This command reports the results of the system check. This command is reportable only. It cannot be queried or set. A A R R G G U U M M E E N N T T D D E E T T A A I I L L S S Name Type Size...
- Page 126 B B I I N N A A R R Y Y F F O O R R M M D D E E T T A A I I L L S S COMMAND ID: NUMBER OF ARGUMENTS: ARGUMENT FORM: <System Check><Status><Message>...
- Page 127 TIMELOCALE - TIME LOCALE SETTINGS This command sets or reports the time locale settings. A A R R G G U U M M E E N N T T D D E E T T A A I I L L S S N N a a m m e e T T y y p p e e S S i i z z e e...
- Page 128 UID - UNIT ID This command reports the unit ID. This command is read-only. A A R R G G U U M M E E N N T T D D E E T T A A I I L L S S N N a a m m e e T T y y p p e e S S i i z z e e...
- Page 129 VOLUME - VOLUME ADJUSTMENT This command changes or reports back the gain for the output channel set as the EC reference. A A R R G G U U M M E E N N T T D D E E T T A A I I L L S S N N a a m m e e T T y y p p e e S S i i z z e e...
-
Page 130: Compliance
(1) this device may not cause harmful interference, and (2) this device must accept any interference received including interference that may cause undesired operation. Changes or modifications not expressly approved by ClearOne Communications could void the user's authority to operate the equipment. FCC PART 68 COMPLIANCE US:FBIBR00BRAV Ringer Equivalence Number (REN): 0.0B(ac) - Page 131 It is designed to be connected to a compatible modular jack that is also compliant. See installation instructions for details. If you experience problems with this equipment, contact ClearOne Communications, 1825 Research Way, Salt Lake City, Utah 84119, or by phone at (800) 945-7730 for repair and warranty information.
- Page 132 This precaution may be particularly important in rural areas. NEW ZEALAND COMPLIANCE In the event of main power failure, the Converge 560/590 equipment will become inopera- ble with regard to making telephone calls. Also, all persons using the Converge 560/590 for recording telephone conversations shall comply with New Zealand law, which requires that at least one party to the conversation be aware that the conversation is being recorded.
- Page 133 Manufacturer's Address: 1825 West Research Way Salt Lake City, Utah 84119 U.S.A. Model Name: Converge 560, Converge 590, Converge 560 Wired & Converge 590 Wired Model No.: 910-153-560 through 910-153-595 S S t t a a n n d d a a r r d d ( ( s s ) ) t t o o w w h h i i c c h h C C o o n n f f o o r r m m i i t t y y i i s s d d e e c c l l a a r r e e d d : : 8 8 9 9 / / 3 3 3 3 6 6 / / E E E E C C "...
- Page 134 7 7 3 3 / / 2 2 3 3 / / E E E E C C " " L L o o w w V V o o l l t t a a g g e e D D i i r r e e c c t t i i v v e e ( ( L L V V D D ) ) " " : : IEC 60950-1: 2003 Safety of Information Technology Equipment, Including Electrical Business Equipment.
-
Page 135: Index
INDEX Adjusting t t he S S ettings 5 5 9 Dialer a a nd P P honebook U U sage 4 4 8 Auto-Answer 60 Dialer 49 Auto-Disconnect 60 make a call 49 Ring Melody 59 redial 50 Ringer Level 60 Phonebook 48 add 48 Basic C C onnections 1 1 3... - Page 136 Mixer 40 Record and Playback 45 equalization 46 preconfigured devices 44 volume 45 RAV-W W are 2 2 4 Communication Settings 28 camera port 29 control port 29 static IP address 28 user name/password 29 connections 25 files 26 edit 26 import 26 new 26 save 26...
Need help?
Do you have a question about the Converge 560 and is the answer not in the manual?
Questions and answers