Table of Contents
Advertisement
Available languages
Available languages
Quick Links
Advertisement
Table of Contents

Related Manuals for BorMann SERVICE


Summary of Contents for BorMann SERVICE
- Page 1 BDX2150 053552 v2.2 WWW.NIKOLAOUTOOLS.GR...
-
Page 2: Safety Precautions
SYMBOLS WARNING! Instructions or symbols Attention! Risk of injury! Carefully read the operator’s manual. which, if not observed, could result in Do not touch. damage and/or injury. Disconnect the tool from the power This power tool corresponds to supply before assembling, cleaning, protection class II, it is equipped with Do not expose to rain. - Page 3 Clean your power tool carefully. Check that the moving parts work properly and do not jam and that there are no parts broken or damaged to such an extent that the operation of the power tool is affected. Contact an authorised service centre for any repairs needed before using the tool. Poorly maintained power tools can cause serious damage or harm.
-
Page 4: Specifications
* To ensure the safety and reliability of the product and the warranty validity, all 90° ×90° 115x55 mm repair, inspection, repair or replacement work, including maintenance and special 90°×45° 65x55 mm adjustments, must only be carried out by technicians of the authorized service Cutting capacity 45° ×90° 115x35 mm department of the manufacturer. -
Page 5: Before Operation
BEFORE OPERATION WARNING: Always disconnect the tool from the power source before making any adjustments. Permanently mounting table saw & blade WARNING: To reduce the risk of injury from unexpected saw movement, place the saw in the desired area either on a work bench or other recommended leg set. -
Page 6: Setup And Operation
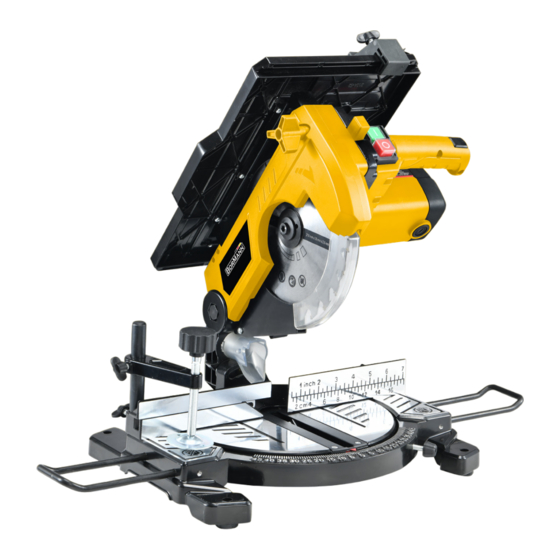
Extention wings To hold long workpieces horizontally, holders are provided on both sides of the tool. Loosen the screws and extend the holders to the appropriate length for holding the workpiece. Then tighten the screws. Lower saw blade cover Remove the lower blade guard and store it safely for future use. After using the saw, clean the blade and other parts carefully and reinstall the lower blade guard to avoid accidents when not using the tool. - Page 7 Parallel guide NOTE: Cutting along the length of a piece of material rather than across it is called rip cutting. Rip cutting should always be done with the parallel guide set to the desired width and on the right hand side of the tool's sawing table. NOTE: Check that the parallel guide is locked in position and is parallel to the saw blade.
- Page 8 ON/OFF switch The ON/OFF switch controls the tool's activation and deactivation. The ON/OFF buttons are located on the front left side of the handle. There are two distinctly different coloured buttons for each function: • The green button, marked with the "I" symbol. It represents "ON". When the plug is connected to the socket, press the button down and the tool will enter its working position.
- Page 9 Caution: • When the table rotates to 0° , and the miter cutting head is vertical to the table face, the cutting wood thickness cannot be more than 55 mm, and the cutting width more than 115mm. • When the table rotates 45° to the left, and the miter cutting head is vertical to the table face, the cutting wood thickness cannot be more than 55 mm, and the cutting width more than 65mm.
-
Page 10: Maintenance And Adjustments
MAINTENANCE AND ADJUSTMENTS WARNING: Make sure the tool is disconnected from the power source before performing any maintenance work. WARNING: Be extremely cautious when handling the blade. Maintainance The tool should be cleaned after every use. Remove all sawdust etc from the visible parts of the tool using a vacuum cleaner. A vacuum cleaner can also be connected to the tool's dust extraction port at the rear of the machine. -
Page 11: Environmental Disposal
Installing the blade 1. Ensure the blade is suitable for your tool. 2. Make sure that the direction of the arrow on the blade matches the direction of rotation arrow found on the tool's blade guard. The blade teeth should always point downwards at the front of the saw. -
Page 12: Οδηγιεσ Ασφαλειασ
ΣΥΜΒΟΛΑ Διαβάστε προσεκτικά το ΠΡΟΕΙΔΟΠΟΙΗΣΗ! Μη τήρηση των οδηγιών Προσοχή! Κίνδυνος τραυματισμού! εγχειρίδιο χρήσης. μπορεί να οδηγήσει σε ζημιά ή/και τραυματισμό. Μην αγγίζετε. Αυτό το ηλεκτρικό εργαλείο ανοίκει Αποσυνδέστε το εργαλείο από την παροχή στην κατηγορία προστασίας II, είναι ρεύματος πριν από τη συναρμολόγηση, τον Μην... - Page 13 β) Μην χρησιμοποιείτε το εργαλείο εάν ο διακόπτης δεν λειτουργεί. Οποιοδήποτε εργαλείο δεν μπορεί να ελεγχθεί είναι επικίνδυνο και πρέπει να επισκευαστεί πριν τη χρήση. γ) Αποσυνδέστε το μηχάνημα από την πρίζα ή από την μπαταρία πριν να πραγματοποιήσετε ρυθμίσεις, αλλαγή εξαρτημάτων ή πριν το ακουμπήσετε κάτω. Με...
-
Page 14: Τεχνικά Χαρακτηριστικά
της εγγύησης όλες οι εργασίες επιδιόρθωσης, ελέγχου, επισκευής ή αντικατάστασης Κοπή 45° ×90° 115x35 mm συμπεριλαμβανομένης της συντήρησης και των ειδικών ρυθμίσεων, πρέπει να (A) 45°×45° 45x30 mm εκτελούνται μόνο από τεχνικούς του εξουσιοδοτημένου τμήματος Service του (Δ) 45°×45° 70x30 mm κατασκευαστή. Βάθος κοπής 30mm * Χρησιμοποιείτε... -
Page 15: Πριν Τη Λειτουργια
ΠΡΙΝ ΤΗ ΛΕΙΤΟΥΡΓΙΑ ΠΡΟΕΙΔΟΠΟΙΗΣΗ: Αποσυνδέετε πάντα το εργαλείο από την πηγή ρεύματος πριν κάνετε οποιαδήποτε ρύθμιση. Σταθερή τοποθέτηση του φαλτσοπρίονου ΠΡΟΕΙΔΟΠΟΙΗΣΗ: Για να μειώσετε τον κίνδυνο τραυματισμού από απροσδόκητη μετακίνηση του πριονιού, τοποθετήστε το εργαλείο είτε σε πάγκο εργασίας είτε σε άλλη ενδεδειγμένη βάση στήριξης. Η βάση του πριονιού διαθέτει τέσσερις οπές για την στερέωσή του. Εάν το πριόνι... - Page 16 Φτερά προέκτασης Για τη συγκράτηση μακρών τεμαχίων εργασίας σε οριζόντια θέση, παρέχονται βραχίονες και στις δύο πλευρές του εργαλείου. Χαλαρώστε τις βίδες και επεκτείνετε τα φτερά στήριξης στο κατάλληλο μήκος για τη συγκράτηση του τεμαχίου. Στη συνέχεια σφίξτε τις βίδες. Κάτω...
- Page 17 Παράλληλος οδηγός ΣΗΜΕΙΩΣΗ: Η κοπή κατά μήκος πρέπει πάντα να γίνεται με τον παράλληλο οδηγό ρυθμισμένο στο επιθυμητό πλάτος και στη δεξιά πλευρά του πάγκου κοπής του εργαλείου. ΣΗΜΕΙΩΣΗ: Ελέγξτε ότι ο παράλληλος οδηγός έχει ασφαλίσει στη θέση του και είναι παράλληλος με το δίσκο. Ελέγξτε ότι το μαχαίρι σχισίματος είναι σωστά ευθυγραμμισμένο...
- Page 18 Διακόπτης λειτουργίας Ο διακόπτης ON/OFF ελέγχει την ενεργοποίηση και απενεργοποίηση του εργαλείου. Τα κουμπιά ON/OFF βρίσκονται στην μπροστινή αριστερή πλευρά της λαβής. Υπάρχουν δύο σαφώς διαφορετικού χρώματος κουμπιά για κάθε λειτουργία: • Το πράσινο κουμπί, το οποίο επισημαίνεται με το σύμβολο "I". Αντιπροσωπεύει την ένδειξη "ON".
- Page 19 Προσοχή: • Όταν η βάση περιστρέφεται στις 0° και η κεφαλή κοπής γωνίας είναι κάθετη στην βάση, το πάχος του ξύλου κοπής δεν μπορεί να υπερβαίνει τα 55 mm και το πλάτος κοπής τα 115 mm. • Όταν η βάση περιστρέφεται κατά 45° προς τα αριστερά και η κεφαλή κοπής γωνίας είναι κάθετη στην βάση, το πάχος ξύλου κοπής δεν μπορεί να είναι μεγαλύτερο...
- Page 20 ΠΡΟΣΑΡΜΟΓΕΣ ΚΑΙ ΣΥΝΤΗΡΗΣΗ ΠΡΟΣΟΧΗ: Βεβαιωθείτε ότι το εργαλείο είναι αποσυνδεδεμένο από την πηγή ρεύματος πριν εκτελέσετε οποιαδήποτε εργασία συντήρησης. ΠΡΟΣΟΧΗ: Να είστε εξαιρετικά προσεκτικοί όταν χειρίζεστε τη λεπίδα. Συντήρηση Το εργαλείο πρέπει να καθαρίζεται μετά από κάθε χρήση. Απομακρύνετε όλα τα πριονίδια κ.λπ. από τα μέρη του εργαλείου χρησιμοποιώντας ηλεκτρική σκούπα. Μια ηλεκτρική σκούπα μπορεί επίσης να συνδεθεί στη...
- Page 21 Τοποθέτηση του δίσκου 1. Βεβαιωθείτε ότι ο δίσκος είναι κατάλληλος για το εργαλείο σας. 2. Βεβαιωθείτε ότι η κατεύθυνση του βέλους στο δίσκο ταιριάζει με το βέλος κατεύθυνσης που βρίσκεται στο προστατευτικό της λεπίδας του εργαλείου. Τα δόντια του δίσκου πρέπει να δείχνουν πάντα προς τα το μπροστινό μέρος του εργαλείου. 3.
- Page 22 Proof of the warranty right is the purchase document of the tool (retail receipt or invoice). Under no circumstances shall the company cover the relevant cost of spare parts and respec ve required working hours unless a copy of the purchase document is presented. In case the repair has to be done by our service department the cost of transpor- ta on (to and from) is en rely borne by the sender (client).
- Page 23 GARANZIA- GARANCIA -GARANCIJE [IT - AL - SRB] Gli ele routensili sono sta fabbrica secondo gli standard rigorosi, stabili dalla nostra azienda, che sono allinea con i rispe vi standard di qualità europei. Gli ele routensili della nostra azienda sono forni con un periodo di garanzia di 24 mesi per uso non professionale, 12 mesi per uso professionale e 6 mesi per le ba erie. La garanzia è valida dalla data di acquisto del prodo o.
-
Page 24: Warranty
à service staff . The warranty takes the form that defec ve parts will be repaired or des défauts matériels, seront corrigées par notre service après-vente. La garan- replaced with perfect parts free of charge at our discre on. -
Page 25: Garanzia
GARANZIA GARANYIJA Questo apparecchio è un prodo o di qualità. È stato proge ato in conformità Dan l-apparat huwa prodo ta ‘kwalità. Kienet imfassla f’konformità mal-istan- con le a uali norme tecniche e realizzato con a enzione u lizzando materiali dards tekniċi a wali u saret b’a enzjoni bl-użu ta ‘materjali normali u ta’... - Page 26 A garancia olyan formája, hogy a hibás alkatrészek javítása vor fi rec fi -cate de personalul nostru de service post-vânzare. Garanția ia vagy cseréje a tökéletes alkatrészekkel ingyenes. A cserélt részek tulajdonunk forma faptului că...
- Page 27 GWARANCJA JAMSTVO To urządzenie jest produktem wysokiej jakości. Został zaprojektowany zgod- Ovaj je uređaj kvalitetan proizvod. Dizajniran je u skladu s trenutnim tehničkim nie z aktualnymi standardami technicznymi i wykonany starannie przy użyciu standardima i izrađen je pažljivo koristeći normalne, kvalitetne materijale. Ga- zwykłych, dobrej jakości materiałów.
Need help?
Do you have a question about the SERVICE and is the answer not in the manual?
Questions and answers