Satel PERFECTA 64 M Quick Installation Manual
Alarm control panel
Hide thumbs
Also See for PERFECTA 64 M:
- User manual (46 pages) ,
- Quick user manual (12 pages) ,
- Manual (10 pages)

Subscribe to Our Youtube Channel
Related Manuals for Satel PERFECTA 64 M


Summary of Contents for Satel PERFECTA 64 M
- Page 1 Alarm control panel PERFECTA 64 M Firmware version 2.00 QUICK INSTALLATION GUIDE perfecta_64_M_sii_en 02/23 SATEL sp. z o.o. • ul. Budowlanych 66 • 80-298 Gdańsk • POLAND tel. +48 58 320 94 00 www.satel.pl...
- Page 2 Please visit us at: https://support.satel.pl Hereby, SATEL sp. z o.o. declares that the radio equipment type PERFECTA 64 M is in compliance with Directive 2014/53/EU. The full text of the EU declaration of conformity is available at the following internet address: www.satel.pl/ce...
-
Page 3: Table Of Contents
CONTENTS 1. Installation in short......................2 2. Installing the control panel ....................2 2.1 Description of the mainboard ..................3 3. Installing the MICRA wireless system module ..............4 4. Connecting devices to the communication bus ..............5 4.1 Setting the device address ..................5 4.2 Connecting the keypads .................... -
Page 4: Installation In Short
PERFECTA 64 M SATEL The manual contains basic information on the PERFECTA 64 M control panel installation. For more information, please refer to the full installation manual available at www.satel.pl. Disconnect power before making any electrical connections. 1. Installation in short Planning the alarm system Place the devices that you want to install in the alarm system on the site plan. -
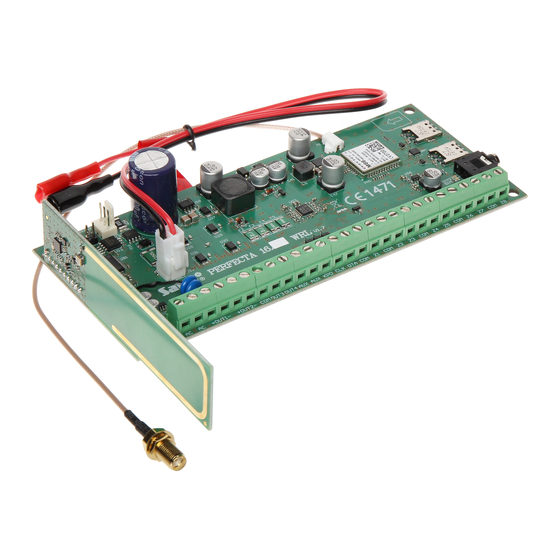
Page 5: Description Of The Mainboard
SATEL PERFECTA 64 M Before connecting the mainboard to power source (battery, alternating voltage from transformer), you must first complete all the installation work with hardwired devices (connection of keypads, expansion modules, detectors etc.). The control panel should be installed indoors, in spaces with normal air humidity. A 230 VAC power circuit with protective grounding must be available at the installation place. -
Page 6: Installing The Micra Wireless System Module
PERFECTA 64 M SATEL The SIM1 or SIM2 LED is on even if no card is installed. SIM1 slot in which the first SIM card is to be installed. SIM2 slot in which the second SIM card is to be installed. -
Page 7: Connecting Devices To The Communication Bus
SATEL PERFECTA 64 M Fig. 3. Installing the PERFECTA-RF module. 4. Connecting devices to the communication bus The bus wires must be run in one cable. The distance between the device and the control panel may be up to 600 m. -
Page 8: Connecting The Keypads
PERFECTA 64 M SATEL Connecting the keypads The control panel supports up to 4 keypads. These can be either wired or wireless keypads (the wireless ones can only be installed after starting the control panel). Addresses of the keypads must be set within the range from 0 to 3. For instructions on how to program addresses of the PRF-LCD keypads, please refer to p. -
Page 9: Connecting The Abax 2 Wireless System Controller
SATEL PERFECTA 64 M Fig. 5. Connecting keypad to the control panel. Connecting the ABAX 2 wireless system controller If the ACU-220 / ACU-280 controller is to be used, do not install the PERFECTA-RF module or the INT-RX-S expander. These devices cannot be used simultaneously. -
Page 10: Connecting The 433 Mhz Keyfobs Receiver Expansion Module
PERFECTA 64 M SATEL Data of the wireless keypads, wireless devices and keyfobs are stored in the controller. If you connect a controller with registered devices to the control panel: keypads will be added to the alarm system, wireless devices will be assigned to the alarm system zones / outputs, ... -
Page 11: Connecting The Hardwired Output Expanders
Fig. 8. Connecting the INT-E expander to the control panel. The INT-E expander will be identified as: INT-E – power supply by SATEL is not connected to the expander connector, INT-EPS – power supply by SATEL is connected to the expander connector. -
Page 12: Connecting Detectors And Other Devices To The Zones
PERFECTA 64 M SATEL Fig. 10. Connecting the INT-IT-2 device to the control panel. INT-CR wire Description Control panel terminal brown power AUX / KPD white common ground gray clock green data Table 4. Connecting the INT-CR device to the control panel. -
Page 13: Connecting The Sirens
SATEL PERFECTA 64 M NO – for connecting a detector with NO (normally open) alarm output. Closing the circuit will trigger an alarm. EOL – for connecting a detector with NC or NO alarm outputs. An EOL resistor must be used in the circuit. -
Page 14: Connecting The Microphone
SATEL 7. Connecting the microphone SATEL offers the MIC-1 microphone, which can be connected to the mini-jack socket on the control panel. If you decide to use another type, it should be an electret microphone, e.g. a typical computer microphone. -
Page 15: Starting The Service Mode
SATEL PERFECTA 64 M 2. Connect the 230 VAC wires to the terminals of transformer primary winding. 3. Connect the terminals of transformer secondary winding to the control panel AC terminals. To make the connection, use flexible wires with a cross-section of 0.5-0.75 mm... -
Page 16: First Steps After Starting-Up The Control Panel
PERFECTA 64 M SATEL First steps after starting-up the control panel 8.6.1 Control panel with wired keypads 1. Set correct, individual addresses in the wired keypads. 2. Run the device identification function. 8.6.2 Control panel without wired keypads 1. Connect computer to alarm control panel. -
Page 17: Identifying Devices
SATEL PERFECTA 64 M 8. Open the CLK and DTA keypad terminals. 9. Connect wires properly to the CLK and DTA keypad terminals. 10. Power on the keypad. 10. Identifying devices Devices connected to the communication bus and the communication connector (PERFECTA-RF) will not be properly supported, unless they have been identified by the control panel. -
Page 18: Connecting The Computer To The Control Panel
12. Connecting the computer to the control panel You can connect the control panel RS-232 (TTL) port with the computer USB port. To make the connection, use the USB-RS converter offered by SATEL. Having connected the computer to the control panel, you can: ... - Page 19 SATEL PERFECTA 64 M control panel receives transmissions from the device. For detailed information about installation of individual devices, please refer to the manuals of the respective products. All MICRA wireless devices must be registered to the control panel. You can do it in the PERFECTA S program or the LCD keypad.
Need help?
Do you have a question about the PERFECTA 64 M and is the answer not in the manual?
Questions and answers