Altronix TROVE Series Installation Manual
Hide thumbs
Also See for TROVE Series:
- Installation manuals (16 pages) ,
- Installation manual (4 pages) ,
- Installation manual (8 pages)
Advertisement
Table of Contents
- 1 Specifications
- 2 Overview
- 3 Optional Accessories
- 4 Installing Trove1R into Rack Tower
- 5 Assembling and Attaching Z Bracket Wire Management Accessory
- 6 Configuration of Altronix Power Supply And/Or Sub-Assembly Boards
- 7 Configuration of HID Vertx Boards
- 8 Trove1R Enclosure Dimensions
- Download this manual
Access & Power Integration
Trove1V1R
- Trove rack enclosure with
®
Altronix/HID VertX
backplane (TV1R)
Installation Guide
All registered trademarks are property of their respective owners.
More than just power.
Rev. TVR112818
TM
Installing Company: _______________ Service Rep. Name: __________________________________
Address: _____________________________________________ Phone #: __________________
Advertisement
Table of Contents

Related Manuals for Altronix TROVE Series


Summary of Contents for Altronix TROVE Series
- Page 1 Access & Power Integration Trove1V1R - Trove rack enclosure with ® Altronix/HID VertX backplane (TV1R) Installation Guide All registered trademarks are property of their respective owners. More than just power. Rev. TVR112818 Installing Company: _______________ Service Rep. Name: __________________________________ Address: _____________________________________________ Phone #: __________________...
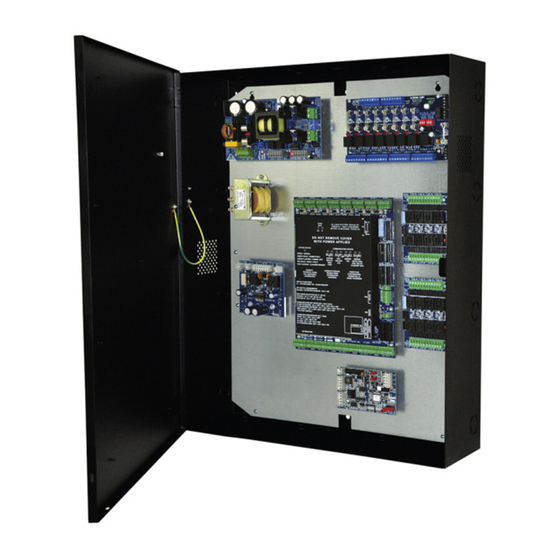
- Page 2 Overview: Altronix Trove1V1R rack mount access & power integration solution accommodates various combinations of ® HID VertX boards with or without Altronix power supplies and accessories for access systems. Specifications: Agency Listings: • CE European Conformity. Trove1V1R ® Trove1R rack mount enclosure with TVR Altronix/HID VertX backplane.
- Page 3 1. Remove backplane from enclosure prior to installing into rack cabinet (do not discard hardware). 2. In order to mount included UL Listed tamper switch (Altronix Model TS112 or equivalent) turn the enclosure upside down. Punch out the knockout in designated location, on the back of the unit, from outside of the drawer (Fig.
- Page 4 Assembling and Attaching Z Bracket Wire Management Accessory (included): Altronix Trove Rack enclosures include Z Bracket, a convenient and reliable wire management accessory. Hardware (included): Fig. 3 Ten (10) bolts and eight (8) lock nuts. 1. Carefully unpack Z Bracket. Do not discard hardware (included) (Fig.
- Page 5 TV1R: Configuration of Altronix Power Supply and/or Sub-Assembly Boards 1. Fasten spacers onto metal pems configuration (A) or (B) of backplane depending on the board (Fig. 5, pg. 5). 2. Position access controller module over corresponding spacers and fasten screws into spacers (Fig. 5a, pg. 5).
- Page 6 TV1R: ® Configuration of HID VertX Boards 1. Fasten spacers onto metal pems configuration (A) of backplane (Fig. 6, pg. 6). 2. Position access controller module over corresponding spacers and fasten screws into spacers (Fig. 6a, pg. 6). 3. Mount backplane to enclosure with hardware. Access Controller Position Chart for the Following Models: ®...
- Page 7 Notes: Trove1V1R Installation Guide - 7 -...
- Page 8 4.57” 116.1mm 26.5” 673.1mm 19” (482.6mm) 3.375” 85.8mm Altronix is not responsible for any typographical errors. –––––––––––––––––––––––––––––––––––––––––––––––––––––––––––––––––––––––––––––––––––––––––––––––––––––––––––––––– 140 58th Street, Brooklyn, New York 11220 USA | phone: 718-567-8181 | fax: 718-567-9056 website: www.altronix.com | e-mail: info@altronix.com MEMBER IITrove1V1R D09V - 8 -...
Need help?
Do you have a question about the TROVE Series and is the answer not in the manual?
Questions and answers