
Related Manuals for LUNA OPTICS LN-G3-B50


Summary of Contents for LUNA OPTICS LN-G3-B50
- Page 1 LN-G3-B50 GEN-3 HD DIGITAL TECHNOLOGY DAY & NIGHT BINOCULAR 6-36x50 VERSION M7 V1.16 INSTRUCTION MANUAL IMPORTANT: Please read this manual in its entirety prior to using this device!
- Page 2 4. For more details on how to operate your viewer, please read this manual completely to ensure proper operation. YOUR PACKAGE INCLUDES THE FOLLOWING: 1. LN-G3-B50 Binocular 2. 16GB Micro SD-card (installed into the SD-card slot) 3. Color Enhancing Filter (installed into the front lens cover – daylight use only –...
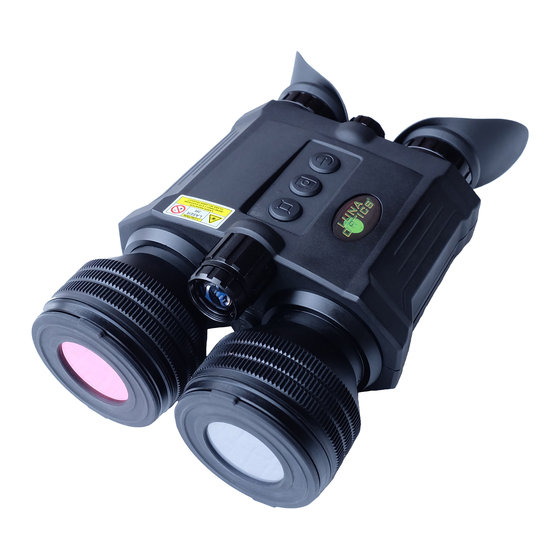
- Page 3 Please identify all the parts of the device PRIOR to operation! 11-b 11-a...
-
Page 4: Installing The Batteries
GLOSSARY: 1 – Objective Lens Focusing Ring 8 – Menu / Super Controller 2 – IR Illuminator Focusing Wheel 9 – Power Indicator Light 3 – IMAGE Button 10 – Folding Eyecups 4 – CAMERA / LRF Button 11 – Lens Covers: 5 –... - Page 5 illuminator or Video/Wi-Fi functions are activated, and more powerful output is not necessary and may make power supply area hot to the touch. To connect the Power Bank, open the Connection Area rubber cover by gently pulling it outward and then swing it counter-clockwise to the right and locate the Micro-USB-C connector.
-
Page 6: On-Screen Display Icons
Now it is time to focus the front objective lens to the distance of the object you wish to view. Rotate the Objective Lens Focusing Wheel (1) focusing on the object until the image is at its best. Once the clear image is obtained, you will no longer need to adjust the eyepieces, just rotate the front objective lens to adjust the distance to the object you are viewing. - Page 7 Counter Number Remaining Image Space MENU / SUPER CONTROLLER FUNCTIONS: our binocular features a unique and user-friendly adjustment called Super Controller (8). It incorporates various operating functions and makes navigating and adjusting menu functions fast, easy and natural without having to take your eyes off the eyepieces in the field.
-
Page 8: View Mode
MAIN MENU consists of the following selections: VIEW MODE: DAYTIME COLOR: this setting presents image in natural full color, best suited for daytime viewing and recording B&W MONOCHROME: this setting presents the image in monochrome black and white color (preferred for nighttime urban settings) NV GREEN PHOSPHOR: this setting presents image in traditional night vision green color (good for nighttime field settings) NV WHITE PHOSPHOR: this setting presents image in traditional night... - Page 9 FHD 1080P / 30FPS: HD 720P / 30FPS: CAPTURE MODE: Instant: select if you want no delay in capturing still image. Image will be captured as soon as the camera button is pressed. (Default mode) Delay 3S: device will count down 3-2-1 and then image is captured Delay 10S: device will countdown 10 seconds and then image is captured TV MODE: NTSC: select when connecting to TVs in North America (including USA),...
-
Page 10: Image Button
magnification, rotate the Super Controller to the left (counterclockwise) and image magnification will decrease by 3x with each rotation. Factory default setting is 6x NOTE: During any image magnification adjustments, please avoid pressing onto the Super Controller, as this may activate the device main menu. POWER &... - Page 11 Once the time is adjusted you may choose to change the date format to MM/DD/YYYY or YYYY/MM/DD according to your preference. Once you are finished setting date and time, you can exit the menu by pressing Controller for approximately 2 seconds. Once set, the time will be displayed on the bottom of the image display.
-
Page 12: Important: Please Read
IMAGE COLOR OPTIONS: The binocular has 4 distinct image colors, which are suitable for a variety of light and terrain conditions. In order to change the image color, you just need to momentarily press onto the Menu/Controller. Each press will switch to the next available color according to this order: Daytime Color (default mode) displays images in full-color. -
Page 13: Brightness Adjustment
BRIGHTNESS ADJUSTMENT: Your digital viewer is equipped with dual image brightness control. An automatic picture optimization sensor adjusts the image according to the available ambient and artificial light. In addition, a manual Image Brightness Button (3) allows you to fine-tune the image brightness to the most comfortable level. Please note that during daylight you will need to tone the brightness down to avoid image flickering and/or washout and to preserve the battery life. -
Page 14: Taking Pictures And Recording Videos
Once the rangefinder is activated, in Manual mode, you will need short-press the Camera/LRF button (4) (momentary press) and the distance is displayed. IMPORTANT: Please be aware that if you press and hold the Camera/LRF button, video recording will start, therefore if you only wish to measure the distance you must press and release the button immediately. - Page 15 installed into the SD-card slot. The Micro-SD card can be upgraded up to 128GB, which is especially useful if you plan to record a lot of videos See RE-FORMATTING 64 & 128GB CARDS TO FAT32 FORMAT on page 18 for important instructions. Your binocular features a multi-use CAMERA/LRF button (4).
- Page 16 IMPORTANT: If you see “Memory Error” message displayed, your micro-SD card is either bad, or, if you have a 64GB or 128GB card, it is not operating in FAT32 format. Please refer to page 18 for re-formatting instructions. SD-CARD REMOVAL, DATA VIEWING AND TRANSFER OPTIONS: It is possible to view the images and videos directly on the unit’s micro-display.
- Page 17 or on iPhone/iPad. For Android users, if you have a problem finding the app in Google Play Store, please scan the QR code below Enter Main Menu and scroll to Wi-Fi selection. Turn the Wi-Fi ON. Now look through the eyepiece and observe the Wi-Fi signal name (typically M7_followed by a set of numbers) and Password (typically 12345678).
-
Page 18: Troubleshooting
“Format Partition” (alternatively right-click on the highlighted disc and choose the same function). A pop-up window will appear. You can label your partition (such as “Luna Optics Monocular” or any other name you desire (it’s optional) and then make sure to select “FAT32”... - Page 19 You are pressing and holding the Camera/LRF button. You must press it only momentarily to get the distance reading. I’m trying to record (or stop) the video but still image is taken: You are releasing the Camera/LRF button too soon. You must press it and hold it for approximately 2 seconds.
-
Page 20: Technical Specifications
Operating Time (4xCR123A batteries, IR off, no video/Wi-Fi) _____________4.5hrs External outputs ____________________________________ micro-USB-C / RCA-V Dimensions_______________________190mm x 126mm x 76mm (7.5”x4.9”x2.9”) Weight__________________________________________________ 980g (2.2lbs) Warranty________________________________________________________2yrs ---------------------------------------------------------------------------------------------------------- LUNA OPTICS, INC. 300 Hawthorn Dr., Fate, TX 75087 (USA) E-mail: info@lunaoptics.com Web: www.lunaoptics.com © 2022...
Need help?
Do you have a question about the LN-G3-B50 and is the answer not in the manual?
Questions and answers