
Subscribe to Our Youtube Channel
Related Manuals for LUNA OPTICS LN-G3-M50


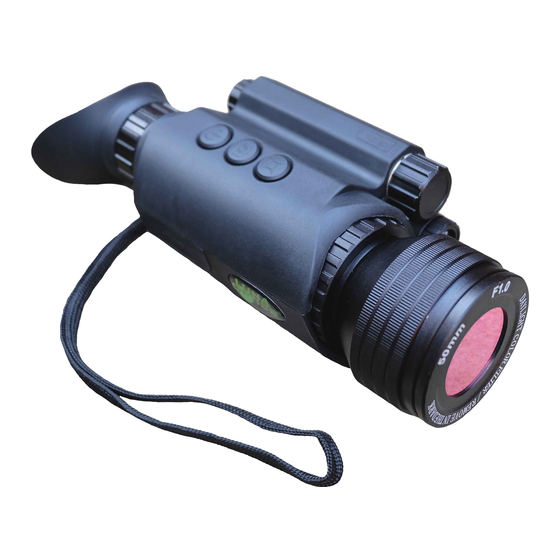
Summary of Contents for LUNA OPTICS LN-G3-M50
- Page 1 LN-G3-M50 GEN-3 HD DIGITAL TECHNOLOGY DAY & NIGHT MONOCULAR 6-36x50 INSTRUCTION MANUAL SOFTWARE VERSION M5/2021/06/17 IMPORTANT: Please read this manual in its entirety prior to using this device!
- Page 2 4. For more details on how to operate your viewer, please read this manual completely to ensure proper operation. YOUR PACKAGE INCLUDES THE FOLLOWING: 1. LN-G3-M50 Monocular 2. 8GB Micro SD-card (installed into the SD-card slot) 3. Color Enhancing Filter (installed onto the front lens – daylight use only –...
- Page 3 Please identify all the parts of the device PRIOR to operation! 11-a 11-b 11-c...
-
Page 4: Installing The Batteries
GLOSSARY: 1 – Objective Lens Focusing Wheel 8 – Folding Eyecup 2 – IMAGE Button 9 – Menu Super Controller 3 – CAMERA Button 10 – Power / IR Indicator Lights 4 – POWER & IR Button 11 – Connection Area: 5 –... -
Page 5: Turning The Unit On And Off
TURNING THE UNIT ON AND OFF: Your night vision unit has one-touch push-buttons. To turn the unit ON, press the POWER Button (4) momentarily once. The LED Power Indicator (10) located on the back of the unit should light up in green color. Look through the eyecup (8) – you should see the Welcome screen for a few seconds, followed by image. - Page 6 OPERATING FROM A 5V/2A POWER BANK: Your digital viewer can also operate from the commonly available 5V USB Power Bank chargers. Please make sure the output of the Power Bank is at least 2A, as less powerful output may fail to power the unit especially when the IR illuminator is activated or during video recording / Wi-Fi connection.
- Page 7 MAIN MENU consists of the following selections: MODE: Video: this mode allows you to record videos when CAMERA button (3) is pressed during operation Photo: this mode allows you to capture still images when CAMERA button (3) is pressed during operation Playback: this mode allows you to playback videos and photos stored on your SD card RESOLUTION:...
-
Page 8: Image Button
Your unit is also equipped with electronic zoom function, which allows you to change image magnification from 6x to 36x. To increase the image magnification rotate the Menu Super Controller (9) to the right (clockwise) and look into the ocular – you will see the image magnification increase with each rotation click by 3x. -
Page 9: Setting Up Date And Time
SETTING UP DATE AND TIME: As your viewer has capability to take images and record video, time and date is automatically stamped onto each image and video recording. To set the correct date and time, please follow this procedure: Turn the unit ON. After image appears, press onto the Super Controller (9) and hold it for approximately 2 seconds to activate the menu. - Page 10 IR illuminator is operating. The illuminator intensity can be further increased by pressing the IR button (4) second and third time (momentarily). The IR icon in the image display will change colors from pink to orange to red, indicating the three different power levels.
-
Page 11: Important: Please Read
IMPORTANT: PLEASE READ! Due to the inherited limitations of any digital image sensor, video refresh rate will be significantly slower during nighttime, resulting in visible image lag/delay when using your monocular in the dark. It is important to take the following steps to minimize this effect and ensure the best possible image and video recording quality: During nighttime and in any dark condition always activate built-in IR... - Page 12 Your monocular has a multi-use CAMERA button (3). It can be used to record video and capture still images. You can switch the function of this CAMERA button by activating the Main Menu (long press onto Super Controller (9)) and selecting Mode function and then select either Video for video recording or Photo for still image capture.
- Page 13 selection is done by short-pressing the Super Controller. Once in the Playback Mode you will be able to switch between photos and videos by rotating the Super Controller and short-pressing Super Controller will activate any video file. To exit the Playback Mode simply press Super Controller for 2 seconds. You can connect the unit directly to the computer via USB connection by utilizing the micro-USB connector (11-b).
- Page 14 Enter Main Menu via Super Controller (9) and scroll to Wi-Fi selection. Turn the Wi-Fi ON. Now look through the eyepiece and observe the Wi-Fi signal name (typically M5) and Password (typically 12345678). Find the device Wi-Fi signal on your phone (same as shown on the unit’s display) and select it.
-
Page 15: Troubleshooting
“Format Partition” (alternatively right-click on the highlighted disc and choose the same function). A pop-up window will appear. You can label your partition (such as “Luna Optics Monocular” or any other name you desire (it’s optional) and then make sure to select “FAT32”... -
Page 16: Technical Specifications
External Power ________________________________________ 5V/2A micro-USB Operating Time (battery power) __________________________________3-3.5hrs External outputs _________________________________ micro-HDMI / micro-USB Dimensions________________________170mm x 80mm x 63mm (6.7”x3.1”x2.5”) Weight___________________________________________________ 510g (17 Oz) Warranty_________________________________________________________1yr ---------------------------------------------------------------------------------------------------------- LUNA OPTICS, INC. 300 Hawthorn Dr., Fate, TX 75087 (USA) E-mail: info@lunaoptics.com Web: www.lunaoptics.com © 2021...
Need help?
Do you have a question about the LN-G3-M50 and is the answer not in the manual?
Questions and answers