Advertisement
Equipment

*1х USB - for charging devices; 2nd USB - for the dashcam's power.
**Depending on the region.
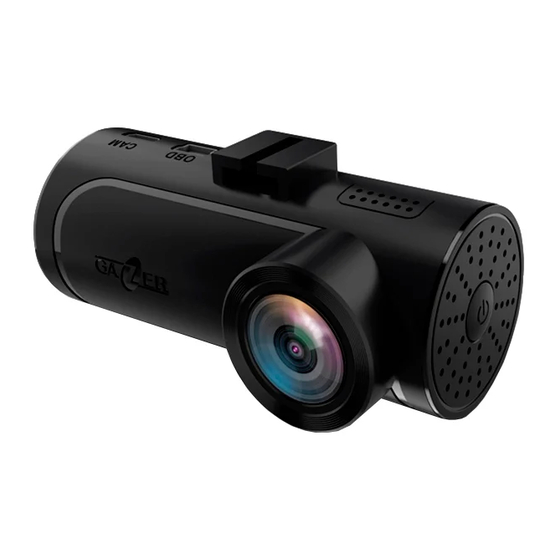
Controls

- Micro USB connector for rear view camera
- Mini USB Connector for power supply / OBD adapter
- Fastening bracket for windshield
- Camera lens
- Power button
- Speaker
- Device operation indicator
- Wi-Fi indicator
- MicroSD card slot
- RESET button
- Microphone
Precautions
Do not use chemical cleaning agents. Use a soft cloth or lens cleaning kit to clean the dashcam lens. Do not use paper napkins or towels. Avoid hits, drops and mechanical damage to the device.
- Storage temperature: -20 °С to +70 °С.
- Operating temperature: from +5°C to +40°C.
Do not try to repair the dashcam by yourself. In case of any breakdowns, contact the dealer or service center.
Neither the manufacturer nor the seller will not be responsible for any losses, or missed opportunities due to the use of video footage and data obtained with the help of this dashcam.
Installation and connection
- Degrease the windshield surface before mounting.
- Make sure that the installation location is dry and clean.
- Do not attach the 3M tape at temperatures below +5°C.
- Prior to installation, position the dashcam accurately on the windshield.
- Use a felt-tipped pen to mark the mounting location.
- Remove the protective layer from 3M tape and mount the dashcam to the pre-selected location.
- Insert the memory card into the device. Make sure that you do it correctly. The memory card should be put gently into the slot until it clicks.
- Connect the power cable to the dashcam. Whenever the car's ACC signal is ON, the device will automatically turn on on and make a beep sound.
- Connect the power cable to the car charger power connector.
- Connect the optional OBD adapter and GPS antenna, to the OBD II port of your car. Install the GPS antenna on the windshield or under the panel, where the signals from satellites will not be blocked by car metal parts.
Pairing the wireless button with the dashcam
To connect the wireless button with the dashcam, follow these steps:
- Open the battery compartment cover by turning it counterclockwise.
- Insert a battery type CR 2032
- Press the button and hold it for 8 seconds, then the dashcam will play the sound, which means that pairing of the wireless button happened.
- Close the cover by turning it clockwise.
Description of the device
Turn on and off
- Whenever power is connected to the dashcam, it automatically turns on and starts recording.
- After the power is turned off, it completes the recording and switches off.
You can turn the dashcam ON / OFF manually by pressing and holding the POWER button on the device housing.
Description of the indicators
Indicators:
- Green light blinks 1 time per second – Recording video from the main camera
- Green light blinks 2 times per second – Recording video from the main and secondary cameras
- Permanent green light – No recording, no SD memory card
- Permanent red light – No recording, SD card is damaged or missing
Wi-Fi indicator:
- Permanent blue light – Connected to the APP.
Camera connection
To connect your smartphone to the dashcam, do the following steps:
- Install the Gazer Dashcam IoV on your smartphone from the App Store or Google Play.
- Go to the Wi-Fi settings and connect to the «Gazer F730» network. The default password is 12345678.
- Then launch the Gazer Dashcam IoV application, the dashcam will connect automatically.

Note: If the password is lost, you must reset your device to the factory settings. To do this, press the POWER button 9 times and then press again after the beep sound. The default password is 12345678.
Recommendation: We recommend to change the default password prior to the device usage start.
Preview, viewing and media downloading
Preview: After connecting the dashcam there will be a current video shown on the top of the screen on the "Camera" tab. To view the full video frame, you can use the video slider on the bottom of the video or expand it to the full screen by using the appropriate button on the right lower corner.
Photos and videos viewing: To view the recorded photos and videos, go to the "Media" tab. You can view files that are stored on the memory card and files that are already stored in the smartphone's memory in this tab.
Photos and videos downloading: To download photo or video, use the "Download" button, which appears as the pointed down squared arrow when you open a specific video or photo. You can also select multiple videos or photos in the album using the "Select" button and downloading them simultaneously by clicking the "Download" button.
Wireless button, G sensor operation
Wireless button:After clicking on the wireless button, the dashcam makes an instant photo, and creates a 15 seconds duration video (10 s before + 5 s after pressing the button). The pictures and videos created in this way are placed in separate folders on the dashcam memory card.
G sensor: After G sensor is tripped, the dashcam creates a separate 15 seconds video (10 s before + 5 s after G sensor tripped). The video clip thus created is stored in a separate folder on the dashcam's memory card, and in a separate album when viewing files through the application. Also, videos are protected from cyclic overwriting.
Auto sync: You can activate the "Auto Download" option in the settings of the Gazer Dashcam IoV application. Thus every time when the device is connected to the application, all photos and videos taken by button pressing or after the G sensor emergency response are automatically downloaded to the application.
ADAS
The dashcam has the ADAS function, which includes the Lane Departure Warning System (LDWS) and the FCWS (Forward Collision Warning System). To enable features, use ADAS button in the settings of APP. In the settings, you can separately enable or disable LDWS and FCWS, as well as adjust the operation and alert sensitivity.
To calibrate the system, use the "ADAS Calibration" button located on the top on the "Camera" tab.
Note: Please note that the ADAS system does not work when the dashcam is connected to the application.

ADAS is an additional driver assistance system on the road. Do not rely only on system alerts, always control the situation around the car while driving.
Software updating
To check the dashcam software updates, go to the "Settings"tab and select "Update version". Then download the available updates using a Wi-Fi connection or a mobile data network.
Turn on the device and connect to it using the Gazer Dashcam IoV application. Then upgrade the device with the help the appropriate option in the settings to update the dashcam.
It takes 3-4 minutes to update the device. The dashcam red indicator will blink. Do not disconnect power from the device, and do not remove the memory card during the process of updating. The dashcam will reboot after a successful update.
Connecting the second camera
The dashcam supports the connection of the second camera. The cameras can be either for internal or external installation.
The cameras are plugged into the microUSB slot, which is located next to the power connector. Video recordings from the second and main video are stored in the separate files on the memory card.
You can view the current video from the additional camera after its connection, and download the recordings using the Gazer Dashcam IoV application.
Additional features with optional OBD + GPS adapter connected
Connecting the optional OBD adapter opens up many additional features.
Note: OBD + GPS Adapter supports most of the car models. If your car is not supported, a lot of features will not work.
Turn on and off
- After the ignition is switched on, the dashcam will turn on and start recording.
- After the ignition is switched off, the dashcam will turn off.
It is also possible to configure the dashcam operation in such a way that it will turn on and off after vibration detection or the absence of vibration. - The dashcam will turn off if there is no vibration within three minutes; if any slightest impact on the dashcam (door opening, engine start) the device will turn on and continue recording.
This mode of operation is required if the OBD adapter does not support working with your car.
Parking mode
- To enable Parking mode it is enough to select the sensitivity of the G sensor operation in this mode.
- To turn off the Parking mode, select the Sensitivity setting to Off.
Also, while with optional OBD adapter connected, the Time-Lapse recording mode is available - If the Time-Lapse function is On - the dashcam switches to low-frame mode 0.5, 1 or 2 video frames per second (optional in the settings) after turning off the ignition.
- If the parking mode is switched on together with the Time-Lapse function, then if the G sensor is tripped, the dashcam will go to normal recording mode of 30 fps and record a 3-minute video, and then return to Time-Lapse mode.
- After turning on the ignition, the dashcam switches to the standard recording mode with a frequency of 30 fps.
The car battery discharge protection
While optional OBD adapter and parking mode connected or the Time-Lapse function is On, car battery discharge protection begins to work.
- If during the Parking mode or Time-Lapse the voltage in the on-board network falls below 11.8 V (default value) - the dashcam will The dashcam will start to record again after switching on the engine ignition.
Speed, engine speed data, etc.
To view vehicle data, open the device status tab with the "LIST" button.
When you click on the "OBD Data" button, you can view the data of the car, and also launch a car scan for errors in the control units.
When you click on the "0-100 km/h" button, you can view speed acceleration measurements data.
When you click the "Sync" button - your account data is synchronized on the server.
HUD mode (display information on the windshield)
To use the HUD mode, press the corresponding button on the "Camera" tab. When this function is turned On – smartphone will display different information in the current time: speed, engine speed, travel distance, trip duration, car coolant temperature, current flow, average speed. The information will be displayed in contrasting colors and in the mirror image, which will allow it to be projected onto the windshield.
To use this feature, the smartphone should be fixed to the dashboard not far from the place of discrepancy between the glass and the panel.
Note: It is recommended to use the HUD mode at night for maximum effect.
Travel routes
To view travel routes, as well as traffic statistics on the route, go to the "Route" tab.
Routes of trips will be overlaid on the map. If you are using the Android device, remember that many smartphones, when connecting to a Wi-Fi Dashcam, doesnt have internet connection.
That is why to display the map of the travel place, you must first connect to the dashcam and download the travel data, then disconnect the Wi-Fi of dashcam network to download the cartographic data from Internet using a mobile data network or the other Wi-Fi network.
Specifications
| Camera viewing angle | 170° |
| Aperture | F 1.8 |
| Sensor | 1/2.9" 2 M Sony Exmor Sensor |
| Resolution | 1920x1080 30 fps 1280x720 30 fps |
| File format | MP4, H.264 |
| Wi-Fi | 2.4 Ghz |
| Memory card support | MicroSDXC up to 256 Gb |
| Power | 5 V |
| Working temperature | +5 - +40°C |
| Dimensions | 78x32x38 mm |
| Weight | 42 g |

Documents / ResourcesDownload manual
Here you can download full pdf version of manual, it may contain additional safety instructions, warranty information, FCC rules, etc.
Advertisement


Need help?
Do you have a question about the F730 and is the answer not in the manual?
Questions and answers