Table of Contents
Advertisement
Quick Links
ENG
Precautions
Package contents
•
Never use chemicals to clean the unit.
•
DVR storage temperature: from -20°С to +70°С.
•
DVR operating temperature: from +5°С to +40°С.
•
Use soft cloth or a lens cleaning kit to clean the DVR lens. Avoid using paper
napkins or towels.
•
Do not attempt to repair the DVR by yourself. In case of malfunctions,
contact the vendor or the service center.
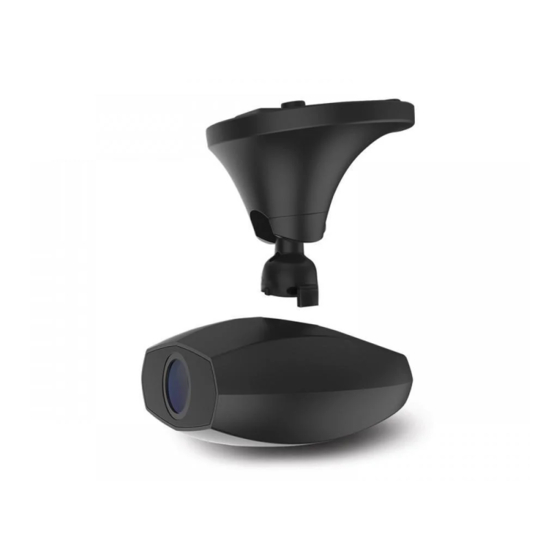
Gazer F735g DVR
Mount
Remout control
Mount part with 3M
scotch
•
Neither the manufacturer nor the vendor shall be responsible for any
damages or lost profit due to the use of video footage and data obtained
with this DVR.
Installation
1.
Degrease the windshield surface before mounting. Make sure that
Car power adapter
USB
User manual
Warranty card
16 Gb Gazer
the mounting location is dry and clean. Do not use the 3М mount at
12/24V*
cable
micro SDHC
temperatures below +5°С.
memory card
2.
Prior to installation, position the DVR accurately on the windshield. Use a
(10 class)**
felt-tipped pen to mark the mounting location.
*1х USB - for charging devices; 1х USB - for the DVR's power.
3.
Remove the protective layer from the 3M tape and mount the DVR in the
**Depending on the region.
preselected location.
4.
Insert the memory card into the device. Make sure that you do it correctly.
Take the memory card so that its contacts are facing the lens and then put it
Controls
gently into the slot until it clicks.
5.
Connect the power cable to the DVR. Whenever the АСС signal is supplied,
1. Mount
the device will turn on automatically and make a beep sound.
2. Micro USB socket:
power socket
Note:
3. Magnetic mount
•
Due to Gazer F735g "Automatic video rotation" function, it makes no difference
4. Speaker
which side in relation to horizon the DVR is installed (the device will automatically
5. Micro SD card slot
rotate the image by 180° if needed).
6. Reset button
7. Microphone
•
The device supports memory cards up to 128 Gb. Do not insert or eject the
8. GPS Indicator
memory card during DVR operation.
9. Power Indicator
•
The DVR power cable must be connected to 2.1А output on the car charger.
10. Operation indicator
Extra USB 1А output can be used to charge portable devices.
11. Remote control
•
You can mount the RC on the dashboard or on the steering wheel. Do not
mount the RC in places where it could obstruct the airbag inflation.
-2-
-3-
3. Video viewing
Pairing two DVRs
Real-time video viewing.
For real-time video viewing, connect your mobile
device to the DVR, launch the "Gazer Viewer" app, and then press "Play"
Gazer F735g DVR supports pairing with Gazer F720 DVR. Combining two devices
button in "Camera" tab.
into a single network, this feature allows using them as a dual-channel system
and viewing video files in "Picture-in-picture" mode.
Viewing recorded video files.
To view previously recorded video files, switch to
the full screen viewing mode first. To do this, press "Playback" or "Maximize"
Pairing process:
icon in the bottom right corner of the preview screen in "Camera" tab. Then drag
the slider in the lower section of the screen or swipe the screen to the right to look
1.
Make sure that both DVRs are switched on and their remote controls paired.
for the required video clip. For convenient search and navigation through recorded
2.
Press both remote controls simultaneously 5 times within 2 seconds until
video clips, one can also use the video gallery with thumbnails and recording time.
you hear "Start pairing" voice prompt.
Downloading video clips.
In the full screen real-time video viewing mode,
3.
Once pairing is complete, the DVR will playback "Pairing successfully" voice
press "Scissors" icon to switch to the video editing (slicing) and downloading
prompt.
mode. Use the upper slider to search for the required video clip and the lower
4.
To view videos from both devices, connect to Gazer F735g DVR.
sliders to set the exact time and duration of the video clip you are currently
editing. To download the selected video clip, press "Download" button.
4. Taking photos
Usage
To take a photo, press a corresponding button on the RC. To record a 10-second
video clip with photos, enable "Capture with video clip" item in the DVR
1. App installation
settings menu. Once this setting is enabled, the DVR will save the photo and
a 10-second video clip whenever you press the corresponding button on the
To interact with and control the DVR using your iOS or Android device, you
RC (5 seconds before and 5 seconds after the button is pressed). These photo
must first download "Gazer Viewer" app from Google Play or App Store.
images and video clips are stored on the DVR memory card and transferred
automatically to your mobile device.
2. Camera connection
5. Photo and video publishing
For iOS.
Select "Wi-Fi_Gazer F735g" network in Wi-Fi settings and connect
to it. Default password – 1234567890. Launch "Gazer Viewer" app and press
"Albums" tab provides access to all photos, video clips and manually saved
"Refresh" button to connect to the DVR.
videos. To publish a photo or video, select one of the files and press "Publish"
icon.
For Android.
Launch "Gazer Viewer" app. Press "+" button to search for the
6. Pairing RC with the DVR
camera, then select "Gazer F735g" to establish connection. Default password
– 1234567890.
If the DVR is not responding to signals, check the LED indicator on remote
control's body. If the status indicator lights up when you press the button, go to
"Settings", then to "Advanced settings", and follow the instructions described
Caution!
For Android – do not connect to a Wi-Fi network recorder via the
in "Remote control pairing". If the status indicator on the remote control fails
phone settings.
to light up, it means that the battery in the RC battery compartment is faulty. In
this case, remove the RC back cover and replace the battery.
Note:
Should you lose the password, you will have to be reset the device to
7. Parking mode
factory settings. To do this, press and hold "Reset" button on the DVR body
When the DVR is connected to a power source and nothing affects its operation
for 5 seconds. Default password – 1234567890.
(the G-sensor detects no vibrations) for 10 minutes, it automatically switches to
"Parking mode" and starts recording in "Time-lapse" mode to save the memory
card space ("Time-lapse" mode can be activated only when "Parking mode"
Caution!
Once you start using the device, we recommend that you change
is enabled). In 5 seconds after the G-sensor is tripped, the DVR returns to the
the default password by typing in your own password in "Camera password"
standard mode.
field located in "Settings" / "Camera settings".
You can download a detailed user manual at www.gazer.com
-4-
-5-
RU
Specifications
Комплектация
No. of cameras
1
Camera viewing angle
140°
Maximum video resolution
Quad HD (2560x1440)
6-layer coated glass lens with F1.8
Lens
aperture
Видеорегистратор
Крепление
Пульт ДУ
Sensor
1/3"
Gazer F735g
Video parameters
H.264, MP4
WDR function
Yes
Sound recording
Yes
Microphone muting
Yes
Micro USB interface
Yes
Memory card support
MicroSDXC, up to 128Gb
Time and date watermarking
Yes
Автомобильный
USB
Руководство
Auto activation on power-up
Yes
адаптер питания
кабель
пользователя
12/24В*
Loop video recording
Yes
Type of mount
3M tape
*1х USB – для зарядки портативных устройств; 1х USB – для подключения
питания к видеорегистратору.
G-sensor
Yes
** В зависимости от региона.
Parking mode
Yes
GPS
Yes
Элементы управления
Wi-Fi
2,4 GHz
Time-lapse recording
Yes, in parking mode
5V, PSU 12/24V from the car lighter
Power
socket with additional USB connector
1A
Battery
Built-in, 250 mAh
Dimensions, mm
65*75*65
Weight, g
70
-6-
-7-
Меры предосторожности
•
Не используйте химические средства для чистки устройства. Для
Видеорегистратор Gazer F735g поддерживает сопряжение с видеорегистра-
очистки линзы регистратора воспользуйтесь мягкой тканью или набором
тором Gazer F720. Данная функция объединения их в общую сеть позволяет
для чистки объективов. Не следует использовать бумажные салфетки
удобно использовать устройства в качестве двухканальной системы и про-
или полотенца.
смотра видео «Картинка в картинке».
•
Избегайте ударов, падений и механических повреждений устройства.
•
Температура хранения: от -20°С до +70°С.
1.
Убедитесь, что оба видеорегистратора включены, а пульты ДУ сопряжены
•
Температура эксплуатации: от +5°С до +40°С.
Ответная часть
с регистраторами.
•
Не пытайтесь ремонтировать видеорегистратор самостоятельно. В случае
крепления с 3M
2.
Одновременно нажмите на оба пульта ДУ 5 раз в течении 2 секунд до
возникновения каких-либо поломок, обратитесь к продавцу или в
скотчем
воспроизведения голосовой подсказки «Start pairing».
сервисный центр.
3.
По окончанию процесса сопряжения регистратор воспроизведет
•
Завод-изготовитель и продавец не несут ответственности за убытки,
звуковую подсказку «Pairing successfully».
а также упущенную выгоду, возникшие в результате использования
4.
Для просмотра видео с обоих устройств необходимо подключиться к
видеозаписей и данных, полученных при помощи регистратора.
регистратору Gazer F735g.
Установка и подключение
1.
Перед установкой обезжирьте поверхность лобового стекла. Убедитесь,
Гарантийный
Карта
что место установки сухое и чистое. Не устанавливайте крепление на
Видеорегистратор поддерживает функцию удаленного управления через мо-
талон
памяти micro
3М скотче при температуре ниже +5°С.
бильное устройство на ОС iOS или Android. Для этого загрузите на мобильное
SDHC Gazer 16
2.
Перед установкой примерьте точное положение регистратора на
устройство приложение «Gazer Viewer» из Play Mаркет или App Store.
Гб (10 class)**
лобовом стекле. Обведите место крепления маркером.
3.
Снимите защитную пленку с 3М скотча и зафиксируйте крепление
регистратора в предварительно выбранном месте.
Для iOS.
произведите подключение. Пароль по умолчанию – 1234567890. После
4.
Вставьте карту памяти в устройство. Обратите внимание на правильность
установки. Карта памяти должна устанавливаться без усилий до звука
чего запустите приложение «Gazer Viewer» и нажмите кнопку «Обновить»
щелчка фиксатора.
для подключения к регистратору.
5.
Для Android.
Присоедините кабель питания к регистратору. При подаче сигнала АСС
1. Крепление
автомобиля устройство автоматически включится и подаст звуковой
для поиска камеры, выберите «Gazer F735g» и произведите подключение.
сигнал.
Пароль по умолчанию – 1234567890.
2. Micro USB разъем:
Примечания:
разъем питания
Важно.
3. Магнитное крепление
•
Регистратор оснащен функцией автоматического переворота видео, поэтому
настройки телефона.
4. Динамик
не имеет значения, какой стороной установлен регистратор относительно
5. Слот для MicroSD
горизонта (при необходимости, устройство автоматически перевернет изо-
Примечание:
карты памяти
бражение на 180°).
настроек к заводским установкам. Для это нажмите и удерживайте в
6. Reset: кнопка сброса
•
Устройство поддерживает карты памяти объёмом до 128 Гб. Не вставляйте
течение 5 секунд кнопку «Reset» на корпусе регистратора. Пароль по
умолчанию 1234567890.
7. Микрофон
и не извлекайте карту памяти во время работы регистратора.
8. Индикатор работы GPS
•
Кабель питания регистратора должен быть подключен к выходу 2.1А на
автомобильном ЗУ, дополнительный выход USB 1А можно использовать
Рекомендация:
9. Индикатор питания
для зарядки портативных устройств.
дуем изменить установленный по умолчанию пароль. Для этого пере-
10. Индикатор режима
йдите в меню «Настройки»/«Настройки камеры» и введите свой
работы
•
Вы можете зафиксировать пульт ДУ на приборной панели или на рулевом
пароль в поле «Пароль камеры».
11. Пульт ДУ
колесе. Не крепите пульт на месте раскрытия подушки безопасности.
-8-
Сопряжение двух регистраторов
Процесс сопряжения:
Особенности использования
1. Удаленное управление
2. Подключение камеры
В настройках Wi-Fi выберите сеть «Wi-Fi_Gazer F735g» и
Запустите приложение «Gazer Viewer». Нажмите кнопку «+»
Для Android - не подключайтесь к Wi-Fi сети регистратора через
В случае утери пароля необходимо произвести сброс
Перед началом использования устройства рекомен-
-9-
Advertisement
Table of Contents

Subscribe to Our Youtube Channel
Related Manuals for Gazer F735g


Summary of Contents for Gazer F735g
- Page 1 Меры предосторожности Сопряжение двух регистраторов Real-time video viewing. For real-time video viewing, connect your mobile device to the DVR, launch the “Gazer Viewer” app, and then press “Play” Package contents • Never use chemicals to clean the unit. Gazer F735g DVR supports pairing with Gazer F720 DVR. Combining two devices Комплектация...
- Page 2 подачі живлення Приєднайте кабель живлення до реєстратора. При подачі сигналу АСС 1. Кріплення пошуку в реальному часі, оберіть «Gazer F735g» та здійсніть підключення. Во вкладке «Альбомы» доступны все отснятые фото, короткие видеоролики автомобіля пристрій автоматично увімкнеться, після чого ви почуєте...
Need help?
Do you have a question about the F735g and is the answer not in the manual?
Questions and answers