
Related Manuals for Barbieri TracMow 70 E POWER


Summary of Contents for Barbieri TracMow 70 E POWER
- Page 1 REMOTE CONTROLLED GRASSLAND MOWER BARBIERI BARBIERI GROUP GROUP MADE IN ITALY Operator’s Manual MODEL: power ENGLISH Barbieri Hybrid Vehicle...
- Page 2 NOTE...
- Page 3 SAFETY HIGHLIGHTS A - INTRODUZIONE SAFETY QUICK REMIND SAFE AND DANGER AREA Danger Gefahr Pericolo Peligro DANGER Operator with PPE only SAFE AREA Danger Gefahr Operator with Pericolo PPE only Peligro SLOPE LIMITATION REPLACE SAFETY PARTS 314813 TORQUE 130 Nm 6202542 45°...
- Page 4 A - INTRODUCTION SICUREZZA A - INTRODUCTION INTRODUCTION This handbook must be considered as part of the machine. The seller of new and second-hand machines must record in the selling document that this booklet has been given along with the machine.
-
Page 5: Improper Uses
For further applications different from the authorized one or in case of misunder- standing of this handbook, please contact the technical department of the manufacturer. BARBIERI s.r.l. - Technical assistance service 36040 SOSSANO - (Vl) - ITALY Tel: 0444/885722 - Fax: 0444/885482 e-mail support@barbieri-fb.com... - Page 6 SICUREZZA C - INDEX C - INDEX OF CONTENTS A - INTRODUCTION 5.11.1 Load or unload on a truck B - PROPER USE AND LIMIT OF USE 5.12 Safety in the work field -DANGER C - INDEX AREA D - MACHINE IDENTIFICATION 5.13 Machine cleaning Serial Number...
- Page 7 D - MACHINE IDENTIFICATION A - INTRODUZIONE D - MACHINE IDENTIFICATION In the event of a problem, before contacting the dealer for repairs or to order spare parts, the following identification numbers of the machine must be noted: • Model and chassis number •...
-
Page 8: Section 1 - Technical Data
SECTION 1 - TECHNICAL DATA SICUREZZA 1 - TECHNICAL DATA 1.1 Technical data... - Page 9 SECTION 1 - TECHNICAL DATA A - INTRODUZIONE 1 - TECHNICAL DATA 1.2 Noise The noise level was obtained during the equipment in action, in neutral position and the results are the following: Electric Motor BHV (10 Kw): Acoustic pressure level (LpAm) ..dB(A) Acoustic power level (LwA)...//...
-
Page 10: Section 2 - Safety Norms
SECTION 2 - SAFETY NORMS SICUREZZA 2 - SAFETY NORMS Power OFF Back Left Rear debris Chain & rubber guard Belt cover bonnet Right Front Blade supp. Blade Blade fasteners Front Flap-Guard Fig. 5 2.1 SAFETY DEVICES The terms “FRONT” - “REAR” - “RIGHT” - “LEFT” used in this handbook and in the spare parts catalogue, are referred to the machine as shown in Fig. - Page 11 SECTION 2 - SAFETY NORMS A - INTRODUZIONE 2 - SAFETY NORMS 2.2 WARNING LABELS AND SAFETY ADVICES The most important warning labels are placed near to the danger around the machine. Be sure to understand the meaning of the labels in order to use a proper behaviour to avoid any danger action.
- Page 12 SECTION 2 - SAFETY NORMS SICUREZZA 2 - SAFETY NORMS DANGER: Do not work in slopes over the limits Stability of the machine can be lost DANGER : RISK OF INJURY On a slope, stay below never above the machine. 2.3 WARNING LABELS AND SAFETY ADVICES WARNING: Read all safety warnings designated by this symbol and all instructions.
- Page 13 SECTION 2 - SAFETY NORMS A - INTRODUZIONE 2 - SAFETY NORMS Grassland mower Safety Warnings - Personal safety a) Stay alert, watch what you are doing and use common sense when operating a Grassland Mower. Do not use a Grassland Mower while you are tired or under the influence of drugs, alcohol or medication.
- Page 14 SECTION 2 - SAFETY NORMS SICUREZZA 2 - SAFETY NORMS g) Use the power tool, accessories and tool bits etc. in accordance with these instruc- tions, taking into account the working conditions and the work to be performed. Use of the power tool for operations different from those intended could result in a hazardous situation.
- Page 15 SECTION 2 - SAFETY NORMS A - INTRODUZIONE 2 - SAFETY NORMS Grassland mower Safety Warnings - General advices Before starting the Mower, be sure that the SAFETY DEVICES are well working and fitting. Without these cares the operator might work in a danger situation. This machine has been designed and manufactured for being used by one operator only who hold the Radiocontrol.
- Page 16 SECTION 2 - SAFETY NORMS SICUREZZA 2 - SAFETY NORMS 15) Plan well your work before starting 16) Keep the area of work clear and clean. 17) Only use the machine in clear visibility. 18) If you hit any objects during the work, stop the machine and check for any damage immediately.
-
Page 17: Section 3 - Machine Preparation
SECTION 3 - MACHINE PREPARATION A - INTRODUZIONE 3 - MACHINE PREPARATION 3.1 Endowment and unpacking Fig. 6 The machine is supply with: 1 x Basic Unit X-Rot e-Power 1 x Radio Control 2 x Lithium battery for Radio control 1 x Battery charger 1 x Radio control’s hanging belt 1 x User Manual &... -
Page 18: Control Components
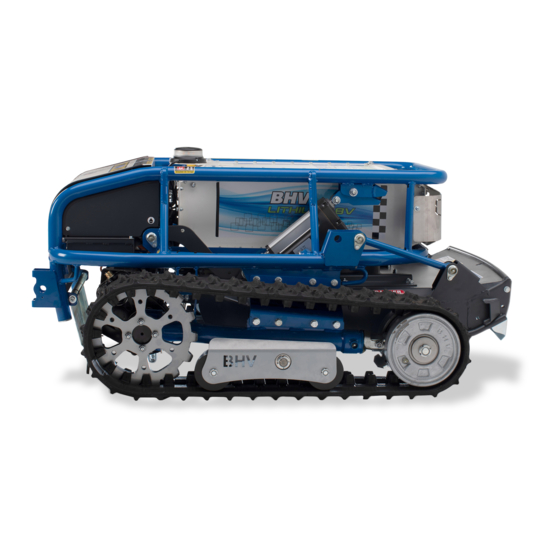
SECTION 4 - CONTROL COMPONENTS SICUREZZA 4 - CONTROL COMPONENTS Fig. 7b Basic Unit: Identification of the main components. (Fig.7b) A) Tensor wheels I) Rear Flap-guard (*) Q) Remote control B) Crawler’s roller J) Beaconnect R) Front Flap-guard (*) C) Drive wheel K) GPS Antenna S) Blade support D) Crawler Belt... -
Page 19: Section 4 - Components And Controls
SECTION 4 - COMPONENTS AND CONTROLS A - INTRODUZIONE 4 - CONTROL COMPONENTS 4.2 BATTERY The machine is equipped with a Li-Ion battery with a high density of charge, which guarantees a long operation time, and reduced weight. The battery is equipped with an innovative electronic control system (Battery Management System) that constantly monitors the environmental conditions and the power required in order to always offer the best and most economical performance. -
Page 20: Mower Deck
SECTION 4 - COMPONENTS AND CONTROLS SICUREZZA 4 - CONTROL COMPONENTS 4.3 MOWER DECK The cutting deck has a special shape to reduce the power requirement. The knife is driven directly from the motor via a belt that is connected to an electromagnetic (EM) clutch. -
Page 21: Remote Control Functions
SECTION 4 - COMPONENTS AND CONTROLS A - INTRODUZIONE 4 - REMOTE CONTROL FUNCTIONS 4.6 TRANSMISSION The power is transmitted to the tracks via two robust and low-noise spur gears. The portal shape of the drive enables a very low center of gravity, which is only 15 cm from the ground. - Page 22 SECTION 4 - COMPONENTS AND CONTROLS SICUREZZA 4 - REMOTE CONTROL FUNCTIONS A + B Machine activation: Battery Level: Radio control Signal level of the Fuel reserve Battery reserve Battery Radio remote control In case of Anomalies Alarm - code With lever With lever Speed limiter...
- Page 23 SECTION 5 - INSTRUCTIONS FOR A SAFE USE A - INTRODUZIONE 5 - SAFE USE This section explains the various devices in the machine and shows the dangers or misuse that must be avoided. We recommend that you carefully read and become familiar with the procedures that will result in correct use of the machine in order to obtain maximum performance while minimizing intrinsic risks.
- Page 24 SECTION 5 - INSTRUCTIONS FOR A SAFE USE SICUREZZA 5 - SAFE USE 5.3 MACHINE STOP (Fig. 10) To switch off the machine, press the red alarm button at any time (Fig. 10 (O)). The machine suddenly stops. Shortly after stopping, remember to release the alarm switch in its normal position.
- Page 25 SECTION 5 - INSTRUCTIONS FOR A SAFE USE A - INTRODUZIONE 5 - SAFE USE 5.5 WORK IN THE SLOPE It is advisable to work in the longitudinal way on slopes. At the end of the way there is no need to turn as the machine works in both directions.
- Page 26 SECTION 5 - INSTRUCTIONS FOR A SAFE USE SICUREZZA 5 - SAFE USE 5.8 CUTTING HEIGHT ADJUSTMENT (F of Fig.10) It is possible at any time to control the cutting height from the remote control. In case of thick, tall grass, it is recommended that the cutting deck be set 10 cm from the ground to allow the grass to get out.
- Page 27 SECTION 5 - INSTRUCTIONS FOR A SAFE USE A - INTRODUZIONE 5 - SAFE USE 5.11.1 LOADING ONTO OR UNLOADING FROM A TRUCK When loading the front mower onto a truck, turn off the truck’s engine, apply the truck’s parking brakes, and chock the wheels to avoid unexpected moving of the truck or trailer.
- Page 28 SECTION 5 - INSTRUCTIONS FOR A SAFE USE SICUREZZA 5 - SAFE USE 5.12 SAFETY IN THE WORK FIELD It is mandatory to follow these rules to not create danger for the operator and for people, pets or things around the operation area. a) Operate if you have a perfect control at your sight of the area of 50m radius around the machine, only.
-
Page 29: Washing The Mower
SECTION 5 - INSTRUCTIONS FOR A SAFE USE A - INTRODUZIONE 5 - SAFE USE FIG 19 - DANGER AREA Danger Gefahr Pericolo Peligro DANGER Operator with PPE only SAFE AREA Danger Gefahr Operator with Pericolo PPE only Peligro Fig. 19 5.13 WASHING THE MOWER Under no circumstances spray water on electrical parts (motors, batteries, connectors, charger, electric cabinet) High pressure cleaner may only be used for the track and the... - Page 30 SECTION 5 - INSTRUCTIONS FOR A SAFE USE SICUREZZA 5 - SAFE USE 5.14 Use of Compass Servo Drive (Optional) The machine is equipped with a driver assistant, which makes the work much easier: - increases the safety of the operator considerably, who is not forced to be near the machine and to work with it precisely.
-
Page 31: Section 6 - Troubleshooting
SECTION 6 - TROUBLESHOOTING A - INTRODUZIONE 6 - FAILURE AND FIX... - Page 32 SECTION 6.1 - RADIOCONTROLLER ERRORS LIST SICUREZZA 6.1 - ERRORS COD. 1 COD. 2 TYPE PROBLEM WHAT TO CHECK Communic. CAN1 (Radiocontr.) Communic. CAN2 (Drivers) Communic. CAN3 (Engine) Emergency mushroom button Heartbeat drive 1 Emergency Drive 1 Heartbeat drive 2 Emergency Drive 2 J1939 - engine control unit A2,A3,A4...
- Page 33 SECTION 7 - MAINTENANCE A - INTRODUZIONE 7 - MAINTENANCE Main Maintenance points Fig. 20 A) Battery B) Blade C) Blade fasteners D) Mower deck protection Fr.& Rear Lubrication points Fig. 21 K Grease nipple H Reductor gear oil cap...
-
Page 34: Check Before Use
SECTION 7 - MAINTENANCE SICUREZZA 7 - MAINTENANCE 7.1 CHECK BEFORE USE 7.1.1 Check Main battery level (Fig 22) Switch the battery ON and connect the machine to the Radio control. To check the battery level press the button (B) and the battery level will appear on the display. The battery range of charge is between 99% and 4%. - Page 35 SECTION 7 - MAINTENANCE A - INTRODUZIONE 7 - MAINTENANCE 7.1.2 Check the cutting blades The blade rotates at high speed, so abnormal wear or damage to a blade can cause the machine to vibrate excessively. In addition, hitting a stone or other hard object lying in the field can make the blade lose its sharpness.
- Page 36 SECTION 7 - MAINTENANCE SICUREZZA 7 - MAINTENANCE 7.1.4 Check the crawler tension and their conditions It is important to check the condition of the tracks to prevent them from coming out of the guides while you are working. If their tension is not sufficient upon inspection, check that the tracks are not damaged or worn.
-
Page 37: Maintenance And Adjustment
SECTION 7 - MAINTENANCE A - INTRODUZIONE 7 - MAINTENANCE 7.2 MAINTENANCE AND ADJUSTMENT 7.2.1 Maintenance schedule and lubrication program... - Page 38 SECTION 7 - MAINTENANCE SICUREZZA 7 - MAINTENANCE 7.2.2 Main Battery Charge The main Battery is a high capacity battery chemistry in Lithium-ions. The high density of charge allows the machine to perform a professional work for 4 hours. The battery does not have memory effect so it is recommended to charge it any time before to start a new work.
-
Page 39: Battery Care
SECTION 7 - MAINTENANCE A - INTRODUZIONE 7 - MAINTENANCE ATTENTION: - The mower cannot be used while che charging process take place as the battery is disconnect from the machine. - During the charging operation do not wash the machine. - Appropriate Battery pack for use with the Grassland Mower is: BHV Battery pack type BHV-51-184 48V - 184Ah... - Page 40 SECTION 7 - MAINTENANCE SICUREZZA 7 - MAINTENANCE 7.2.4 Blade sharpeing and replacing The blade of this mulching machine is turning very fast so that a small damage in one single blade can create an imbalance which turn in a strong noise and vibration.
- Page 41 SECTION 7 - MAINTENANCE A - INTRODUZIONE 7 - MAINTENANCE DANGER: If the blades are removed from the blade support, the fastening screws must be replaced (tightening torque 130Nm). DANGER: The fastening screws of the blades are safety elements, so they must always be checked and if damaged, they must be replaced within the prescribed intervals (every 50 hours).
- Page 42 SECTION 7 - MAINTENANCE SICUREZZA 7 - MAINTENANCE 7.2.6 Use of the tensioner It is very important to use the chain tensioner correctly. The tensioner must be adjusted according to the working conditions. IMPORTANT: Incorrect adjustment of the tensioner can result in the machine stops while working, either due to the track block or from jumping out of their rail.
- Page 43 SEZIONE 7 - MAINTENANCE A - INTRODUZIONE 7 - MAINTENANCE 7.2.8 Battery and remote control The radio transmitter is supplied with 2 Li-MH batteries. Even if one battery is enough for a day, it is recommended to charge both batteries before starting work. A battery charger is supplied with the radio control to charge the battery.
- Page 44 SEZIONE 7 - MAINTENANCE SICUREZZA 7 - MAINTENANCE 7.4 Notice for disposal Li-NH Battery The symbol of the crossed-out waste container on the device means that it must be handled separately from normal waste. The owner is responsible for handing over scrapped equipment to the designated points of collection for the recycling of electric or electronic waste material.
-
Page 45: Section 8 - Warranty
SECTION 8 - WARRANTY A - INTRODUZIONE WARRANTY CLAIMS SECTION 8 – COMPLAINTS AND WARRANTY The basic principle of the guarantee provisions is compliance with and observance of the relevant operating instructions. Never attempt unauthorized modification of the mower as this could be very hazardous. Damaged or worn parts should be replaced with manufacturer genuine spare parts. -
Page 46: Engine Warranty
SECTION 8 - WARRANTY SICUREZZA WARRANTY CLAIMS 8.3 DURATION The period of warranty is: - 24 months for private utilization of the machine; - 12 months for commercial - municipality or renting operation. In this period value the guarantee terms as specified on paragraph 8.1. 8.4 ENGINE WARRANTY The conditions and the terms of warranty are those conceded by the engine’s manufactu- rer;... -
Page 47: Section 9 - Declaration Of Conformity
European Directive 2006/42/CE ann.2A Manufacterer and depositary BARBIERI Srl - P.le Luigi Sturzo, 15 - 00144 Roma (RM) Italia w/ of the technical file: production site in Via Seccalegno, 23 - 36040 Sossano (VI) Italia. - Page 48 THANK YOU FOR CHOOSING OUR PRODUCT! SICUREZZA With this product you have chosen unique features, the value of which you can immediately appreciate and evaluate over time: - The lightness of the machine allows it to work on slopes that are impossible for other machines PRODUCTIVITY - The available accessories increase the work opportunities PRODUCTIVITY...
- Page 49 NOTE...
- Page 50 GROUP GROUP MADE IN ITALY BARBIERI SRL – Power Product Registered office: 00144 ROMA (RM) - PIAZZALE LUIGI STURZO N. 15 Production site & Factory: Via Seccalegno. 23 - 36040 SOSSANO (VI) Italy Tel.+39 0444 885722 - Fax +39 0444 885482 www.barbieri-group.com...
Need help?
Do you have a question about the TracMow 70 E POWER and is the answer not in the manual?
Questions and answers