Advertisement
Available languages
Available languages
Quick Links
Para Español, vea páginas 7-12.
Pour le français, consulter les pages 13-18.
H-2043
1-800-295-5510
uline.com
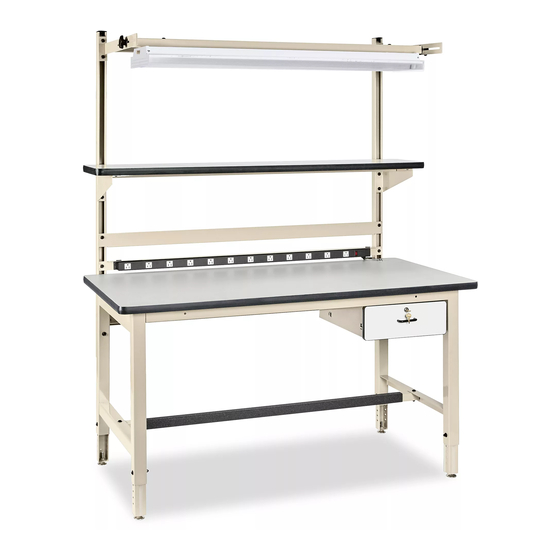
ANTI-STATIC
WORKBENCH
Two Person Assembly
TOOLS NEEDED
Recommended
Wire Stripper
7/16" Wrench
Phillips
3/16" Allen Wrench
Screwdriver
1/8" Allen Wrench
(Included)
PARTS
Bench Top x 1
Shelf x 1
Light Fixture x 1
Shelf Bracket x 2
Drawer Assembly x 1
Drawer Front
Drawer Back
Back Rail x 1
Mounting Plate x 1
Mounting Plate x 1
48" Electrical Strip x 1
Metal Bin Holder x 1
Electrical Strip Mounting Rail x 1
Footrest Crossbeam x 1
Front Rail x 1
Shelf Support Beam x 1
Vertical Upright x 2
Light Fixture Support Beam x 1
Leg Extender x 4
Light Fixture Support Frame x 1
Leg Assembly x 2
PAGE 1 OF 18
1122 IH-2043
Advertisement

Related Manuals for U-Line H-2043


Summary of Contents for U-Line H-2043
- Page 1 Para Español, vea páginas 7-12. Pour le français, consulter les pages 13-18. H-2043 1-800-295-5510 uline.com ANTI-STATIC WORKBENCH Two Person Assembly TOOLS NEEDED Recommended Wire Stripper 7/16" Wrench Phillips 3/16" Allen Wrench Screwdriver 1/8" Allen Wrench (Included) PARTS Bench Top x 1...
- Page 2 HARDWARE 1/4 x 2¾" Hex 5/16 x 2½" Hex 1/4 x 3/4" Hex 3/8 x 1" Allen 3/16 x 2¾" Flat Allen 3/16 x 2¼" Flat Allen Head Bolt x 4 Head Bolt x 1 Head Bolt x 6 Head Bolt x 12 Head Bolt x 2 Head Bolt x 2 3/16 x 2⁄"...
- Page 3 ASSEMBLY CONTINUED WIRING BENCH TOP 4. Place bench top with the bottom facing up on a flat, non-marring surface. Place assembled frame Install the following hardware into the pre-drilled hole on upside down on top of the bench top. the bench top in the order listed below. (See Figure 4) NOTE: Back rail should be flush with edge of top, Above bench top: 5/16"...
- Page 4 ASSEMBLY CONTINUED 5. Cut wire to appropriate length, leaving 3. Attach footrest to leg assemblies using 3/16 x 2¼" flat approximately 1-2" slack. Strip jack wires 1/4" and Allen head bolts, 1/4" finish washers, 1/4" flat washers connect to the ring terminal by crimping wires in and 3/16"...
- Page 5 ASSEMBLY CONTINUED LIGHT FIXTURE SHELF With second person, attach light fixture support frame 1. Choose desired height on vertical uprights and to vertical uprights using 3/8 x 1" Allen head bolts and mount shelf brackets using 3/8 x 1" Allen head bolts 3/8"...
- Page 6 ASSEMBLY CONTINUED ELECTRICAL STRIP BIN HOLDER 1. Attach electrical strip mounting rail to vertical 1. Attach metal bin holder to vertical uprights at uprights using 3/8 x 1" Allen head bolts and desired height using 3/8 x 1" Allen head bolts and 3/8"...
-
Page 7: Herramientas Necesarias
H-2043 800-295-5510 uline.mx MESA DE TRABAJO ANTIESTÁTICA Se Recomienda Armar HERRAMIENTAS NECESARIAS Entre Dos Personas Pinza Pelacables Llave de 7/16" Desarmador Llave Allen de 3/16" de Cruz Llave Allen de 1/8" (Incluidas) PARTES 1 Cubierta de 1 Repisa 1 Lámpara... - Page 8 TORNILLERÍA 4 Pernos de Cabeza 1 Perno de Cabeza 6 Pernos de 12 Pernos de 2 Pernos de Cabeza 2 Pernos de Cabeza Hexagonal de Hexagonal de Cabeza Hexagonal Cabeza Allen Plana Allen de 3/4 x 2¾" Plana Allen de 1/4 x 2¾"...
- Page 9 CONTINUACIÓN DEL ENSAMBLE CABLEADO DE LA CUBIERTA DE LA MESA 4. Coloque la cubierta de la mesa con la parte inferior hacia arriba en una superficie plana que no deje Instale la siguiente tornillería en el orificio marcas. Coloque el armazón ensamblado boca preperforado de la cubierta de la mesa en el abajo encima de la cubierta de la mesa.
- Page 10 CONTINUACIÓN DEL ENSAMBLE REPOSAPIÉS 5. Corte el cable al largo apropiado dejando aproximadamente 1-2" de margen adicional. Pele los 1. Voltee la mesa de trabajo hacia arriba. cables de los enchufes 1/4" y conéctelos a la terminal de anillo engarzando los cables en la terminal. 2.
- Page 11 CONTINUACIÓN DEL ENSAMBLE REPISA NOTA: Deje al menos 12" del poste por debajo de la cubierta de la mesa para estabilizarla y Escoja la altura deseada en los postes verticales asegurarla. e instale soportes para repisa utilizando perno de 4. Repita la operación en el poste restante. cabeza Allen de 3/8 x 1"...
- Page 12 CONTINUACIÓN DEL ENSAMBLE MULTICONTACTOS PORTAGAVETAS Fije el riel de instalación para multicontacto a Fije el portagavetas de metal a los postes verticales los postes verticales utilizando pernos de cabeza utilizando pernos de cabeza Allen de 3/8 x 1" y Allen de 3/8 x 1" y tuercas deslizantes de 3/8". tuercas deslizantes de 3/8".
-
Page 13: Outils Requis
H-2043 1-800-295-5510 uline.ca ÉTABLI ANTISTATIQUE Montage à deux OUTILS REQUIS personnes recommandé Pince à dénuder Clé de 7/16 po Tournevis Clé Allen de 3/16 po cruciforme Clé Allen de 1/8 po (inclus) PIÈCES Surface d’établi x 1 Tablette x 1... -
Page 14: Matériel D'installation
MATÉRIEL D'INSTALLATION Boulon hexagonal de Boulon hexagonal Boulon hexagonal Boulon Allen de Boulon Allen plat de Boulon Allen plat de 1/4 po x 2 ¾ po x 4 de 5/16 x 2 ½ po x 1 de 1/4 x 3/4 po x 6 3/8 x 1 po x 12 3/16 x 2 ¾... - Page 15 MONTAGE SUITE CÂBLAGE DE LA SURFACE D'ÉTABLI 4. Placez la surface d'établi, face inférieure vers le haut, sur une surface plane qui ne raye pas. Placez Installez le matériel suivant dans le trou prépercé le cadre assemblé à l'envers sur la surface d'établi. de la surface d'établi dans l'ordre indiqué...
- Page 16 MONTAGE SUITE 5. Coupez les fils à la longueur appropriée en laissant 2. Décollez la doublure de cire du ruban adhésif environ 1 à 2 po de mou. Dénudez les fils des fiches de protection pour repose-pied. Placez le ruban de 1/4 po et connectez-les à...
- Page 17 MONTAGE SUITE TABLETTE REMARQUE : Pour rendre les établis sûrs et stables, une longueur de 12 po sur le montant 1. Choisissez la hauteur voulue sur les montants doit se trouver en dessous de la surface d'établi. verticaux et fixez les consoles de tablette avec des 4.
- Page 18 MONTAGE SUITE BARRE MULTIPRISE PORTE-BACS Fixez le rail de montage de la barre multiprise aux Fixez le porte-bacs en métal aux montants verticaux montants verticaux avec des boulons Allen de à la hauteur voulue avec des boulons Allen de 3/8 x 1 po et des écrous de rail de 3/8 po. 3/8 x 1 po et des écrous de rail de 3/8 po.
Need help?
Do you have a question about the H-2043 and is the answer not in the manual?
Questions and answers