Advertisement
Available languages
Available languages
Quick Links
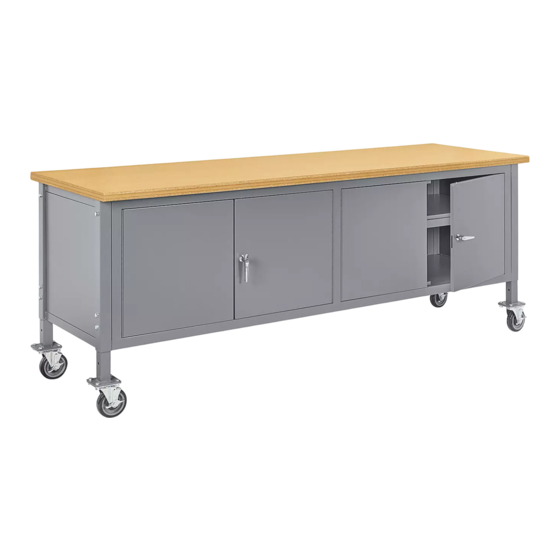
96" CABINET WORKBENCH
TOOLS NEEDED
10 mm Wrench
16 mm Wrench
Drill
3/16" Drill Bit
Tabletop x 1
Back Panel x 1
Front Panel x 1
Feet x 4
PAGE 1 OF 9
1-800-295-5510
uline.com
17 mm Wrench
Phillips Screwdriver
PARTS
Long Bolt x 12
M6 x 30 Hex Bolt x 3
Back Panel
Shelf Mount x 2
Front Panel
Shelf Mount x 1
FOR MOBILE WORKBENCHES ONLY
Medium Lock
Medium Flat
Washer x 16
Washer x 16
Pour le français, consulter les pages 7-9.
Large Flat
Washer x 12
M6 x 15 Hex Bolt x 4
Lock Bar x 2
Center Shelf Panel x 4
Bottom Shelf Panel x 4
Caster x 4
Short Bolt x 16
Para Español, vea páginas 4-6.
Wood Screw x 10
Small Flat
Washer x 7
Door Handle
with Lock x 2
Side Panel x 2
Medium Nut x 16
0322 IH-8205
Advertisement

Related Manuals for U-Line H-8205


Summary of Contents for U-Line H-8205
- Page 1 Para Español, vea páginas 4-6. Pour le français, consulter les pages 7-9. 1-800-295-5510 uline.com 96" CABINET WORKBENCH TOOLS NEEDED 10 mm Wrench 16 mm Wrench 17 mm Wrench Drill 3/16" Drill Bit Phillips Screwdriver PARTS Long Bolt x 12 Large Flat Wood Screw x 10 Washer x 12 M6 x 15 Hex Bolt x 4...
- Page 2 ASSEMBLY Place front, back and side panels upright. Align all 4. For Mobile Workbenches Only: Attach casters with four panels. (See Figure 1) short bolts, four medium flat washers, four medium lock washers and four medium nuts using a 17 mm wrench. NOTE: Panels will be upside down for first part Put casters into locking position.
- Page 3 ASSEMBLY CONTINUED 9. Fasten tabletop to mounting plates with six wood 11. Insert four bottom shelf panels. They should sit on the screws using a Phillips screwdriver, drill or 10 mm lower shelf lip. (See Figure 6) wrench. 12. Insert the center shelf panels with the cut sections NOTE: For additional security, attach four remaining facing the back left, back right and center corners of the cabinet.
-
Page 4: Herramientas Necesarias
800-295-5510 uline.mx MESA DE TRABAJO CON GABINETE DE 96" HERRAMIENTAS NECESARIAS Llave de 10 mm Llave de 16 mm Llave de 17 mm Taladro Broca de 3/16" Desarmador de Cruz PARTES 12 Pernos Largos 12 Rondanas 10 Tornillos Planas Grandes para Madera 4 Pernos Hexagonales 3 Pernos Hexagonales... - Page 5 ENSAMBLE Ponga de pie los paneles delanteros, posteriores y 4. Solo para Mesas de Trabajo Móviles: Una las ruedas laterales. Alinee todos los paneles. (Vea Diagrama 1) con cuatro pernos cortos, cuatro rondanas planas medianas y cuatro rondanas de bloqueo medianas NOTA: Los paneles estarán al revés durante la utilizando una llave de 17 mm.
- Page 6 CONTINUACIÓN DE ENSAMBLE 9. Asegure la cubierta a las placas de instalación con 11. Inserte cuatro paneles de repisa inferiores. Deben seis tornillos para madera utilizando un desarmador descansar sobre el borde de la repisa inferior. (Vea de cruz, taladro o llave de 10 mm. Diagrama 6) NOTA: Para mayor seguridad, coloque los 12.
-
Page 7: Outils Requis
1-800-295-5510 uline.ca ÉTABLI À ARMOIRE – 96 PO OUTILS REQUIS Clé de 10 mm Clé de 16 mm Clé de 17 mm Perceuse Mèche de Tournevis 3/16 po cruciforme PIÈCES Boulon long x 12 Grande rondelle Vis à bois x 10 plate x 12 Boulon hexagonal Boulon hexagonal M6 x 30 x 3... -
Page 8: Montage
MONTAGE Placez les panneaux avant, arrière et latéraux à la 4. Pour les établis mobiles seulement : Fixez les roulettes verticale. Alignez tous les panneaux. (Voir Figure 1) à l'aide d'une clé de 17 mm en utilisant quatre boulons courts, quatre rondelles plates de taille REMARQUE : Les panneaux sont à... - Page 9 MONTAGE SUITE 9. Fixez la surface de travail aux plaques de fixation en 11. Insérez les quatre panneaux de tablette inférieure. Ils utilisant six vis à bois et un tournevis cruciforme, une devraient reposer sur le rebord de tablette inférieure. perceuse ou une clé...
Need help?
Do you have a question about the H-8205 and is the answer not in the manual?
Questions and answers