Table of Contents
Advertisement
Advertisement
Table of Contents

Subscribe to Our Youtube Channel
Related Manuals for Silver King SKDC12-ESUS1


Summary of Contents for Silver King SKDC12-ESUS1
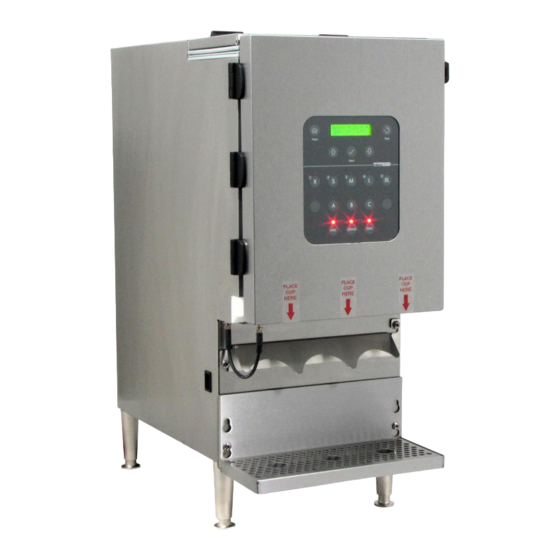
- Page 1 Technical Manual Replacement Parts List Manufactured especially for Dunkin Donuts MODEL: SKDC12-ESUS1 1600 Xenium Lane North, Minneapolis, MN 55441-3787 Phone (763) 923-2441 Fax (763) 553-1209 www.silverking.com FORM NO. 45185 REV D 12/2019 Specifications Subject to Change Without Notice.
-
Page 2: Table Of Contents
Table of Contents Limited Warranty................…....3 Two (2) Year Parts Warranty…………………………………………………………………. 3 Five (5) Year Compressor Warranty……………………………………………………….. 3 Two (2) Year Labor Warranty………………………………………………………………… 3 Introduction…………………………………………………………………………………………………… 4 Unpacking and Set Up…………………………………………………………………………………….. 4 Inspecting for Shipping Damage…………………………………………………………..… 4 Unpacking the Unit................…... 4 Precautions……………………………………………………………………………………………………. -
Page 3: Limited Warranty
Two (2) Year Labor Warranty Silver King warrants to the original purchaser for a period of two (2) years from the date of purchase or two (2) years and six (6) months from the date of shipment from the factory, whichever comes first, a limited service labor warranty on Silver King refrigerated equipment subject to the following terms;... -
Page 4: Introduction
Examine the shipping container immediately upon receipt. Any damage to the container or equipment due to shipping should be reported to the transportation company immediately. Claims should be filed within twenty-four (24) hours. Shipping damage is not the responsibility of Silver King. Unpacking the Unit This unit is shipped in a corrugated box for protection. -
Page 5: Location
Caution – Risk of fire or explosion. Flammable refrigerant used. Consult repair manual/owner’s guide before attempting to service this product. All safety precautions must be followed. Caution – Risk of fire or explosion. To be repaired only by trained service personnel. Use only Silver King approved replacement parts. Flammable refrigerant used. -
Page 6: Installation
Installation CAUTION: To avoid injury, the following steps should be performed by two people. Remove the unit from its packaging material and place it near the mounting location and install the four legs underneath the unit. The unit should be oriented such that the power cord reaches the intended power outlet. Remove the plastic protective film from the stainless steel surfaces and wipe all the surfaces with a mild soap water solution. -
Page 7: Operation
Then plug in the power cord on the bottom of the unit, at the right rear, as shown in Figure 3. Run the cord along the rear of the shelf and plug it into the designated outlet. Figure 3. AC Power Cord Connection Operation Before the First Use Daily Calibration Procedure must be performed before the unit is put into operation. -
Page 8: Threshold Levels
Threshold Levels The Milk and Skimmed Milk levels are set to 600gm and the Cream level to 850gm. The unit goes into lockout when the product in the tanks is less than or equal to these amounts. Controls The bottom portion of the Display Panel is used to control the dispensing of products. Descriptions of these controls are: •... -
Page 9: Operating The Unit
Figure 5: Product Tanks Open Operating the Unit To dispense a drink, perform the following procedure. Step Action Place the drink under the appropriate dispensing tube. Select the type of product required for the drink, (bottom row), then go to Step 3 or Step 4, depending on the type of drink required. -
Page 10: Observing The Current Temperature Inside The Unit
Observing the Current Temperature Inside the Unit To see the current temperature inside the unit, press the up or down arrow until the Temperature is displayed. Changing the Temperature Set Point If Product temperature is not within spec (33 - 40 degrees) perform the following procedure to adjust cabinet temperature accordingly. -
Page 11: Cleaning And Maintenance
Cleaning and Maintenance Because this unit is intended for use with dairy products, it must be cleaned and sanitized prior to the first use, and every 72 hours during regular use. The unit goes into a cleaning lockout every 72 hours and will stay locked until the containers have been removed for cleaning. -
Page 12: Drip Tray Cleaning And Daily Wipe Down
Drip Tray Cleaning and Daily Wipe Down Step Action Remove the drip tray by lifting it up and off of the two mounting screws. Rinse the drip tray in lukewarm potable water. Place the tray in hot water at a minimum water temperature of 140°F or 60°C. A good quality general-purpose soap should be added to the hot water at the concentrations recommended by the detergent supplier. -
Page 13: Cleaning The Product Tanks
Cleaning the Product Tanks Step Action Turn off power to the unit, by placing the power switch in the OFF position. Open the front and top access doors of the unit. Place an empty cup under the dispensing tube to catch any remaining product. Open the product valve by pulling it out slightly and turning it counter-clockwise a quarter of a turn. -
Page 14: Refrigerated Product Compartment Cleaning
Refrigerated Product Compartment Cleaning Each time a new product tank is loaded, check the refrigerated product compartment for ice buildup and dairy spillage. If ice is noticeable, perform the following procedure to remove it. Step Action Turn off power to the unit, by placing the power switch in the OFF positions. Open the front and top access doors of the unit and remove the product tank(s). -
Page 15: Daily Calibration - Adjusting Shot Size
Daily Calibration - Adjusting Shot Size The dispense accuracy of the unit needs to be checked daily to ensure that the unit is dispensing within the required specifications. Perform the following procedure to adjust the shot size. Step Action If unit has been idle (no shots taken for over a half hour) take one shot of size Medium (coffee) for each product to exercise the tubes. -
Page 16: Shot Size Targets
Shot Size Targets With machine set to COFFEE Base With machine set to NEUTRAL Base ALL SHOTS ARE LISTED AND MEASURED IN ALL SHOTS ARE LISTED AND MEASURED IN GRAMS GRAMS TARGET TARGET COFFEE COFFEE LATTE LATTE CAPPUCCINO CAPPUCCINO COOLATTA COOLATTA... -
Page 17: Troubleshooting Guide
Troubleshooting Guide Complaint Cause Solution No voltage at wall receptacle Check circuit breaker or fuse Service cord pulled out of wall receptacle Replace Low voltage causing compressor to cycle on overload Contact power company and confirm that voltage fluctuation does not exceed 10% plus or minus from the nominal rating Containers are in the wrong position Check container positions (L, C, R) -
Page 18: Ordering Parts/Service
Ordering Parts/Service Contact Silver King Refrigeration at (800) 328-3329, prompt 1, for technical assistance. - Page 19 WHEN ORDERING REPLACEMENT PARTS, PLEASE PROVIDE MODEL AND SERIAL NUMBERS.
Need help?
Do you have a question about the SKDC12-ESUS1 and is the answer not in the manual?
Questions and answers
after to calibrate it.. How I can save the changes on Silver
To save changes after calibrating the Silver King SKDC12-ESUS1, follow these steps:
1. Select the product you want to calibrate (Milk, Cream, or Skim) when the display reads "Calibrate Disp Select Product".
2. Press the M button to initiate calibration, making sure a cup is placed under the valve because a medium shot will be dispensed.
3. Weigh the dispensed shot using an external scale.
4. When the display shows "Enter Weight 46 Grams", use the Up or Down arrow buttons to adjust the value on the display to match the actual weight measured.
5. Press the Select button to confirm and save the entered weight.
This process saves the calibration for that product. Once completed, you can either calibrate another product or press the Home button to return to normal operation.
This answer is automatically generated