
Related Manuals for En-Vision America ScripTalk ST400


Summary of Contents for En-Vision America ScripTalk ST400
- Page 1 ScripTalk® Printer User’s Manual Model ST400™ User’s Manual No. ST400-001 v1.0 © En-Vision America, Inc.
- Page 2 This document contains information proprietary to En-Vision America, Inc. This document and the information contained within is copyrighted En-Vision America, Inc. and may not be duplicated in full or in part by any person without written approval from En-Vision America, Inc. While every effort has been made to keep the information contained within current and accurate as of the date of publication, no guarantee is given or implied that the document is error free or that it is accurate with regard to any specification.
- Page 3 LIMITED WARRANTY (a) Supplier warrants that each ScripTalk Printer Model ST400 purchased by Veterans Administration for use at its pharmacy location(s) will be free from defects or errors in materials, design, and workmanship and will conform in all material respects to Supplier’s technical specifications. Except where this limited warranty becomes void pursuant to (b) below, this limited warranty will continue for one year from the date of Veterans Administration’s receipt of the Printer purchased.
-
Page 4: Table Of Contents
TABLE OF CONTENTS INTRODUCTION ..............1 Features of the Printer ..............2 Unpacking ..................2 Included Accessories ..............2 Parts Identification ..............3 INSTALLATION ..............6 Site Location ................. 6 Media Identification ..............6 Loading Labels ................7 Network Connection ..............10 USING THE TOUCH SCREEN .......... -
Page 5: Introduction
INTRODUCTION Thank you for your investment in the ScripTalk Printer Model ST400. The ST400 can print and program the same 2in. x 4in. ScripTalk “talking labels” previously created with model 220-SN. ScripTalk labels can be placed on any size or shape prescription container, and have an embedded RFID chip that holds all of the prescription data printed on the visual portion of the label. -
Page 6: Features Of The Printer
• Set the printer on a solid, flat surface. Inspect the shipping container and printer for any sign of damage that may have occurred during shipping. Please note that En-Vision America shall hold no liability for any damage of any kind sustained during shipping of the product. -
Page 7: Parts Identification
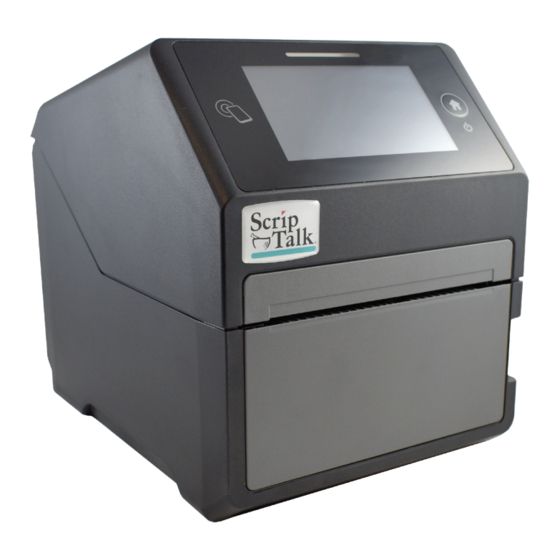
Parts Identification Front View LED Status Indicator – 3 states: Online (blue), Offline (off), Error (red). 4.3” Full Color Touch Screen – Control and configure the printer with taps and swipes. Home/Power Button – Press and hold to power ON or OFF. Press and release while ON to return to the main screen. - Page 8 Parts Identification (cont.) Back View DC Input Power Terminal – Supplies power to the printer by inserting the power plug via the power supply adapter. USB Printing Terminal – Provides printing connectivity via USB. USB Printer Update Terminal – Used to update the printer’s firmware. WARNING: DO NOT USE UNLESS INSTRUCTED TO DO SO BY SCRIPTALK TECHNICAL SUPPORT.
- Page 9 Parts Identification (cont.) Internal View with Top Cover Open Print Head – This component is used to print on the paper. Roll Media Holder – Suspends the roll of labels for smooth feeding. Platen Roller – Feeds the labels. Media Guide Slide Lever – Push backwards to unlock the Roll Media Holder slides for width adjustment.
-
Page 10: Installation
• Place it within operational distance of the host computer, within interface cable specifications. Media Identification The ScripTalk Printer ST400 requires specific label stock that can only be purchased from En-Vision America. If you need more labels, have your purchasing agent fax a PO to 309-452-3643 for the following:... -
Page 11: Loading Labels
Loading Labels CAUTION: The print head and surrounding area will be hot if the printer has been on. Keep bare skin away from these areas to avoid injury. With the power supply off, push the cover open/close latch (1) on the right side to unlock the top cover, and then open the top cover (2). - Page 12 Load the media onto the media holder so that the labels feed from the top of the roll. Pass the leading edge of the labels through the media guides and place it on top of the platen roller. Note: The black line on the label backing will be down.
- Page 13 Plug the 3-prong plug of the power cable into a grounded wall outlet or a grounded surge suppressor strip (recommended). Plug the other end of the cable into the printer’s DC Input Power Terminal. Turn on the power with the Home/Power button. When the printer is done booting up, tap the blue “OFFLINE”...
-
Page 14: Network Connection
Tap the orange “FEED” button to output one blank label, allowing it to align the next for printing. Tap the blue “ONLINE” button to make the printer ready to print. Network Connection Connect a Cat5 or faster Ethernet cable between the RJ45 port on the ST400 and your host PC or network. -
Page 15: Using The Touch Screen
USING THE TOUCH SCREEN The ST400’s color LED touch screen provides easy access to nearly all of the information, settings, and features of the printer. This section will cover only those aspects relevant to using the printer for creating ScripTalk labels. WARNING: It is recommended not to change any settings that are not covered in this section. -
Page 16: Passwords
Passwords By default, and according to Veterans Administration policy, the password requirement feature for the printer is enabled. Note: This feature should not be disabled. The touch screen interface and the printer’s web admin – accessible via the printer’s IP address in a web browser –... -
Page 17: Network Configuration
Network Configuration To set the printer’s network configuration settings, follow the steps below. 1. Turn the printer on. 2. Tap the blue “OFFLINE” button. 3. Tap the “SETTINGS” button. 4. Use the ‘level1’ password to enter the System menu. 5. Tap the orange “Interface” button. 6. -
Page 18: Troubleshooting
TROUBLESHOOTING Label Output Problems Most ScripTalk Printer troubleshooting scenarios fall into one of two categories: No Output or Faulty Output. No Output If the printer is not outputting any labels: • Try pinging the printer to establish whether basic network communication with it is present. •... -
Page 19: Reloading The Profile
Reset Types • Data – Fonts and graphics. Do not include Data in your reset unless instructed to do so by ScripTalk technical support. • Settings: User – Resets the Settings values. User (-Interface) – Performs a User Reset without resetting Interface settings. Factory –... -
Page 20: Error Codes
Error Codes Error Cause(s) Solution(s) 1001: Machine Error A defect has occurred in the product. Restart the printer. 1002: Program Error A program error occurred in the Restart the printer. memory. 1007: Cover Open 1. The top cover is open. 1. - Page 21 Error Codes (cont.) Error Cause(s) Solution(s) 1022: Print Head Overheated The temperature of the printhead has Stop the operation of the printer to exceeded its tolerance value. let the temperature decrease. 1024: Head Density Changed 1. The print head is not installed. 1.
- Page 22 Error Codes (cont.) Error Cause(s) Solution(s) 1121: Multiple Tags Are Detected Multiple ScripTalk RFID tags Check for errant labels within the detected at same time. printer, particularly in the space below the rubber feed roller. 1123: Write Tag Error 1. Tried to write to an RFID tag that was write-locked or to an tag that had more than 64 digits of EPC written to it.
-
Page 23: Specifications
SPECIFICATIONS PHYSICAL CHARACTERISTICS Width 177.8 mm (7.0”) Depth 238 mm (9.37”) Height 214.1 mm (8.43”) Weight 7.5 lbs. (3.4 kg) POWER SUPPLY Input Voltage 100-240 V AC, +/-10%, 50/60 Hz (Full range) Output Voltage 24 V DC, +/-5%, 2.7A ENVIRONMENTAL (EXCLUDING MEDIA) Operating Temperature 32°...
Need help?
Do you have a question about the ScripTalk ST400 and is the answer not in the manual?
Questions and answers