
Related Manuals for En-Vision America ScripTalk 220-SN


Summary of Contents for En-Vision America ScripTalk 220-SN
- Page 1 ScripTalk® Printer User’s Manual Model 220-SN™ User’s Manual No. 220-SN-001 v1.6 © En-Vision America, Inc.
- Page 2 This document contains information proprietary to En-Vision America, Inc.. This document and the information contained within is copyrighted En-Vision America, Inc. and may not be duplicated in full or in part by any person without written approval from En-Vision America, Inc. While...
-
Page 5: Power Supply
PRECAUTIONS FOR LOCATION AND ENVIRONMENT Be sure the surface the 220-SN printer is sitting on and the environment around it satisfy the following characteristics for reliable and safe operation. Place the printer on a surface that is flat, level, and free from vibration ... -
Page 6: Table Of Contents
TABLE OF CONTENTS 1 - INTRODUCTION………………………………………………………………………………..1 1.1 – FEATURES OF THE PRINTER………………………………………………………2 1.2 – UNPACKING…………………………………………………………………………….2 1.2.1 – INCLUDED ACCESSORIES……..……………………………………….3 1.3 – PARTS IDENTIFICATION…………..………………………………………………4 2 – INSTALLATION…………………………………………………………………………………7 2.1 – SITE LOCATION………………………………………………………………………..8 2.2 – MEDIA IDENTIFICATION………………………………………………………….8 2.3 – LOADING LABELS…………………………………………………………………….9 2.4 – CONNECTIONS………………………………………………………………………11 2.4.1 –... -
Page 7: Introduction
1 – INTRODUCTION Thank you for your investment in the ScripTalk Printer Model 220-SN. This Operators manual contains the basic information about the installation, setup, configuration, operation, and maintenance of the printer. A total of 6 topics are covered herein, and they are organized as follows: Section 1: Introduction Section 2: Installation Section 3: Network Configuration... -
Page 8: Features Of The Printer
Set the printer on a solid, flat surface. Inspect the siphhing container and printer for any sign of damage that may have occurred during shipping. Please note that En-Vision America shall hold no liability for any damage of any kind sustained during shipping of the product. -
Page 9: Included Accessories
1.2.1 – Included Accessories After unpacking the printer, verify that you have the following materials: * The shape of the power plug may vary, depending on where it was purchased - 3 -... -
Page 10: Parts Identification
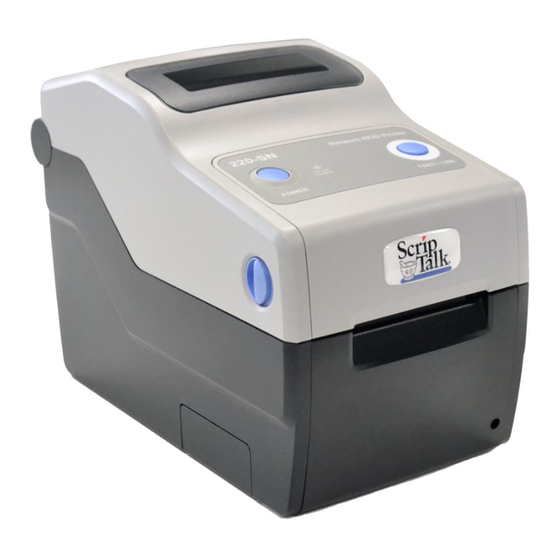
1.3 PARTS IDENTIFICATION Front View (1) Operator Panel – Consists of two contact buttons and one two- color (red and green) LED indicator. (2) Top Cover – Open this cover to load the media and ribbon. (3) Cover Open/Close Latch – Pull latches on both sides of the printer forward to open the Top Cover. - Page 11 1.3 PARTS IDENTIFICATION (CONT.) Back View (9) Top Cover (10) DC Input Power Terminal – Supplies power to the printer by inserting the power plug via the power supply adapter. (11) LAN Interface Terminal – Provides network connectivity via an RJ-45 Ethernet port.
- Page 12 1.3 – PARTS IDENTIFICATION (CONT.) Internal View with Top Cover Open (15) Print Head – This component is used to print on the paper (16) Upper Gap Sensor – Detects the gap of the label in conjunction with the Lower Gap Sensor (18) (17) Roll Media Holder –...
-
Page 13: Installation
2 – INSTALLATION This section helps you with installing ScripTalk Talking Label media (10KB) in the 220-SN, as well as adjustment instructions. The following information is provided: 2.1 - Site Location 2.2 - Media Identification 2.3 - Loading Labels ... -
Page 14: Site Location
2.2 – MEDIA IDENTIFICATION The ScripTalk Printer 220-SN requires specific label stock that can only be purchased from En-Vision America. If you need more labels, have your purchasing agent fax a PO to 309-452-3643 for the following: 00210-10K-0250 ScripTalk Labels, 10K, 250/roll The back of a ScripTalk Label will look similar to the one below. -
Page 15: Loading Labels
2.3 – LOADING LABELS 1. With the power supply off, pull the cover open/close latches (1) on both sides of the printer toward you to unlock the top cover, and then open the top cover (2). Make sure the cover rests firmly in the upright position so that it will not fall forward and injure you. - Page 16 b. Release the media guide slide lever (1) when the proper width is set. 3. Load the media onto the media holder so that the labels feed from the top of the roll. Note: The black line on the label backing will be down.
-
Page 17: Connections
2.4 – Connections This section explains the Ethernet and Power Supply Connection procedures. Note: Use of the USB port is reserved for En-Vision America technicians. Do not attempt to operate the 220-SN through this connection. 2.4.1 – Power Supply Connection To supply electrical power to the printer, follow these steps: 1. -
Page 18: Network Connection
2. Plug the 3-prong plug of the power cable into a grounded wall outlet or a grounded surge suppressor strip (recommended). 3. Plug the 4-pin plug of the power supply into the printer’s DC Input Power Terminal. Be sure to orient the plug so that the flat side faces up. -
Page 19: Network Configuration
3 – NETWORK CONFIGURATION Your 220-SN comes preconfigured with the following LAN settings: IP Address Setting: Manual Local IP Address: 192.168.254.254 Subnet Mask: 255.255.255.0 Gateway Address: 192.168.254.1 IMPORTANT: Once you’ve completed the steps below, you will need to perform the Reset and Reinitialize routine found in... -
Page 20: Troubleshooting
4 – TROUBLESHOOTING 4.1 – Error Signal Troubleshooting The ON LINE (POWER) indicator lights in different colors and patterns listed below to alert the user that an error has occurred. [Indicator sequence (shown from left to right): Off, Solid Red, Solid Green] - 14 -... - Page 21 4.1 – Error Signal Troubleshooting (cont.) - 15 -...
-
Page 22: Troubleshooting Table
Media is not set properly Set media and media guide correctly Foreign material on print head Clean print head and platen roller Damaged platen gear Contact En-Vision America for support INCORRECT LABEL POSITIONING Incorrect offset settings Perform a Default Settings Reset (see Section 4.4) - Page 23 (see Section 4.4) Foreign material on print head Clean print head and platen roller UNEVEN PRINT DARKNESS Damaged or worn platen roller Contact En-Vision America for support Foreign material on print head Clean print head and platen roller Defective print head...
-
Page 24: Network Troubleshooting
4.3 – NETWORK TROUBLESHOOTING If you are receiving no label output from the printer, ask your IT department to take these steps to determine whether there is a network issue: Ensure the network cable and ports are not defective. ... -
Page 25: Factory Reset
4.5 – FACTORY RESET To perform a factory reset on the printer, follow these steps: 1. The printer should be OFF and the cover OPEN. 2. Press and hold FEED/LINE. 3. Press and release POWER. 4. While the LED is SOLID RED, release FEED/LINE. -
Page 26: Print Configuration
4.6 – PRINT CONFIGURATION To print a 3-page configuration list, follow these steps: 1. The printer should be OFF and the cover CLOSED. 2. Press and hold FEED/LINE. 3. Press and release POWER. 4. Wait for the LED to turn SOLID GREEN, then release FEED/LINE when LED is... -
Page 27: Cleaning
5 – CLEANING This section provides information on cleaning the 220-SN printer. 5.1 – CLEANING MATERIALS AND SCHEDULE To produce optimal printing, the printer must be kept clean of the dirt and adhesive that constantly accumulates whenever feeding labels. To ensure only the proper cleaning tool is used, be sure to purchase the Thermal Printhead Cleaning Pen (Part# 00220-SN-CLEAN) from En-Vision America. -
Page 28: Parts To Clean
5.2 – PARTS TO CLEAN The image below identifies the parts that will need to be cleaned: (1) Print Head (2) Upper Gap Sensor (3) I-mark Sensor (under left Media Guide) (4) Platen Roller (5) Lower Gap Sensor - 22 -... -
Page 29: Specifications
6 – SPECIFICATIONS PHYSICAL CHARACTERISTICS Width 128 mm (5.04”) Depth 235 mm (9.25”) Height 173 mm (6.81”) Weight 3.3 lbs. (1.5 kg) POWER SUPPLY Input Voltage 100-240 V AC, +/-10%, 50/60 Hz (Full range) Output Voltage 19 V DC, +/-5%, 3A At peak times: 40 Watts / 60 VA (at 30% printing ratio) Power Consumption During standby: 2.5 Watts / 5.3 VA...
Need help?
Do you have a question about the ScripTalk 220-SN and is the answer not in the manual?
Questions and answers