Salus Controls RT310, RT310TX, RT310RF Quick Guide
- Installation manual (14 pages) ,
- Quick manual (2 pages) ,
- Full user manual (20 pages)
Advertisement
- 1 Introduction
- 2 Product compliance
- 3 Safety Information
- 4 Technical specification
- 5 Button functions
- 6 LCD Icon description
- 7 RT310 Terminals description
- 8 RXRT510 Receiver terminals description
- 9 DIP Switch Settings
- 10 RT310 Wiring diagram
- 11 RT310RF Wiring diagram
- 12 Change the Setpoint temperature
- 13 Frost Protection
- 14 Sleep Mode
- 15 Pairing the RT310TX with the Receiver
- 16 Test the pairing process
- 17 Installer Mode
- 18 Reset of the RT310 thermostat
- 19 Reset of the RT310TX thermostat
- 20 Documents / Resources
Introduction
RT310 / RT310TX / RT310RF is a digital room thermosat used to control room temperature. Device launching heating system by shorting terminal blocks, simultaneously informing the action and showing this information on the LCD display. Before use please read this manual carefully. Use only AA 1.5 V alkaline batteries in the thermostat. Place the batteries into the battery slot located under the cover. Do not use rechargeable batteries.
Product compliance
This product complies with the essential requirements and other relevant provisions of the following EU Directives: EMC 2014/30/EU, LVD 2014/35/EU, RED 2014/53/EU and RoHS 2011/65/EU. Full text of the EU Declaration of Conformity is available on www.saluslegal.com
 868.0-868.6MHz; <13dBm
Safety Information
 Use in accordance to national and EU regulations. Use the device as intended, keeping it in dry condition. Product for indoor use only. Installation must be carried out by a qualified person in accordance to national and EU regulations.
Technical specification
| RT310 | RT310TX | |
| Thermostat supply | 2 x AA alkaline batteries | 2 x AA alkaline batteries |
| Receiver supply | - | 230 V AC |
| Thermostat rating max | 3 (1) A | - |
| Receiver rating max | - | 16 (5) A |
| Outputs | Voltage free NO / COM /NC terminals | Voltage free NO / COM terminals |
| Temperature range | 5 - 35°C | 5 - 35°C |
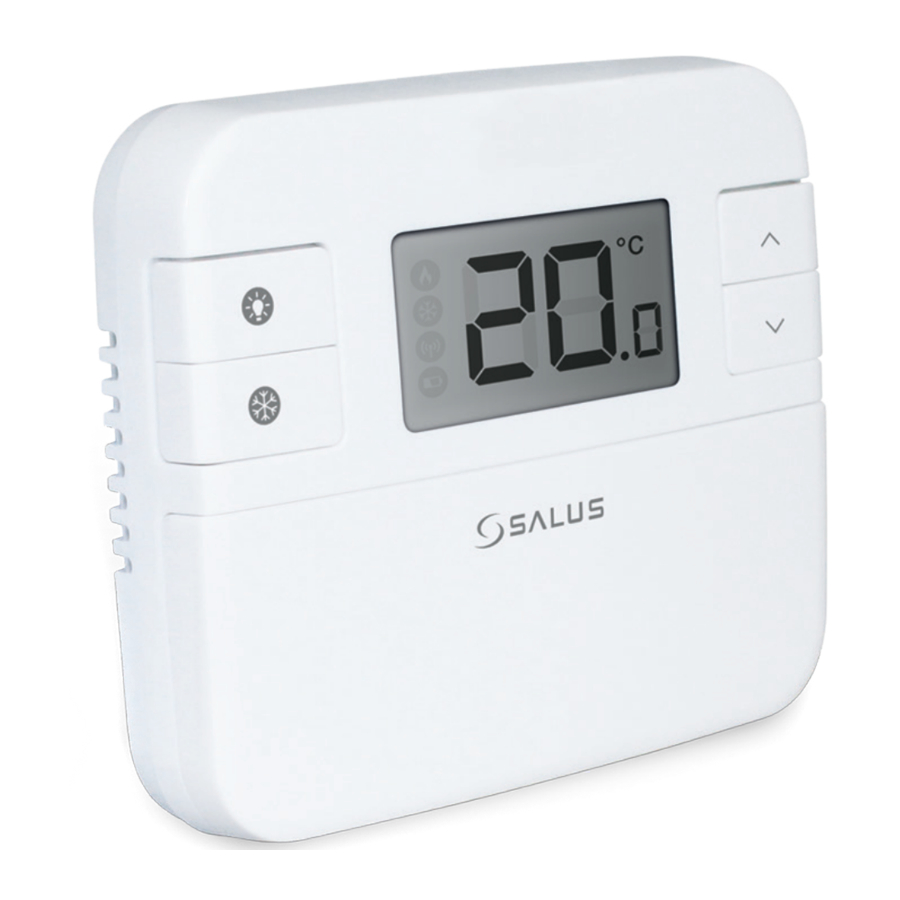
Button functions

- Turn on the LCD backlight
- Turn On/Off the Frost Mode
- Increase button
- Decrease button
- When in Manual Mode, ON will turn the boiler on.
- When in Manual Mode, OFF will turn the boiler off.
- Receiver operates in automatic mode according to the thermostat
- Receiver output is controlled by the On/Off slide switch.
LCD Icon description
![]()
- Heating Mode ON
- Frost Protection Mode ON
- RF signal indicator (only in RT310RF)
- Low battery status
- Temperature unit
- Room / setpoint temperature
RT310 Terminals description

| Terminal | Description |
| 1 - COM | Common Terminal |
| 2 - NC | Switched Live OFF |
| 3 - NO | Switched Live ON |
RXRT510 Receiver terminals description

| Terminal | Description |
| NO | Switch Terminal |
| COM | Common Switch Terminal |
| L, N | Supply (230 V AC) |
DIP Switch Settings
The DIP Switches can be found on the rear of your thermostat.

| Control feature | TPI | Span |
| Operation | When TPI is selected on DIP switch № 2, the DIP switch № 1 is functional. You can choose the Cycles Per Hour between a lower comfort level (6CPH) and a higher comfort level (9CPH). | When Span is selected on DIP switch № 2, the DIP switch № 1 is not functional. The temperature accuracy of your thermostat is set to ± 0.25°C. |
RT310 Wiring diagram

RT310RF Wiring diagram
Note: If you are using the RT310RF pack, the pairing between the thermostat and the receiver is already done.


Change the Setpoint temperature

Actual room temperature.

Press  or
or  to set the temperature.

2 seconds timeout.

Actual room temperature.
Frost Protection

Press  button to turn On/Off frost protection.
 The Frostpoint temperature can be reviewed by pressing the UP button once, but can only be changed in Installer Mode.
Sleep Mode

When Sleep Mode is active all the thermostat functions will be paused.

Press any button to stop the Sleep Mode.
Pairing the RT310TX with the Receiver
Note: If you are using the RT310RF pack, the pairing between the thermostat and the receiver is already done.
If you bought the RT310TX and RXRT510 separately or if you want to re-pair thermostat with the receiver, make sure that the device is disconnected from the power supply and the switches on the receiver have been set to AUTO and ON. Then connect the receiver to the power supply and wait for the red LED to light steadily. Then switch to the OFF position and again to ON position quickly. The red flashing LED will confirm entering the pairing mode.
Begin the pairing process

Press and hold TEST / PAIRING button for 3 seconds.
Pairing process can take up to 9 minutes.
End the pairing process

Once devices are successfully paired, LED on the receiver will go solid red. Press and hold TEST / PAIRING button for 3 seconds to end the pairing process.
Test the pairing process

Press TEST / PAIRING button to check the connection with the receiver.

Press TEST / PAIRING button again to return to the main screen.
Installer Mode

Press three buttons at the same time for 3 seconds.
| dxx | Function | Parameter | Default value |
| d01 | Temperature display increments | 0.1°C or 0.5°C | 0.5°C |
| d02 | Temperature offset | +/- 3.0°C | 0.0°C |
| d03 | Frost Protection setpoint temperature | 5.0°C - 17.0°C | 5.0°C |
Reset of the RT310 thermostat

Press the RESET button once. You can use a paper clip. Your thermostat will be reset and will start up automatically.
Reset of the RT310TX thermostat

Remove the batteries without pressing any button.
Wait 2 minutes and insert the batteries again.
Your device will be restarted.
When you want to change the batteries your device will use the internal memory to backup your settings. You have 30 seconds to change the batteries before losing your settings.
NOTE:
If you do not notice the "low battery" symbol displayed on the screen in time, it will shut down. In this case, after removing the old batteries, it is necessary to wait 5 minutes before inserting the new batteries. Otherwise, it is possible that a condenser will remain partially discharged and it can prevent the thermostat from restarting.
SALUS Controls plc
SALUS House
Dodworth Business Park South,
Whinby Road, Dodworth, Barnsley S75 3SP, UK.
T: +44 (0) 1226 323961
E: sales@salus-tech.com
E: techsupport@salus-tech.com
For PDF Installation guide please go to www.salus-manuals.com
SALUS Controls is a member of the Computime Group.
Maintaining a policy of continuous product development SALUS Controls plc reserve the right to change specification, design and materials of products listed in this brochure without prior notice.

Documents / Resources
References

Download manual
Here you can download full pdf version of manual, it may contain additional safety instructions, warranty information, FCC rules, etc.
Advertisement


Need help?
Do you have a question about the RT310 and is the answer not in the manual?
Questions and answers