Advertisement
Quick Links
IES6200-PN-16T4GS-2P48
Managed PROFINET Industrial
Ethernet Switch
Quick Installation Guide
3onedata Co., Ltd.
Address: 3/B, Zone 1, Baiwangxin High Technology
Industrial Park, Xili, Nanshan District, Shenzhen
Website: www.3onedata.com
Tel:
+86 0755-26702688
Fax:
+86 0755-26703485
【Package Checklist】
Please check the integrity of package and accessories while
first using the switch.
1
Industrial Ethernet switch
2.
DIN-Rail mounting attachment
3.
Certification
4.
Warranty card
If any of these items are damaged or lost, please contact our
company or dealers, we will solve it ASAP.
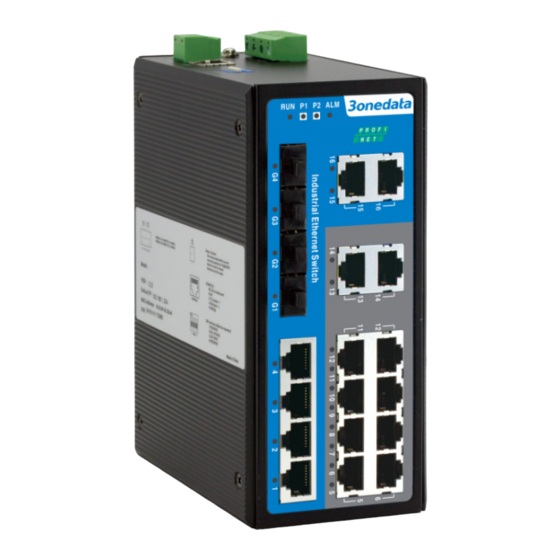
【Product Overview】
This product is 20-port 100M/Gigabit managed DIN-Rail
PROFINET
industrial
Ethernet
IES6200-PN-16T4GS-2P48 (4 Gigabit SFP fiber ports + 16
100M copper ports + 2 12~48VDC power supplies).
【Panel Design】
Front view and right view
Rear view, Bottom view and Top view
1.
2.
3.
4.
5.
6.
7.
8.
9.
10.
switch.
The
model:
11.
12.
13.
Device running status indicator RUN
Power supply indicator P1/P2
Relay alarm status indicator ALM
Gigabit fiber port (SFP slot)
Gigabit fiber port indicator
100M copper port
100M copper port indicator
DIN-Rail mounting kit
Power input terminal (PWR1, PWR2)
Grounding screw (Protective grounding)
Relay alarm output terminal block (2 pins)
Console port
DIP switch
【Mounting Dimension】
Unit: mm
Notice Before Mounting:
Don't place or install the device in area near water or
moist, keep the relative humidity of the device
surrounding between 5%~95% without condensation.
Before power on, first confirm the supported power
supply specification to avoid over-voltage damaging the
device.
The device surface temperature is high after running;
please don't directly contact to avoid scalding.
【DIN-Rail Mounting】
The product adopts 35mm standard DIN-Rail mounting which
is suitable for most industrial scenes, mounting steps as
follows:
Check if the DIN-Rail mounting kit is installed firmly.
Clip the upper part of the DIN-Rail mounting kit, i.e.
the fixed side, into the DIN rail.
Press the lower side of the device and insert the
lower part of DIN-Rail mounting kit (the side with
Advertisement

Subscribe to Our Youtube Channel
Related Manuals for 3onedata IES6200-PN-16T4GS-2P48


Summary of Contents for 3onedata IES6200-PN-16T4GS-2P48
- Page 1 Relay alarm output terminal block (2 pins) the fixed side, into the DIN rail. IES6200-PN-16T4GS-2P48 (4 Gigabit SFP fiber ports + 16 Console port Press the lower side of the device and insert the 100M copper ports + 2 12~48VDC power supplies).
- Page 2 spring support) into DIN-Rail. PWR1 PWR2, which supports non-polarity status, which has simplified the overall troubleshooting Tips: process. The function of each LED is described in the table anti-reverse connection function, that the device can work The DIN-Rail spring support is a metal sheet that can below: normally after reverse connection.
- Page 3 Gigabit SFP 1000Base- X, SFP slot 100M copper port 10/100Base-T(X), RJ45, Automatic Flow Control, Full/half Duplex Mode, MDI/MDI-X Autotunning Console port CLI command management port (RS-232), RJ45 Alarm interface 2-pin 7.62mm pitch terminal blocks, support 1 relay alarm Click “Login” button to login to the WEB interface of output, current load capability is the device.
Need help?
Do you have a question about the IES6200-PN-16T4GS-2P48 and is the answer not in the manual?
Questions and answers