Table of Contents
Advertisement
Quick Links
PROPER USE GUIDELINES
Cumulative Trauma Disorders can result from the prolonged use of manually powered hand tools. Hand tools are intended for occasional use and low volume
applications. A wide selection of powered application equipment for extended- - use, production operations is available.
1. INTRODUCTION
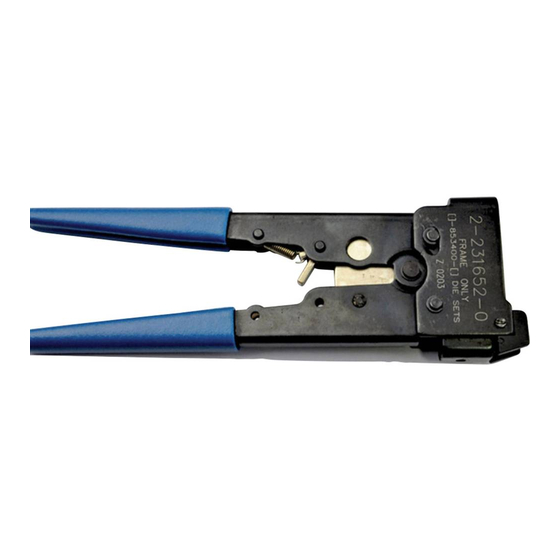
Modular Plug Hand Tools 231652--[ ] (shown in
Figure 1) are designed to terminate modular plug
connectors onto stranded or solid, shielded or
unshielded flat oval cable or round cable. The tool
also cuts and strips unshielded flat oval cable; other
cable must be prepared by separate tools.
Each tool includes Die Set 853400--[ ] (see Figure 2),
except Tool 2--231652--0 which is available without a
die set. The die sets are also available separately.
All numerical values in this instruction sheet are
NOTE
in metric units [with U.S. customary units in
i
brackets]. Dimensions are in millimeters [and
inches]. Figures are not drawn to scale.
Die
Holding
Indenter (Die)
Screw
Color Code Dot
Cable
Cutter
Flat
Oval
Cable
Stripper
Ratchet
Release
(Pawl)
CAUTION
!
Figure 1
Modular Plug Hand Tools
(Premium Grade) 231652- [ ]
Nest (Die)
Color Code
Dot
Ratchet
Handle
DO NOT cycle the tool
without a die in place;
otherwise, damage to the
stripping blades may occur.
Reasons for reissue of this instruction sheet are
provided in Section 8, REVISION SUMMARY.
2. DESCRIPTION
(Figure 1)
The die set consists of a nest and an indenter, each
marked with a color code dot. The die set is held in
the tool by a single die holding screw. Each die set
is unique to its purpose, but die sets can be
interchanged to accommodate any modular plug.
Refer to Figure 2.
The tool features a wire cutter and flat oval cable
stripper to prepare unshielded flat oval cable. The tool
handle ensures full crimping. Once engaged, the
ratchet will not release until the handles have been
FULLY closed, unless the ratchet release (pawl) is
depressed to manually release the ratchet. When
depressed, the pawl prevents crimping of an
improperly positioned modular plug.
CORRESPONDING DIE SET
TOOL
PART
NUMBER
2- - 231652- - 1
853400- - 1
2- - 231652- - 3
853400- - 3
2- - 231652- - 6
853400- - 6
2- - 231652- - 7
853400- - 7
2- - 231652- - 8
853400- - 8
3- - 231652- - 0
1- - 853400- - 0
3- - 231652- - 5
1- - 853400- - 3
3- - 231652- - 6
1- - 853400- - 4
The BLACK color--coded tool and die set can be used for non--keyed
G
modular plugs; however, the RED color--coded tool and die set are more
durable when crimping non--keyed modular plugs.
Figure 2
Instruction Sheet
408- - 9767
22 JUL 09 Rev L
COLOR
DESCRIPTION
CODE
(Modular Plug
DOT
Type)
8--Position
Line, Blue (Small
Black
Conductor), Keyed,
Non- - KeyedG,
Shielded
Green
4--Position Handset
6--Position
Orange
Offset Latch
6--Position
Violet
Long Body
2- - , 4- - , 6- - Position
Blue
Line, Blue (Small
Conductor)
8--Position
White
High Performance
8--Position
Line, Blue (Small
Red
Conductor),
Non- - KeyedG
8--Position Slimline
Gray
Cat6/6A
Advertisement
Table of Contents

Related Manuals for Tyco Electronics 2-231652-1


Summary of Contents for Tyco Electronics 2-231652-1
- Page 1 Instruction Sheet 408- - 9767 Modular Plug Hand Tools (Premium Grade) 231652- [ ] 22 JUL 09 Rev L PROPER USE GUIDELINES Cumulative Trauma Disorders can result from the prolonged use of manually powered hand tools. Hand tools are intended for occasional use and low volume applications.
- Page 2 UP). Insert cable into modular plug until fully plug bottoms in the die cavity but the locking latch bottomed. does not snap into position. 2 of 7 Rev L Tyco Electronics Corporation...
- Page 3 Step 3 Handles Closed Step 3 Modular Plug in Fully Seated Position Step 4 Cable Strip Length 12.7- - 14.3 [.50- - .56] (Ref) Note: Not to Scale Figure 4 Figure 5 Rev L 3 of 7 Tyco Electronics Corporation...
- Page 4 1. Close tool handles until the dies bottom, but DO End of Wire Circuits 0.00- - 0.25 NOT release the handles. High Performance [.000- - .010] 2. Loosen the two screws that hold the movable Figure 6 blade assembly. 4 of 7 Rev L Tyco Electronics Corporation...
- Page 5 Remove fixed blade assembly and movable wear or damage to the die set or tool head requires blade assembly from tool. removal of the affected part from service. Rev L 5 of 7 Tyco Electronics Corporation...
- Page 6 4. Test for proper crimp height according to CUSTOMER SERVICE (038--035) Section 4, Step 4. If plug crimp height is within TYCO ELECTRONICS CORPORATION acceptable limits, lightly lubricate the tool and die PO BOX 3608 set, and place it back into service. If the crimp HARRISBURG PA 17105--3608 69.8 [2.75]...
- Page 7 1- - 231666- - 4 Tool, 4-- and 6--Position Line Die Set, 8- - Position Die Set, 6- - Position Long Body Die Set, and 8- - Position High- - Performance Die Set Figure 10 Rev L 7 of 7 Tyco Electronics Corporation...
Need help?
Do you have a question about the 2-231652-1 and is the answer not in the manual?
Questions and answers