Ingenico AXIUM DX8000 Quick Start Manual
Hide thumbs
Also See for AXIUM DX8000:
- User manual (32 pages) ,
- User manual (33 pages) ,
- User manual (12 pages)
Table of Contents
Advertisement
Quick Links
Quick Start Guide
AXIUM DX8000
GETTING STARTED
Set up your DX8000 in a convenient location close to a power source. Connect the power cable to the power
supply and the USB connector socket of the terminal.
CHANGING THE PAPER ROLL
Hold the terminal in one hand. Open the paper roll compartment by lifting the catch located at the top of the
DX8000. Fully open the printer cover and remove the old paper roll.
Unstick the end of the new roll and insert the paper roll in the compartment as shown below:
Pull the paper to the top of the terminal. Holding the free end of the paper, close the cover. Press
simultaneously on both upper corners of the cover until it clips into position.
ONLY OPEN THE PRINTER COVER AS SHOWN - DO NOT FORCE THE PRINTER COVER
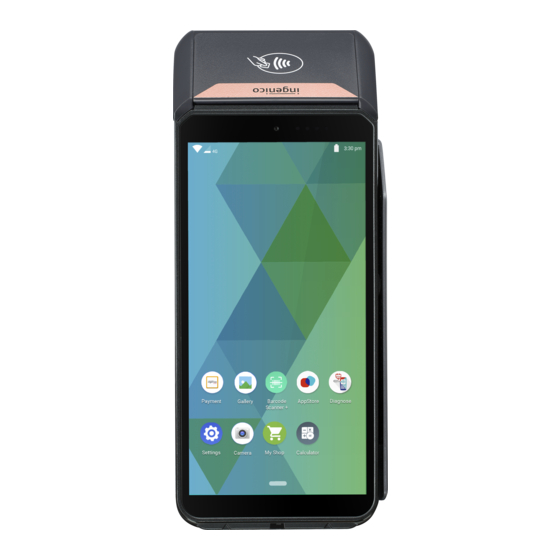
Contactless Card
Read Area
Contactless Card
Indicator
Front Camera
Magnetic Card
Reader
Screen
Smart Card
Reader Slot
Rear Camera
Flash Light
Battery
Compartment
Base Charging
Connectors
Speaker
Paper Roll
Compartment
Power Key
Volume Keys
USB Connector
Port
DIV434837A rev3
Advertisement
Table of Contents

Related Manuals for Ingenico AXIUM DX8000


Summary of Contents for Ingenico AXIUM DX8000
- Page 1 Quick Start Guide AXIUM DX8000 GETTING STARTED Set up your DX8000 in a convenient location close to a power source. Connect the power cable to the power supply and the USB connector socket of the terminal. Contactless Card Read Area...
- Page 2 INSTALLING THE TERMINAL Power the terminal on by pressing the The terminal will power key for 3 to scan for local 4 seconds. From Select Open available networks the initial power settings. and provide a list on screen swipe to select from. up, then tap the NER PAY icon.
- Page 3 THE CHIP CARD READER Customer cards must be inserted as shown, with the chip upwards. Push the card fully into the slot below the screen and follow the instructions on screen. If you see a “Please Insert Again” message, check the card orientation and try again.
- Page 4 The terminal will now connect to the acquirer for authorisation, if the refund is authorised then “REFUND ACCEPTED” will be shown. The terminal will print the merchant receipt which the customer must sign. Remove the card. Check the signature on the merchant copy with that on the card.
- Page 5 Transaction Receipt – (Merchant Copy – CHIP & PIN card) Merchant ID Terminal ID Card AID & Label Card Issuer Card Number Entry Method ICC for Inserted Cards SWIPED for Swiped Cards Transaction Type KEYED for Keyed Cards CONTACTLESS for Contactless Cards Successful PIN Entry Date &...
- Page 6 Mail Order – SALE Change the selected service to Customer Not Present. This is achieved by tapping the icon in the top right of the display. Tapping the Select Service option popup and selecting the Customer Not Present option presented. Select the appropriate card capture detail option for the transaction.
- Page 7 This Quick Start Guide relates to AXIUM DX8000 terminal – NER PAYMENT software. Whilst every effort has been made to ensure that the content of this document is accurate, Ingenico will not accept responsibility for any loss, damage or injury that may be incurred as a result of any errors or inaccuracies. The product is varied to suit requirements and as such some features may vary or be disabled.
Need help?
Do you have a question about the AXIUM DX8000 and is the answer not in the manual?
Questions and answers