Table of Contents
Advertisement
Advertisement
Table of Contents

Related Manuals for Ingenico AXIUM D7


Summary of Contents for Ingenico AXIUM D7
- Page 1 AXIUM D7 User Guide...
-
Page 2: Table Of Contents
Contents 1_Introduction 2_Presentation 2_1 Content of the box 2_2 Overview of the AXIUM D7 3_Prepare your terminal 3_1 Connect the battery 3_2 Install SIM & MicroSD 3_3 Install SAM 3_4 Switch On/Off the terminal 4_Charge your terminal 4_1 Battery characteristics... - Page 3 7_Docking station 8_Recommendations 8_1 Safety 8_2 Security of your terminal 9_Standards 10_Troubleshooting 11_Marking Copyright© 2019 Ingenico All rights reserved AXIUM D7 900034667 R11 000 04/0119...
-
Page 4: 1_Introduction
WARRANTY / SECURITY Use only the power supply included with the product to ensure best performance and safety. Maintenance should only be provided by Ingenico authorized technician. Failure to comply with these instructions will void the manufacturer’s responsibility. This symbol indicates an important Warning. -
Page 5: 2_Presentation
2_Presentation 2_1 Content of the box AXIUM D7 terminal unit equipment Payment side with small display and physical keyboard Merchant side (Android User Interface) with a 7 inch display and touch panel interface. Android is a trademark of Google LLC. - Page 6 Power supply and USB-C cable WARNING The power supply unit provided with your equipment is specially designed for Ingenico terminals. Do not use any other power supply. The use of a power supply with apparently similar voltage/current characteristics may damage your terminal.
-
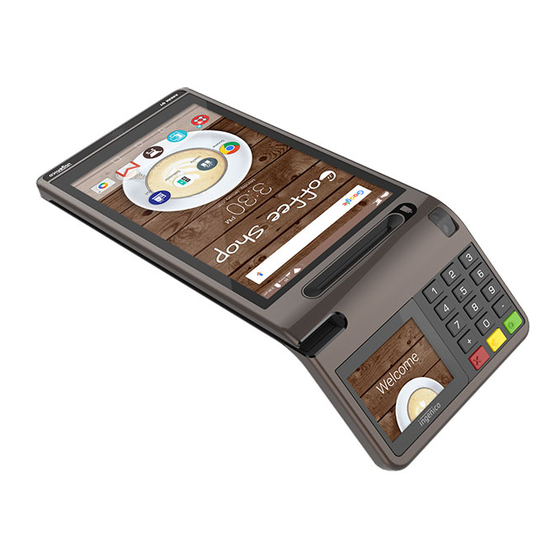
Page 7: 2_2 Overview Of The Axium D7
2_2 Overview of the AXIUM D7 Front camera 7inch Display with Touch Panel Smart Card Reader Keyboard with backlight Magnetic Card Reader Contactless Reader around the display 2.4inch Display with Touch Panel Copyright© 2019 Ingenico All rights reserved AXIUM D7... -
Page 8: 3_Prepare Your Terminal
Disengage the trapdoor Take the battery pack included in the box Locate the battery pack connector beside the battery compartment Copyright© 2019 Ingenico All rights reserved AXIUM D7 900034667 R11 000 04/0119... -
Page 9: 3_2 Install Sim & Microsd
3_2 Install SIM & MicroSD Turn your terminal and unclip the battery trapdoor by pushing on it as shown on the picture Disengage the trapdoor Access to the connectors below the battery Copyright© 2019 Ingenico All rights reserved AXIUM D7 900034667 R11 000 04/0119... - Page 10 MicroSIM format (3FF) or NanoSIM format (4FF) inserted in a MicroSIM adaptor SIM1 SIM2 MicroSD (option) connector To Remove the microSD OR MicroSIMs, please push slightly it and it will come out. Copyright© 2019 Ingenico All rights reserved AXIUM D7 900034667 R11 000 04/0119...
-
Page 11: 3_3 Install Sam
SAMs are identified by the engraved marks on the lower housing When introducing a SAM in its slot, be sure to put the cut corner as indicated on the engraved marks SAM#2 connector SAM#1 connector Copyright© 2019 Ingenico All rights reserved AXIUM D7 900034667 R11 000 04/0119... -
Page 12: 3_4 Switch On/Off The Terminal
In order to restart the terminal, press the ON/OFF key. 4_Charge your terminal 4_1 Battery characteristics Characteristics Li-Ion Polymer Capacity 4000mAh Charging voltage 4.2V Charging Current (Max) 1.5A Battery Life 500 cycles (80 % of capacity) Copyright© 2019 Ingenico All rights reserved AXIUM D7 900034667 R11 000 04/0119... -
Page 13: 4_2 Charge Of The Battery
How does the battery need to be charged? When used with a terminal power supply: connect the power supply to AXIUM D7 USB-C connector. (located on the left side of the product) Using the docking station, Place the terminal on its docking... -
Page 14: 4_3 Changing The Battery
It will then correctly perform-full recharge with the next battery. Main battery Axium D7 is fitted with battery specially designed for this terminal. Only use the appropriate chargers and batteries listed in the Ingenico’s catalogue. Do not short-circuit the battery. - Page 15 Copyright© 2019 Ingenico All rights reserved AXIUM D7 900034667 R11 000 04/0119...
- Page 16 The yellow key cancels the last characters 5_2 Touch panel on consumer side The AXIUM D7 device is equipped with touch panel allowing to capture functions and menus using your finger or a stylus. Copyright© 2019 Ingenico All rights reserved...
-
Page 17: 5_3 Reading Card
Use a regular movement in order to ensure a reliable card reading. Smart Card reader Insert the card vertically with the chip facing the customer and leave in position throughout the transaction. Copyright© 2019 Ingenico All rights reserved AXIUM D7 900034667 R11 000 04/0119... -
Page 18: 5_4 Fcc/Ic Compliance
- Connect the equipment into an outlet on circuit different from that to which the receiver is connected. - Consult the dealer or an experienced radio/TV technician for help. This device complies with Industry Canada licence-exempt RSS Copyright© 2019 Ingenico All rights reserved AXIUM D7 900034667 R11 000 04/0119... - Page 19 Intended use and SAR evaluation The AXIUM D7 is an Android Point of Sale (POS) terminal. This professional device is composed of two parts. The Android side is the merchant interface that embeds an Electronics Cash Register (ECR).
- Page 20 (~535gr) and its height (265 x 120 mm) do not allow to wear it easily in a holster or in a shirt. Hand held SAR evaluation for "extremity SAR test ONLY" has been applied. Copyright© 2019 Ingenico All rights reserved AXIUM D7 900034667 R11 000 04/0119...
-
Page 21: Installation
6_Installation / Recommendations Location of the AXIUM D7 Place the terminal on flat surface near an electric socket. The terminal should be placed far from any very hot zones, protected from vibrations, dust, damp and electromagnetic radiation (computer screen, anti-theft barrier etc.). - Page 22 3 USB Ports Printing capability Ethernet and Wifi (option) AXIUM D7 can be charged with a dedicated Ingenico docking Station. On the back of the product there are some contacts for charging when the device is put on the docking station.
- Page 23 Disconnect the AXIUM D7 power supply block adapter from the electrical mains network. Lithium cell The AXIUM D7 is fitted with an internal lithium cell which can only be accessed by a qualified technician. Battery AXIUM D7 is fitted with battery specially designed for this terminal.
- Page 24 The terminal must never be put in or left at a location where it could be stolen or replaced by another device. Copyright© 2019 Ingenico All rights reserved AXIUM D7 900034667 R11 000 04/0119...
- Page 25 CAUTION Positioning of the AXIUM D7 on check stand must be in such a way to make cardholder PIN (Personal Identification Number) spying infeasible. Installing device on an adjustable stand must be in such a way that consumers can swivel the terminal sideways and/or tilt it forwards/backwards to a position that makes visual observation of the PIN-entry process difficult.
- Page 26 9_Standards The CE marking indicates AXIUM D7 complies with the relevant Union harmonization legislation: RE Directive 2014/53/ EU for : the protection of the health and the safety of the user and any other person. the protection requirements with respect to electromagnetic compatibility.
- Page 27 Verify that the magnetic strip is not damaged, grooved or cracked Make sure you have inserted correctly the smart card into the smart card reader and removed the card only after the transaction is performed. Copyright© 2019 Ingenico All rights reserved AXIUM D7 900034667 R11 000 04/0119...
- Page 28 (These products must NOT have a safety connection to Earth). Indoor use symbol. This marking indicates power supply meets limited power source safety requirements. Copyright© 2019 Ingenico All rights reserved AXIUM D7 900034667 R11 000 04/0119...
- Page 29 28-32, boulevard de Grenelle, 75015 Paris - France / (T) +33 (0)1 58 01 80 00 / (F) +33 (0)1 58 01 91 35 Ingenico - SA au capital de 47 656 332 / 317 218 758 RCS Nanterre Copyright© 2019 Ingenico...
Need help?
Do you have a question about the AXIUM D7 and is the answer not in the manual?
Questions and answers