
Related Manuals for ResMed Nox A1


Summary of Contents for ResMed Nox A1
- Page 1 How to use your Nox A1 ™ ambulatory recordings Noxturnal version 5.1 ResMed.com/NoxA1...
-
Page 2: Table Of Contents
Contents Nox A1 system …………………………………………………………………………………………………………………………………… page 3 Configure a recording ……………………………………………………………………………………………………………………………… page 7 Patient hook-up …………………………………………………………………………………………………………………………………… page 14 Check signals ……………………………………………………………………………………………………………………………………… page 26 Clean devices and accessories ………………………………………………………………………………………………………………… page 38 Score a recording Download data …………………………………………………………………………………………………………………………………… page 41 Analyse data ……………………………………………………………………………………………………………………………………… page 42 Generate a report …………………………………………………………………………………………………………………………………... -
Page 3: Nox A1 System
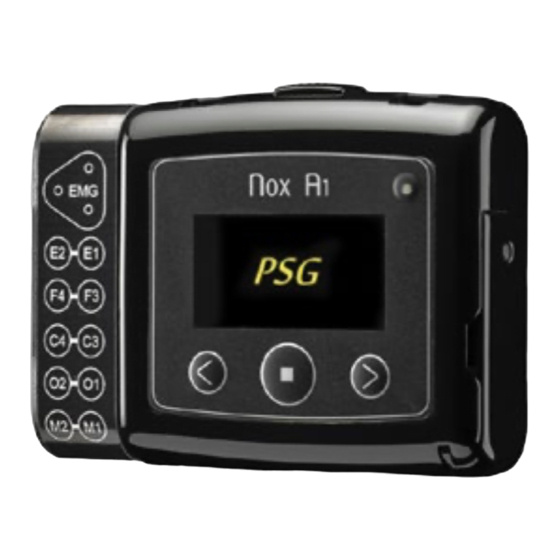
Nox A1 system Accessories Devices Consumables USB cable Abdomen cable Nasal cannula with filter x2 Nox A1 Recorder EKG and PLM cables EEG head cable Disposable RIP belts (Sizes: XSx1, Sx1, Mx1, Lx1, XLx1) EEG 5 lead gold Noxturnal software CD Nonin 3150 oximeter Battery 1.5V AA x2... - Page 4 Nox A1 system NUMBER FUNCTION Unipolar input - EEG channels Display Push button - Turn on the device Reference ground input Push button - Forward Bipolar inputs - EKG and PLM inputs Push button - Backward Battery lid - Covers the battery and the USB connector...
- Page 5 Differential pressure sensor Braebon PT1 0580 ™ Can be connected to one of the bipolar inputs of the Nox A1. Records patient flow when 7073482 using a therapy device. For pressures up to 20 cmH Differential pressure sensor Braebon 0580PES Can be connected to one of the bipolar inputs of the Nox A1.
- Page 6 Nox A1 system • Ambulatory study Clean Configure Insert Check Download Patient devices and a recording batteries signals data hook-up accessories...
-
Page 7: Configure A Recording
Configure a recording... - Page 8 • Connect the Nox A1 Open Noxturnal software on your computer. Open the battery lid of the Nox A1 using the opening tool provided and connect the device to the USB port of the computer. In Noxturnal software, click on Recording >...
- Page 9 Configure a recording • Step 1: Select a recording type Choose a suitable recording type from the drop-down list. Enter the BDA number shown on the back of your oximeter. Click on Next to continue.
- Page 10 Configure a recording • Step 2: Schedule recording “Start Recording At” option is recommended. Select The number of nights The start time The date The duration Click on Next to continue.
- Page 11 Configure a recording • Step 3: Enter patient information Add information on the patient’s identity and physical characteristics. Add at least patient’s First and Last names or patient ID before finishing. The Tags fields can be used to link keywords to the patient in order to easily find him later in the recordings library.
- Page 12 Configure a recording • End configuration Click on Finish to close this window and disconnect the device.
- Page 13 Configure a recording • Insert batteries Insert a new lithium battery or a fully recharged NiMh battery into the Nox A1 device. For the Nox A1: 1 AA battery For the Nonin 3150 oximeter: 2 AAA batteries • Lithium batteries are recommended. They last for up to 15h of Alkaline batteries last for up to 24h.
-
Page 14: Patient Hook-Up
Patient hook-up... - Page 15 Patient hook-up • Attach the device and the belts 2 - Wrap the RIP belt around the patient’s 1 - Clip the abdomen cable to the back of the device and snap the clips thorax and snap it at the back of the device.
- Page 16 2 disposable adhesive electrodes (PN 7075209) Electrode site: Scrub the patient’s skin with NuPrep before placing the adhesive electrodes. Under the right clavicle. On the 7 left rib. Connection to the Nox A1: The EKG cable must be plugged into the bipolar EKG channel.
- Page 17 Electrodes must be placed on the tibialis anterior muscle. If needed, secure the electrodes with tape and/or a Surgilast net. Connection to the Nox A1: Connect the black cable (left leg) to the LM1 bipolar input and the grey cable (right leg) to the LM2 bipolar input.
- Page 18 1 - 2 cm below the inferior border of the mandible and 2 cm right of the midline. 2 - 2 cm below the inferior border of the mandible and 2 cm left of the midline. Connection to the Nox A1: Connect corresponding electrodes to the inputs F, 1 and 2.
- Page 19 Patient hook-up • Place the EEG head cable Before attaching the electrodes, it is important to properly position the ground reference of the EEG head cable. 1 - Choose a snap-on electrode and place 3 - Connect the 2 EEG lead cables as the EEG head cable as shown below: shown below: 2 - Scrub the patient’s forehead with...
- Page 20 Patient hook-up • Place the electrodes (10/20 system) E1 and E2 are respectively 1 cm below the left eye and 1 cm above the right eye. O1 and O2 are 3 cm below the occipital protuberance and 3 cm from the midline. C3 and C4 are on the pre-auricular points axis and 7 cm from the midline.
- Page 21 Patient hook-up • Attach the EEG electrodes Equipment needed: NuPrep abrasive gel 1 - Scrub the different electrode sites with NuPrep and a cotton bud. (PN 7073511) Remove excess gel with gauze. Ten20 conductive paste 2 - Fill the cups with Ten20 conductive paste and place them (PN 7073512) on the correct spots.
- Page 22 You can put a little piece of tape on the cannula on either cheek to hold it securely in place. • Connect the nasal cannula with the filter to the pressure input of the Nox A1.
- Page 23 Patient hook-up • Attach the oximeter 1 - Place the oximeter on the patient’s left wrist if they 3 - Wrap tape around the finger to secure are right-handed or on their right wrist if they are the sensor cable. left-handed.
- Page 24 Connect the pressure tubing to the mask and the Nox A1: 1 - Insert a filter into the pressure input of the Nox A1, where you would usually insert the nasal cannula. 2 - Screw the male luer-lock connector of the pressure tubing into the filter.
- Page 25 2 - Connect the transparent part of the flow sensor to the patient tubing. 3 - Connect the red and black cable to input 1 or 2 of the Nox A1. 4 - Connect the white cable to the black and red cable and plug it into the Airflow input of the differential pressure sensor.
-
Page 26: Check Signals
Check signals... - Page 27 - Check Nox A1 status and parameters (battery status, device profile, start time, etc.) How to use: Turn on the Nox A1 and open the app. Check that the app is in Ambulatory Mode (if needed, change the app mode in the settings ).
- Page 28 Check signals • Overview Start/Stop a recording Disconnect from the Nox A1 PATIENT Enter or modify patient information. CONFIG Choose recording type and recording start date and time. SENSORS Check signal quality and impedance. BIOCAL Perform biocalibration. TRACES View live signals.
- Page 29 Check signals • Verify the recording configuration On this tab you can: • Verify and/or choose the recording type • Enable or disable the audio playback • Verify or choose the Bluetooth address of your oximeter • Enter the start date and time of the recording Save modifications...
- Page 30 Check signals • Check signal impedance The Sensors tab gives an overview of the status of all sensors. The colour code is: Sensor well-placed / Good impedance value Correct impedance value Sensor incorrectly placed / Bad impedance value Note: shows the worst rating impedance value of all EEG electrodes.
- Page 31 Check signals • Check signal impedance Click on Start impedance check. Wait for about 10 sec for the impedances to be displayed. Note: ExG signal quality is degraded during an impedance check. The test ends when you change tab or when you disconnect from the device.
- Page 32 Check signals • Check signal impedance Impedance: Fair connection 0-5kΩ: Good connection 5-20kΩ: Fair connection Good connection >20kΩ: Bad connection >100kΩ: No contact Bad connection Re-attach the electrode if the impedance colour is red or black. Cable colour...
- Page 33 Check signals • Biocalibration Biocalibration is a visual check of the quality of every respiratory and ExG signal. Note: The recording must be ON to access biocalibration. Signals and events will be saved in the device and included in the night recording. Click on Start recording to record signals and score biocalibration events.
- Page 34 Check signals • Biocalibration Choose the biocalibration task Click on Score event if the result is as expected. For example: • Task Hold breath for 10 seconds. • Expected result: All respiration gauges run flat. Choose the biocalibration procedure. (You can create your own procedure using the Noxturnal software).
- Page 35 Check signals • View signals Reset default scale. Automatically adjust signals scale. Use two fingers to zoom in on the signals and the scale. Press twice on a signal to change its height and scale.
- Page 36 Check signals • Check device status and configuration Before closing the app, check all information on the device tab, especially: • Device time • Scheduled recording start time Click on to disconnect the Nox A1 from the app.
- Page 37 Check signals • End of the signal check Push the central button to turn on the device and check that: - The device time is correct - The battery level is high enough - The countdown corresponds to the recording start time Device time Battery indicator Countdown...
-
Page 38: Clean Devices And Accessories
Clean devices and accessories... - Page 39 Clean the devices (recorder and oximeter) and the accessories between each patient according to the procedure below. Effort belts and nasal cannula are single use and must be changed between each patient. Procedure Nox A1 To disinfect the different components, the following cleaning agents can be used: • 70-90% isopropanol •...
-
Page 40: Score A Recording
Score a recording... -
Page 41: Download Data
Download data • Download a recording Connect the device to the computer using the USB cable and click on Download Recording. Noxturnal automatically starts downloading and analysing data. Download and analysis progress is displayed. The process should take about 10 minutes. -
Page 42: Analyse Data
Analyse data • Results page The recording results page is arranged as follows: Patient information Sleep stages Severity indicator Signals and events overview Analysis statistics Commands... - Page 43 Analyse data • Change patient information Click on Edit or on the patient icon to complete or modify patient information.
- Page 44 Analyse data • Define start and end of analysis Move the markers highlighted below to manually define the start and end of the analysis. Recording statistics on the right side are automatically adjusted after every modification. You will find the same markers on every signal sheet.
- Page 45 Analyse data • Exclude part of the recording Click and drag your mouse in the Periods area below and select Score Invalid Data. To delete an invalid data period, click on the red hatched area and click on Delete period.
- Page 46 Analyse data • Check signal quality Check the quality of recorded signals by running the mouse over the Quality icon. If the signal quality is poor, the validity of the overall recording should be questioned. SpO2 Quality Airflow Quality Abdomen Quality Thorax Quality Please note that if problematic areas of the study are excluded the signal quality will increase and study will...
- Page 47 Analyse data • Configure your workspace: select and arrange signals Click on the Signals & Data tab on the right side of your screen and select the signals to display. Check the boxes of the signals you want to display. To move signals in the workspace, click on them when the mouse is shaped like a hand and drag them up and down.
- Page 48 Analyse data • Configure your workspace: create a workspace layout Click on and select New Workspace Layout to create a personalised layout. Enter a name and click on OK. Your new workspace layout is now in the drop down list. You can load it, modify it and save the changes using the menu.
- Page 49 Analyse data • Score events Keyboard Event shortcut To score an event, click and drag over the zone of interest and type the Obstructive apnea letter of the event: Central apnea Mixed apnea Hypopnea Desaturation To delete or modify an event, use one of the following methods: - Click on the event and press the Delete key - Hold the Alt key and click on the event - Right click on the event and select the intended option...
- Page 50 Analyse data • Use filters and reading scale Signals High-pass filter Low-pass filter Usual reading scale EEG (C3, C4, F3, F4, O1, O2, M1 and M2) 0.3 Hz 35 Hz 70 μv/cm EOG (E1 and E2) 0.3 Hz 35 Hz 100 μv/cm EMG (Chin 1-F and 1-2, left/right leg) 10 Hz...
-
Page 51: Generate A Report
Generate a report • Add a screenshot To take a screenshot of a recording, click on the Bookmark tab at the bottom left of your screen. Click on Add bookmark, enter a description of the screenshot and click on OK. If you don’t want this screenshot to appear in the report, uncheck the corresponding box or delete the bookmark. - Page 52 Generate a report • Write an interpretation and generate a report Click on the patient icon and then on Interpretation Notes to access the writing window. Once your interpretation is written, click on OK at the bottom right to confirm. Then go to the Report menu and select the appropriate report.
-
Page 53: Open An Existing Recording
Open an existing recording Click on Library to access existing recordings. Use the Search for… field to find your patients more quickly. -
Page 54: Troubleshooting
Troubleshooting... - Page 55 Solution 2 Press the grey activation button on the left top of the oximeter for two seconds I can’t connect to the Nox A1 Solution 1 Remove and re-insert again the battery into the Nox A1 and try again EEG signals appear to be erroneous Solution 1 Check the signal impedance.
- Page 56 Open the battery door of the Nox A1. Push and hold the central and right buttons simultaneoustly. Plug the mini USB cable into the device. Make sure that the word Erasing is displayed on the screen of the Nox A1.
- Page 57 Troubleshooting: Reset a Nonin 3150 WristOx2 oximeter If the Nonin 3150 WristOx2 oximeter does not perform as expected, it is recommended that you follow the reset process described below: Remove the two batteries and disconnect the probe from the oximeter. Wait for 1 minute and reinsert the batteries.
- Page 58 Noxturnal toolbar Button Description Open the menu to add new sheets and to personalise your workspace layout Create a new workspace Open a recording Undo the last action Open the recording properties Change the time interval of your window Automatically adjust the size of signals to fit into the window Automatically adjust the scale of each signal Open the advanced menu of the sheet Activate audio playback of the recording...
-
Page 59: Consumables And Accessories
Consumables and accessories... - Page 60 Consumables and accessories Consumables kits 7072596 Nox RIP Belts and Cannula Kit (Abdomen cable, Nasal cannulas x80, RIP Belts: Sx20-Mx40-Lx20) 7072597 Nox RIP Belts and Cannula Kit (Abdomen cable, Nasal cannulas x80, RIP Belts Mx80) Nasal cannulas and airflow sensors 7072074 Nox Cannula with filter - x40 - Adult 7075340...
- Page 61 Nox Differential Pressure Sensor Kit 7073740 Pneumoflow Sensor 7073741 Differential Pressure Connector Cable - 2 m 7073745 Nox A1 Adaptor Cable for Differential Pressure - 30 cm 7073743 Flow Straight Connector (transparent part) 7073744 Flow Straight Adapter (green part) 7073746...
- Page 62 DISTRIBUTED BY: See ResMed.com for ResMed locations worldwide. AirSense, AirCurve and S9 are trademarks and / or registered trademarks of the ResMed family of companies. Nox and SenTec products are distributed by ResMed. For information about the manufacturers of Nox and SenTec devices, please contact ResMed, authorised distributor. Product availability may vary across regions. Specifications may change without notice. © 2017 ResMed Ltd. 708108/3 2018-07...
Need help?
Do you have a question about the Nox A1 and is the answer not in the manual?
Questions and answers